Not all of us need a professional screen capture tool like SnagIt to take screenshots from our PC. Sometimes, a simple app will suffice. The Windows operating system has always offered the Prt Sc shortcut key to take a snapshot of your screen, but there’s also a not so obvious free app called Snipping Tool that lets you take screenshots, save, edit, and share captures with others. In this post, I’m going to be showing you how to take screenshots with the Snipping tool in Windows 10.
Where is the Snipping Tool in Windows 10
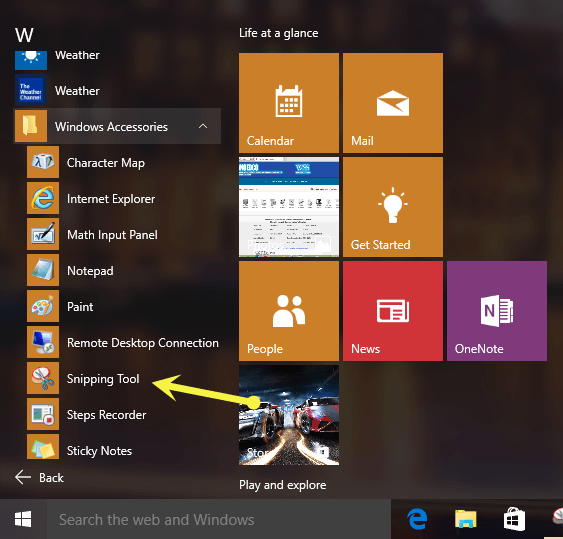
Windows Accessories
You can find the Snipping tool in the All Apps menu in Windows 10.
1. Click the Windows Start button, choose All apps.
2. Then click the 0-9 heading at the top of the screen.
3. From the keypad menu click W.
4. When the Start menu displays the list of programs in W, click Windows accessories and then select Snipping Tool.
Search/Cortana
A much quicker option will be to type Snipping tool in the Search box or ask Cortana to open it up for you.
The Snipping Tool User Interface
The Windows 10 Snipping Tool is a slightly improved one one previous editions. The key feature improvement is the option to delay the screen capture so that you can capture items you were not able to do before, such as pop up menus.
Let’s take a look at all the options available on the Snipping Tool.

New
The New button, as you can probably guess, lets you take a new screenshot. By default, you will be able to capture a rectangular screenshot. However, you can click the New button to capture a free form snip, a Window, or a Full Screen snip. Here’s a little bit more about each option:
- The Free-form Snip lets you draw a line around an object or area to capture it.
- The Rectangular Snip lets you drag the cursor around an object to take a screenshot in the shape of a rectangle.
- Window Snip lets you capture a window by selecting it.
- Full-screen Snip enables you to capture the entire screen, just like you could do with the Print Screen key.
Delay
This new feature in Windows 10 Snipping Tool lets you delay taking the screen shot from 1-5 seconds.
Cancel
If you’ve changed your mind about taking the screenshot, you can hit the Cancel button.
Options
This is the to place for changing the application settings.
How let’s see how to take screenshots with the Snipping Tool.
How to Take Screenshots with Snipping Tool in Windows 10
To take a free-form snip:
1. From the Snipping Tool new drop down, select Free-form snip.
2. Next, choose the area you want to capture by clicking and dragging the cursor around the object. As you drag, you will notice the selected area is highlighted by a red border.
3. When you are done, release the mouse. The captured area is now copied into a new editorial window. Here you can annotate, save or share the screenshot.
To take a screenshot of a pop up menu:
1. On the Snipping tool menu, click the Delay drop down menu and choose a time delay between 1 to 5 seconds.
2. Next, select the snip type from the New drop down.
3. Click New.
4. Now open the pop-up menu you want to take a screenshot of.
5. When the set delay time is up, the screen will fade and you can take the screenshot. If you have selected free-form or rectangular you can draw a line or a rectangle around the part of the screen to complete the capture. Click the Save button to save the screenshot.
How to Edit a Screenshot
The Snipping tool Editor Window offers a few handy tools for editing the snip you captured. The Pen and Highlighter tools let you add markups to the capture. The Eraser tool lets you remove the markups you made on the screen. If you are not happy with the snip and want to take a new one, just hit the New button to go back to the Snipping window.

Once you are satisfied with the capture, you can hit the Save button to save it in a location of your choice.
You can also send the snip you captured to others by clicking the Send Snip button. You can email the recipient provided you have a desktop email client configured on your PC.
How to Customize the Default Options in the Snipping Tool

The Options button on the Snipping Tool lets you set your preferences on how the program should work. The options here are displayed in two sections:
The Application section lets you:
- Hide the instructional content in the main Snipping Tool window.
- Copy all your screenshots to the clipboard so you can paste them in other applications.
- Save your snips as a HTML file and includes the URL of the page in the screenshot.
- Alerts you if you have any captures that you have not saved, prior to exiting the program.
- Lets you choose whether to display or hide the transparent overlay when Snipping tool is active.
The Selection section lets you tweak the color settings:
- Ink Color lets you change the color of the border of the image you’re trying to capture.
- Show selection ink after snips are captured lets you display or hide the color you selected above.
Conclusion
The Snipping Tool is one of the simplest tools that lets you quickly capture great looking screenshots and make quick markups to it before saving or sharing with others. The next time you need to take a screenshot, be sure to give the Snipping Tool a try.
Leave a Reply