Content Delivery Networking provider Cloudflare has launched its own DNS service at 1.1.1.1. The intention behind this is to give consumers greater privacy and faster Internet services when compared to their current ISP. Here’s more on how to protect your Internet Privacy with Cloudflare DNS service.
Privacy is a hotly debated topic these days. Most of us don’t take it too seriously on the assumption that our private lives are not interesting enough to warrant someone’s attention. But the fact is, corporates, governments and practically anyone in the world knows more about you than you imagine. And many of them are using this information to profile and target you with the intention of profiting off you.
In such dark and troubling times, it is better to be safe than sorry. With Cloudflare’s DNS, adding an extra layer of protection is super easy. So here’s how to set it up.
How Cloudflare DNS Maintains Privacy
DNS servers are mostly run by ISPs or companies that are for-profit. Naturally, the DNS services they run have a record of the addresses you enter and sites you visit. With such a huge treasure trove of information, it is easily possible to sell that data to advertisers.
What make’s Cloudflare’s DNS worth paying attention to is the guarantee the company has made that no other DNS provider has done. That is they will never sell your data or use it to target ads.
Cloudflare will never log your IP address like other companies. And they are following up on their promise to do so by retaining KPMG to audit their systems annually.
How Cloudflare DNS Ensures Faster Speeds
Cloudflare has built 1.1.1.1 to be the Internet’s fastest DNS directory. And independent DNS monitor DNSPerf ranks 1.1.1.1 the fastest DNS service in the world, at least 28% faster than anything else on offer. So what are you waiting for? Just follow the steps below to change your default DNS settings.
How to Set Up Cloudflare DNS for All Devices That Connect to Your Router
Linksys
1. Sign in to your Linksys router’s admin page 192.168.1.1.
2. From the top menu, select Setup.
3. Choose Basic Setup.
4. In the Status DNS 1 field, enter 1.1.1.1
5. In the Status 2 field, enter 1.0.0.1
5. Click Save to save the new settings, and you’re done.
You don’t have to reset your router for the change to take effect.
Netgear
1. When connected to your Wi-Fi, go to http://www.routerlogin.com or http://www.routerlogin.net
2. Log in with your admin credentials.
3. Click Internet and then select Use these DNS Servers.
4. Enter the primary (1.1.1.1) and secondary (1.0.0.1) addresses.
5. Click Apply.
D-Link
1. Open your router administration page at 192.168.1.1 or 192.168.0.1.
2. Log in with your credentials.
3. Select Manual Internet Connection Setup.
4. Enter the primary (1.1.1.1) and secondary (1.0.0.1) addresses.
Google Wi-Fi
1. Open the Google Wi-Fi app.
2. Go to the Settings tab.
3. Tap Networking & General.
4. Tap on Advanced Network, and then DNS.
5. Choose Custom, and then enter the primary (1.1.1.1) and secondary (1.0.0.1) addresses.
If you prefer to change the DNS just for individual devices, here’s how to do it.
How to Set Up Cloudflare DNS on Windows 10 PC
1. Open the Control Panel.
2. Click on Network and Internet.
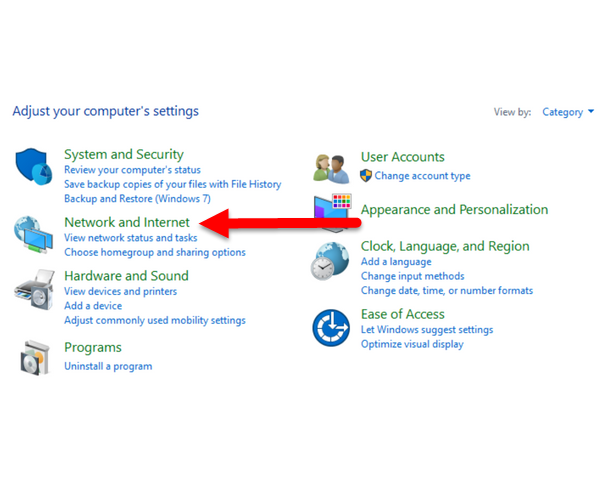
3. Click Network and Sharing Center.
4. Choose Change Adapter Settings.
5. Right click the Wi-Fi network you are currently using and choose Properties.

6. In the Wi-Fi Properties dialog box, select Internet Protocol Version 4 (TCP/IPv4) and click Properties.
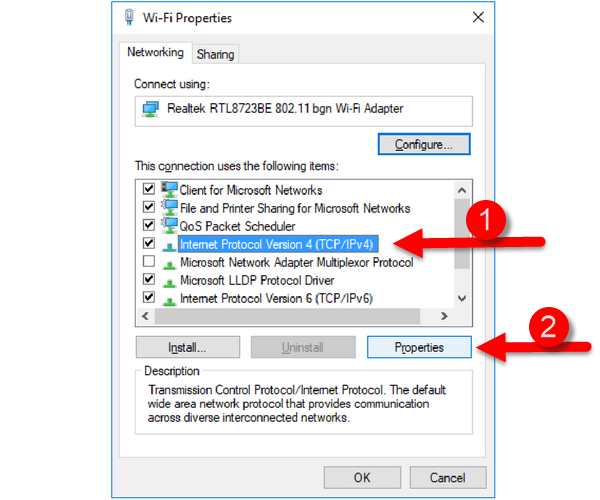
7. In the Internet Protocol Version 4 (TCP/IPv4) Properties dialog box, Click Use The Following DNS Server Addresses.
8. Replace the current DNS settings with Cloudflare’s 1.1.1.1 and 1.0.0.1.
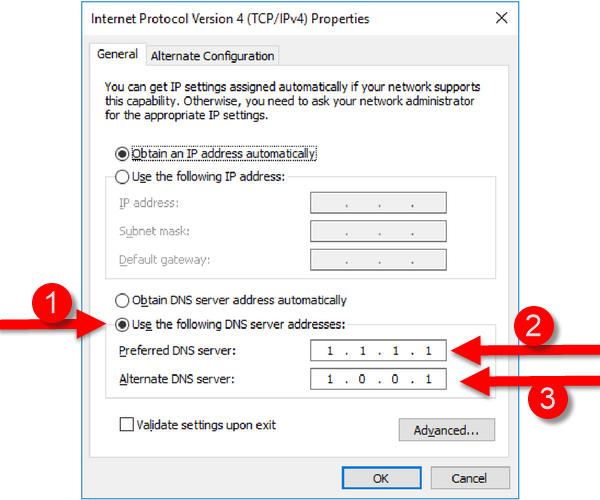
9. Click OK and then close all open dialog boxes to complete the setup.
How to Set Up Cloudflare DNS on Android
The best way to set up the Cloudflare on DNS is to first set it up on the router. Then, you can follow the steps given below.
1. On your Android, go to Settings.
2. Tap Wi-Fi.
3. Long-press your Wi-Fi network and choose Modify Network.
4. If necessary, navigate to an advanced section on your Android. In the DNS 1 and DNS 2 fields, add 1.1.1.1 and 1.0.0.1 respectively.
How to Set Up Cloudflare DNS on iOS
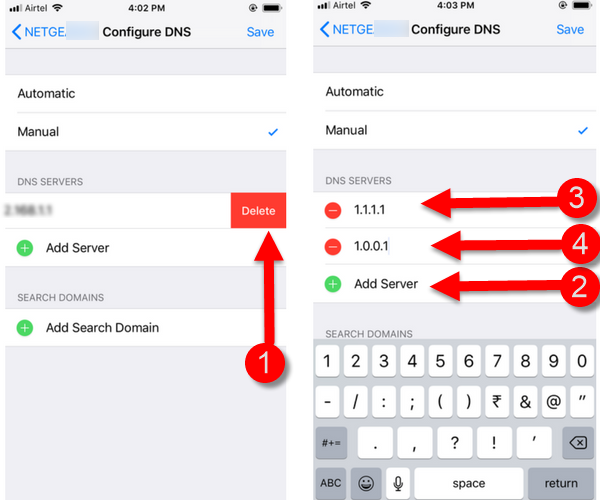
1. On your iOS device, go to Settings.
2. Tap Wi-Fi and then tap the blue “i” next to the network.
3. Tap Configure DNS and set it to Manual.
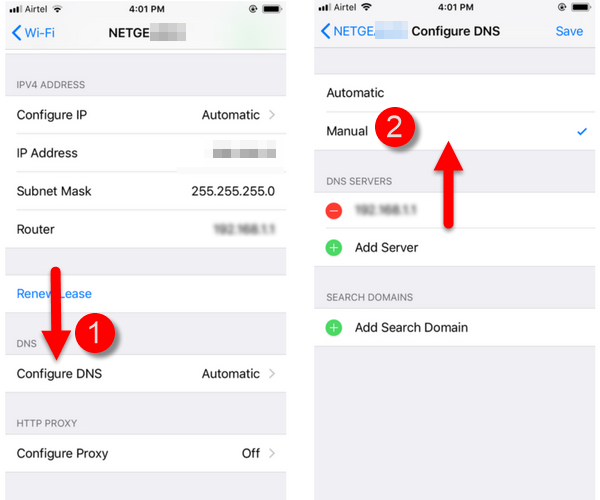
4. Delete any entries under DNS services.
5. Tap Add Server and enter your new DNS settings.
How to Set Up Cloudflare DNS on the Mac
1. Open System Preferences.
2. In the System Preferences dialog box, in the Search box, type DNS servers and press Enter.
3. The Network dialog box opens with the DNS tab active. Click the + symbol below the DNS Servers section.
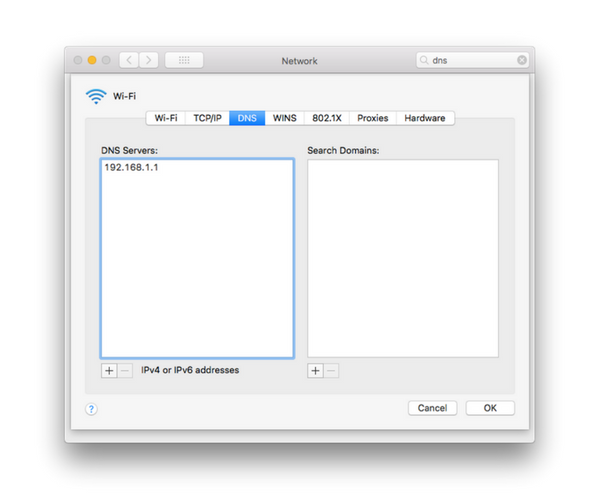
4. Add the DNS settings. and click OK.
That’s it folks! You are well on your way to a safer and faster Internet.
Cheers,
Adeline
Leave a Reply