The Windows Registry contains key information about your computer hardware, user profiles, installed programs and settings. Windows 8 periodically updates the information that is contained in the registry but you should avoid making changes to it because an incorrect or improper change will cause Windows to behave abnormally or may even cause it to stop working altogether. However, there may be times when you do want to make some changes to the registry. In such cases, it is always better to make a backup of the registry files. In this post, we take a look at how to backup the Windows Registry and restore the Registry in case of any issues.
There are actually 3 ways in which you can backup Registry files in Windows 8 and Windows 10.
1. Exporting a Registry
2. Creating a System Restore Point
3. Using a third party tool
Let’s take a look at how each method works.
How to Backup Registry in Windows by Exporting
1. Launch the Run window. In the search box, type regedit and press Enter.
2. If the User Account Control (UAC) pop up appears, click Yes.
3. In the Registry Editor dialog box, on the left pane, select Computer.
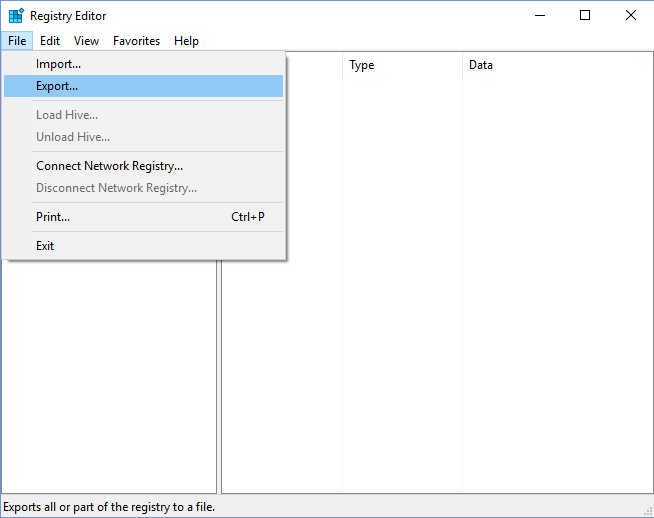
4. Click the File menu, and choose Export.

5. In the Export Registry File window, choose a location to save the registry backup file, enter a file name and then click Save.
Note: Select a location that’s quicker to access, such as your desktop or Documents folder, and include a date to the file name for easier reference in case you plan to periodically back up your files.
Once this is done a REG file will be created in the chosen location. You can now go ahead and make changes to the registry file as you see fit.
If however after making the desired changes, you feel that the results are not what you wanted to see on your PC, you can restore the registry files back to the previous point before you made the changes.
To Restore the Registry in Windows
If you have previously taken a Windows Registry backup, you can now restore the data, if your registry edits have, for some reason gone awry.
1. Navigate to the location where you saved your backup file.
2. Double-click to open it. If the UAC window appears, click Yes.
3. A pop up windows will open up asking if you want to continue. Click the Yes button, if you are certain that the source of the file can be trusted. ( That is, it the actual file that you exported.) If you import a wrong file, you could do considerable damage to your OS, so be careful.
4. When the file import is successfully completed, you will receive a message that confirms the import. Click OK to close the message box.
5. The restore process is now successfully complete. Restart the computer to see the changes take effect.
How to Backup Registry Using System Restore
Another way to backup the registry is to create a System Restore point on your PC. System Restore returns your computer to a previous point in time without losing your most recent data updates. System Restore points are created by default in Windows 8 but can become unreliable as the restore points can be purged by the system as time passes.
To create a Restore Point in Windows:
1. Right-click the Start button and choose System.
2. In the left pane, click System Protection.
3. In the System Properties dialog box that opens, click Create.
4. In the System Protection dialog box, type a description and click Create.
It will take a few minutes for the process to be completed. If you want to restore your system to a previous point in time, simply head back to the System Properties dialog box and click System Restore.
Backup Registry Using Third Party Tools
You can also use third party tools such as RegBak and Registry Backup Portable but since not many of them come recommended by some of the major review sites, its best to be cautious when going in for third party options.
Now that you know how to backup registry files, be sure to use one of the methods mentioned in this post before you set out to make changes to your Registry files.
Leave a Reply