Although Windows 7 is an improvement over previous versions of Windows, there may be many of you who still wish to retain some of the older features of the operating system. One instance is the Classic menu. This tutorial will show you how to create a Classic Menu in Windows 7. When you do this, the Classic Menu will be displayed right next to the Windows Start menu. You can use the Classic Start menu for tasks that you frequently use and the Windows Start menu when you prefer.
How to Create a Classic Menu in Windows 7
1. Click on an empty space in the taskbar and choose Toolbars-> New toolbar.
2. In the New Toolbar – Choose a Folder dialog box, in the Folder text box, type C:\ProgramData\Microsoft\Windows\Start Menu and press Select Folder.
3. The Start Menu Toolbar is created and appears next to the Notification Area.
4. You can now move the newly created Classic Start menu next to the Windows 7 start button. To do this, right click the Taskbar and uncheck the Lock the Taskbar button.
5. Hover the mouse pointer over the Toolbar handle. The pointer will turn into a double-headed arrow. Click and drag the Toolbar handle toward the Start button. This might be just a tad tricky. Make sure you drag the handle below the existing pinned taskbar icons and place it next to the Windows Start menu.
6. After the toolbar is shifted to the new position, you’ll notice that the folders inside the Start menu are displayed on the taskbar. Click and drag the Taskbar Handle to the right of the Start menu to hide them.
7. Right-click the Taskbar again and select the Lock the Taskbar command. When you do this a tiny compressed folder folder icon is displayed.
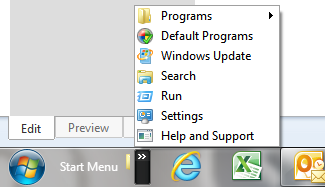
The Classic Start menu now displays the common programs and links. However you will notice that other commands and links such as Shut Down, or Control panel is not displayed in this menu. You can add these commands to the Classic menu which will be detailed in the next tutorial.
The Classic start menu displays all program links but does not contain links to popular commands such as Documents, Settings, Search, Help and Support, Run, and Shutdown. In this tutorial, I’ll show you how to add links to the Classic Start menu in Windows 7.
How to Add Links to the Classic Start Menu in Windows 7
This method works by creating shortcuts on the desktop and moving them to the Start Menu folder.
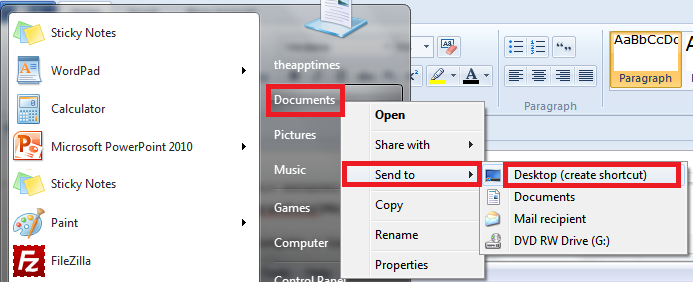
1. Create a shortcut to Documents. In the Windows 7 Start menu, right-click Documents and from the right-click context menu, choose Send to-> Desktop (create shortcut).
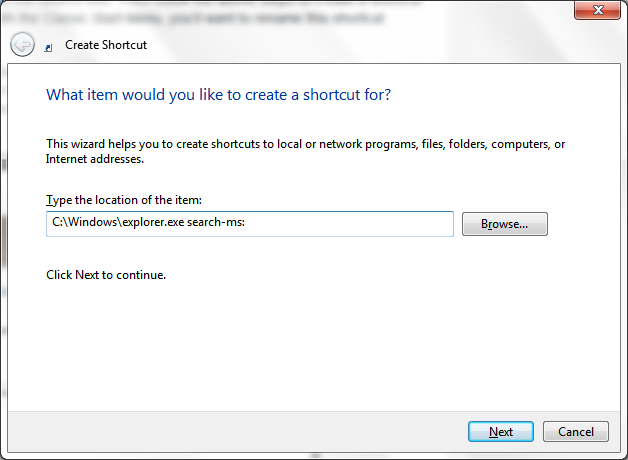
2. Create a shortcut to Search. To do this, right-click the desktop and choose New->Shortcut. In the Create Shortcut wizard, in the Location text box, enter the command C:\Windows\explorer.exe search-ms: Click Next and in the Type a name for this shortcut text box, type Search. Click Finish.
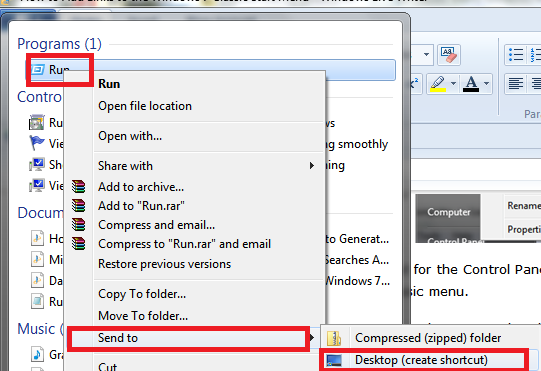
3. Create a shortcut to Run. In the Windows 7 Start menu, in the Search box, type Run. Right-click Run and choose Send to. Then select Desktop (create shortcut).
4. Create a shortcut for Help and Support using the steps in point 3.
5. Similarly, create a shortcut for the Control Panel and rename the shortcut Settings, as seen in the Classic menu.
6. Create a shortcut to Shut Down. To do this, right-click the desktop and choose New->Shortcut. In the Create Shortcut wizard, in the Location text box, enter the command Shutdown.exe –s Click Next and in the Type a name for this shortcut text box, type ShutDown. Click Finish.
7. Launch Windows Explorer and navigate to the C:\ProgramData\Microsoft\Windows\Start Menu folder.
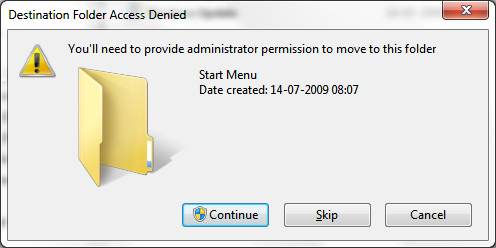
8. Move the shortcuts you created on the desktop to this location by dragging and dropping them into this folder. In the Destination Folder Access Denied dialog box, click Continue to move the shortcuts.
9. Close the Start menu window.
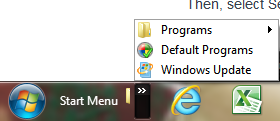
Your Classic Menu is now ready. Click Start Menu on the taskbar to see all the popular task commands displayed.
You are now ready to use the Windows Classic menu.



Leave a Reply