One of the finishing touches that you would give to an Excel sheet before printing it is inserting header and footer data. If you have multiple tabs or pages in your Excel sheet, you may want to add a specific set of information on the header and footer sections for all the sheets or you may want to add custom header and footer information. Whatever you decide, Excel offers a simple, hassle free way to do it. In this post, we’ll show you how to insert header and footer data and do a print preview to see the end result.
How to Insert Header and Footer Data in All Excel Sheets
If your workbook has multiple worksheets and you want to insert the same header and footer data in all of the worksheets, here’s what you have to do:
1. Open up your Excel workbook and select the worksheets where you want to add the header and footer information. (Click the tab while holding the Shift key). You will notice that your Excel sheet has the title [Group] temporarily appended to the name to indicate that the worksheets are all selected.
2. Select the Page Layout tab.
3. In the Page Setup group, click the Page Setup button in the lower-right corner.
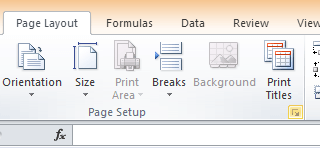
4. The Page Setup dialog box is displayed. Select the Header/Footer tab.
5. From the Header drop down menu, select a preset option.
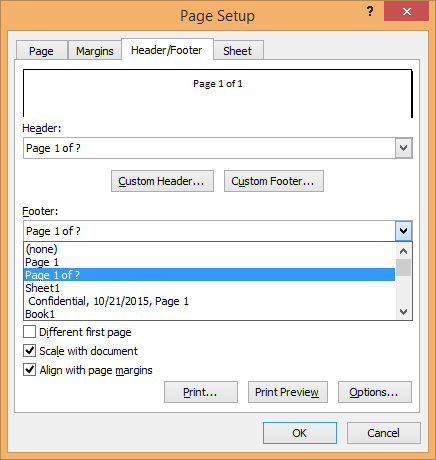
6. Similarly, from the Footer drop down menu, select a preset option.
7. Click OK.
8. Ensure that the Excel sheets are still grouped. If not group them again by clicking on them while holding the Shift key.
9. Select the File Tab and choose Print.
10. In the Print Preview section, notice that the header and footer is applied to all worksheets.
How to Insert Custom Header and Footer Data in All Excel Sheets
The process is much the same as above.
1. Open up your Excel workbook and select the worksheets where you want to add the header and footer information.
2. Select the Page Layout tab.
3. In the Page Setup group, click the Page Setup button in the lower-right corner.
4. The Page Setup dialog box is displayed. Select the Header/Footer tab.
5. Click Custom Header.
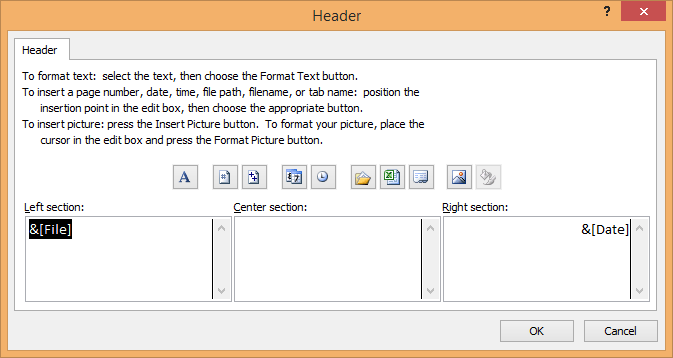
6. In the Header dialog, decide where you want the header data to be displayed; to the left, in the center or to the right.
7. Click inside the header section box.
8. Just above the section boxes, you’ll find a number of icons available to add dates, file names, page numbers, time, path, sheet name and picture. Click the icon that you want to add to the header section. Then click OK.
9. Similarly, click Custom Footer. Click inside the section you want to insert footer data and then select the appropriate icon and then click OK.
10. Select the File Tab and choose Print.
11. In the Print Preview section, notice that the header and footer is applied to all worksheets.
How to Add a Different First Page Header and Footer in Excel
Sometimes, you may want the first page of your worksheet to have a different header than the rest of the worksheets. To do that, first insert the normal header and footer information as given in the steps above. Then to create unique first page headers:
1. Select the Page Layout tab.
2. In the Page Setup group, click the Page Setup button in the lower-right corner.
3. The Page Setup dialog box is displayed. Select the Header/Footer tab.
4. Check the Different first page check box to select the option.
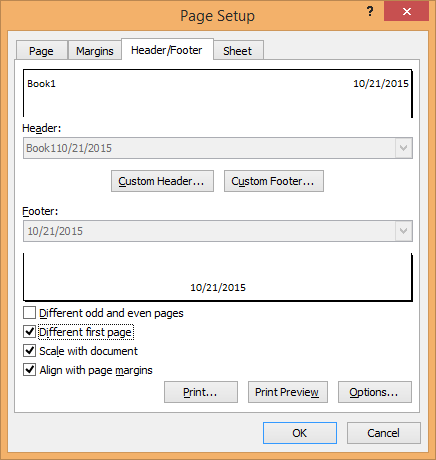
5. You can now customize the header and footer sections as per your requirements. Click Custom Header.
6. To add a unique header in the first spreadsheet, in the Header dialog box, select the First Page Header tab.
7. Click inside a header section and then click an icon from above to add that to the header section. Once you have added all the necessary headers in the different sections, click OK.
8. Next, click Custom Header.
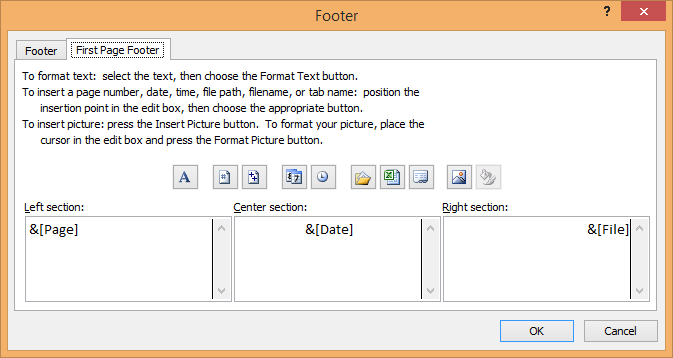
9. To add a unique footer in the first spreadsheet, in the Footer dialog box, select the First Page Footer tab.
10. Click inside a footer section and then click an icon from above to add to that section. Once you have added all the necessary footers in the different sections, click OK.
11. Click OK to close the Page Setup dialog box.
10. Select the File Tab and choose Print.
11. In the Print Preview section, notice that the header and footer is applied to all worksheets.
Leave a Reply