Touch ID is a fingerprint recognition feature that was designed and released by Apple to allow users to unlock Apple devices and make purchases in the Apple Stores.
Touch ID also comes in handy when you want to do more with individual apps. For instance, you may want to secure the documents you have stored in your Dropbox account. Or keep your Evernote data away from prying eyes. Touch ID lets you lock up the apps to keep them more secure.
Touch ID locking is a much better alternative to using passwords, because passwords are easy to forget.
The only problem with using Touch ID is that not all apps support it. Apps like Facebook, Twitter, Whatsapp and even Photos lack the ability to use Touch ID, which is a shame. But you can still take advantage of the feature wherever you can.
Note: Setting up Touch ID on your iPhone takes a little time, but it is well worth the time spent. So, sit back and follow the steps outlined below. Once you’ve completed the setup, you can lock and unlock your iPhone or individual apps, and even make purchases if you want to. Here’s a step by step guide on how to lock apps on the iPhone.
Note: These steps also apply to the iPad.
How to Lock Apps on iPhone Using Touch ID
Turn On Touch ID on your Phone
If you use your fingerprint scanner to unlock your iPhone or iPad, Touch ID is already enabled on your device. If not, you need to turn on the feature. To do this:
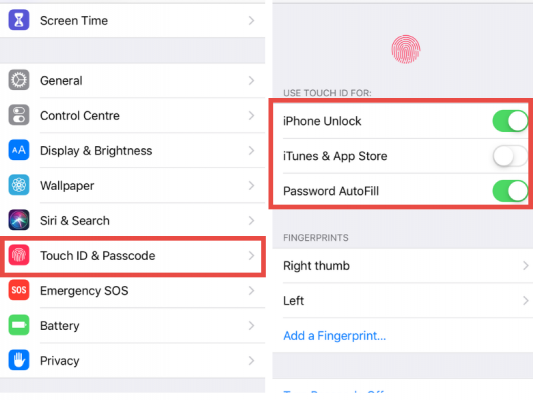
- Go to Settings.
- Select Touch ID & Password.
- Enter your password to continue.
- Turn on Touch ID for any or all of the following:
- iPhone Unlock
- Apple Pay (for iPhone 6 and 6 Plus or later)
- iTunes & App Store
- Password AutoFill

If you are setting up Touch ID up for the first time, follow the instructions on the screen to add your fingerprints.
How to Enable Touch ID for Apps
To lock apps with your fingerprint, you must enable Touch ID in the app you want to use. I’ll use the Dropbox app as an example. The process is the same regardless of the Touch ID app you want to enable it on.
To Set Up Touch ID in an App ( Example: Dropbox)
- Open the app and navigate to Settings.
- Tap Passcode and choose a passcode. (You may have to re-enter your passcode.)
- Next tap Touch ID. Note: Depending on the app, these settings may vary with similar terms.
- Now you can use your fingerprint instead of a password to unlock the app. Just place your finger on the home button to use Touch ID.
Let’s Activate Touch Id For Another App – This Time A Native App – Apple Notes.
Enable Touch Id for Apple Notes
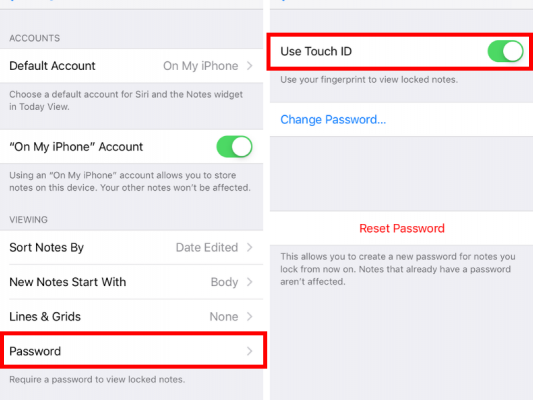
- Go to Settings and tap Notes.
- Tap Password. You’ll be prompted to create a passcode.
- Toggle on Use Touch ID.

One point you need to be aware of with the locking of the Notes app is that individual notes themselves are NOT automatically locked. You must choose the notes you want to lock. To do that:
- Open the Notes app.
- Create a new note or navigate to one you want to lock.
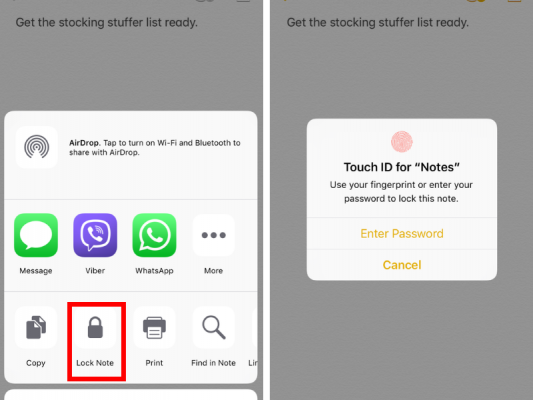
- In the upper right corner, tap the Share icon.
- Tap Lock Note.
- Then activate Touch ID to lock the note.
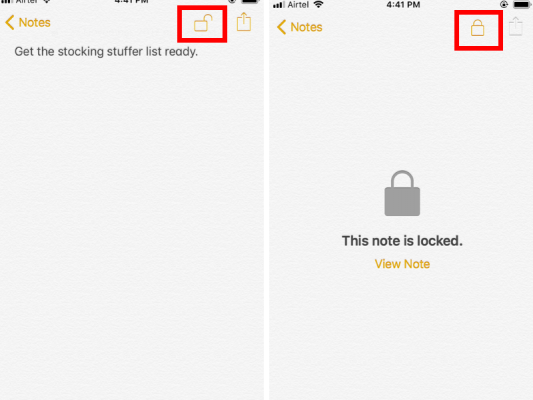
- Finally, tap the Lock icon to lock the note.


Locked Apps May Still Display Info on Widgets
Now that you’ve locked some apps on your iPhone, you may be thinking that all your sensitive information is safe from prying eyes. But there is one factor that you still need to take care of – Widgets. Widgets sometimes tend to display information on the Widget screen on your iPhone. If you have protected apps on your iPhone with Touch ID, you need to make sure you disable those apps’ widgets also in order to prevent the private information from appearing there. Here’s how to do that:
- Swipe left from the first Home screen to open the Widget screen.
- Scroll to the bottom of the screen and tap Edit.
- Tap the red circle to the left of the app name and then tap Remove to confirm.
- Repeat for every apps whose widgets you don’t want to see.
- Tap Done when you are finished.
So that’s how you lock apps on your iPhone using Touch ID.
Leave a Reply