Just as you use Excel macros to do repetitive tasks at the tap of a button, you can use macros to perform repetitive tasks in Microsoft Word. Microsoft Word Macro recorder is a fantastic tool that does all the hard background work for you. You only need to perform your action in the precise order for it to be created.
It makes sense to use Microsoft Word macros when you apply complex formatting to your documents on a regular basis. It also works when you add boilerplate text, header and footer content, page numbers, or a preformatted table to documents on a repeated basis. In this post, we take a look at how you can create Microsoft Word macros and use them in your document.
Normally, when you think macros you tend to wear a frown on your face. However, recording Microsoft Word Macros is actually quite a lot of fun, as you will see in our activity. Just keep in mind that before you record your macro, you need to rehearse the steps for the activity thoroughly until you are confident of doing it without missing any step. This way, you won’t have to redo the procedure every time you make a misstep.
How to Record Microsoft Word Macros
This tutorial was performed on Word 2010, but should work fairly the same on Word 2013 as well.
1. Open your Word document.
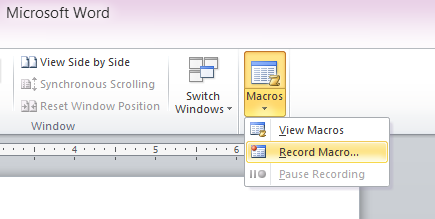
2. On the View tab, in the Macros group, click Macros.
3. From the drop-down list, select Record Macro.

4. In the Record Macro window, in the Macro name text box, enter a name for the macro. The name should not contain spaces or special characters. You can also enter a description for the Macro.
5. Next, assign a macro button or keyboard shortcut.
- To assign a keyboard shortcut: In the Record Macro window, click the Keyboard button. In the Customize Keyboard window, in the Press new shortcut key text box, type the keyboard shortcut you want to use when you run the macro. Click Assign and then click Close. NOTE: Just make sure that the shortcut doesn’t replicate one that is already available by default in Word.
- To assign a button for the macro: In the Record Macro window, click Button. In the Word Options window, select the name of your macro and click Add. Then click OK. When this is done, you will notice that the macro button is automatically added to the Quick Access Toolbar.
6. In your Word document, you will see that the mouse pointer has a cassette tape icon attached to it. This indicates that your actions are now being recorded. Start performing the steps in your document. For instance, if you want the macro to change the text font to Georgia, font size to 14, line space to 1.5 lines then add page numbers to it, here’s what you need to do.
1. Select the text. On the Home tab, in the Font group, from the Font drop down list, select Georgia.
2. From the Font size drop down list, select 14.
3. On the Paragraph group, click the arrow button at the bottom right of the box to open the Paragraph dialog box.
4. In the Indents and Spacing tab, in the Spacing section, from the Line Spacing drop-down, select 1.5 lines.
5. On the Insert tab, in the Header & Footer group, click Page Number->Top of page and then select an option. I’m going for Plain Number 3.
6. Click the Close Header & Footer button.
On the Word Status bar, hit the Stop macro button to complete the recording. Alternatively, you can go to View->Macros-<Stop Recording.
- NOTE: If you don’t see the Macro button on the Status bar, right-click the Status bar and select Macro Recording.
That’s it! You have just recorded your first Microsoft Word macro. Let’s put it into action.
Open up another Word document. On the Quick Access toolbar, click the Macro button. The text in your document should now be converted to Georgia font of size 14 and the page numbers should be automatically inserted.
Leave a Reply