In our Learn Excel series, we continue you teach you how to use the various tools and functions in Excel to enter and analyze your data. In today’s lesson, we’ll talk about what data validation is and how to use data validation in Excel to control what data you enter in your worksheet.
What is Data Validation?
Data validation is a feature in Excel that lets you control what data you enter in a cell. For example, let’s say you want to display only whole numbers in the cell range A1:A15. You can use the Data validation feature in Excel to set the rule as specified above and get Excel to display a custom message when the user enters a value other than that.
There is one major danger in using data validation though. The rules of data validation can be easily overwritten by a simple copy/paste function. If a user copies data from a cell that does not have data validation and pastes it into a cell that has data validation rules applied, the rules of data validation will get deleted. So you have to watch out for this potential problem when using data validation.
Types of Data Validation You Can Apply
By default, Excel offers certain data validation criteria that you can set. These options are available in the Data Validation dialog box. Let’s see what each criteria allows you to do:
Any Value
This option removes any existing data validation. If you have an input message set on the Input Message tab, the message will still show up even if the data validation rule is removed. You have to manually and remove this option on the Input Message tab.
Whole Number
If you want to restrict the data to only whole numbers, this is the option to use. For example, you can specify that the data entered in the cell range must be a whole number greater than or equal to 50.
Decimal
If you want to restrict the data to numbers, this is the option to use. For example, you can specify that the data entered in the range must be greater than or equal to 0 and less than or equal to 1.
List
If you want to restrict the data to items in a list that you provide, use this option. In this case, you will create your own list and get Excel to restrict data using this list. We’ll discuss this later on in the post.
Date
If you want to restrict the data to a date, use this criteria. For example, you can specify that the data entered is greater than or equal to January 1, 2016, and less than or equal to December 31, 2016.
Time
If you want to restrict the data to a time period, use this criteria. For example, you can specify that the data entered is later than
09:00 a.m.
Text Length
If you want to restrict the data to a specific number of characters, you can use this criteria. For example, you can specify that the length of
the data entered must be 5.
Custom
This option requires you to provide a logical formula that determines the validity of the entry.
The Settings tab of the Data Validation dialog box contains two other check boxes, which are worth noting:
Ignore Blank
If this option is selected, blank entries are allowed.
Apply These Changes to All Other Cells with the Same Setting
If this option is selected, the changes you make will apply to all other cells that contain the original data validation criteria.
Circle Invalid Data
The Data Validation drop-down list in the Data Validation dialog box contains an option called Circle Invalid Data. Enabling this option has the effect of adding circles around cells that contain incorrect entries. When you correct the invalid entry, the circle will go away. You can also remove the circles by selecting Clear Validation Circles.
Understanding Data Validation with an Example
Let’s see how data validation works using a simple example.
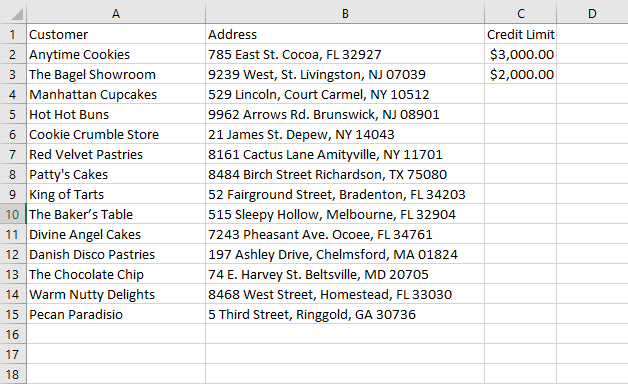
Let’s say that you have a worksheet displaying names of customers to whom you sell goods on credit. The minimum credit limit you offer is $1000 and this can extend up to $7500 but no more.
Let’s say you’ve assigned the job of maintaining the credit limit to one of your workers. To ensure that he/she always sticks to the credit limits set by you, you can set some validation rules. To do this, here’s what you need to do:
1. Select the cell range. In this case, select cells C2:C15.
2. Select the Data tab. In the Data Tools group, click Data Validation. Excel displays the Data Validation dialog box.

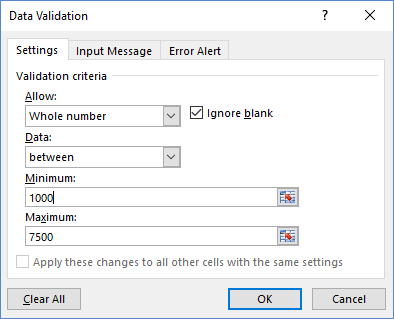
3. On the Settings tab, from the Allow drop-down list, select Whole number.
4. From the Data drop down list, ensure that Between is selected.
5. In the Minimum text box, type 1000.
6. In the Maximum text box, type 7500.
7. Select the Input Message tab.
8. In the Title text box, enter a title. Let’s enter Credit Limit.
9. In the Input message text box, enter the text, Please enter a whole number between 1000 and 7500.

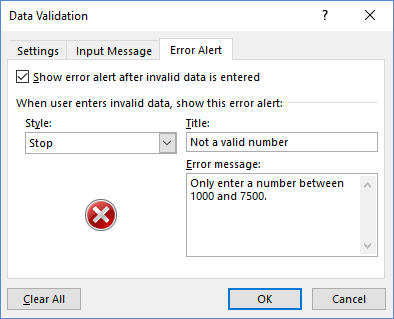
10. If the user ignores the input message and still tries to enter an invalid number, you can use the Error Alert tab to show an alert. Select the Error Alert tab.
11. Check the Show error alert after invalid data is entered check box.
12. Enter a title. Let’s say, Not a valid number.
13. Enter an error message. Let’s write, Only enter a number between 1000 and 7500.
14. Click OK.
That’s it!
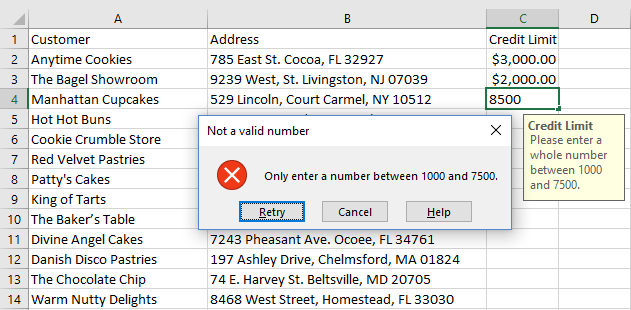
Now click inside cell C3. Notice that Excel shows you a message indicating the value restriction. Enter the value 8500. You can see the error alert displaying that you’ve entered an invalid number.
Creating a Custom List for Data Validation
One of the most common ways in which people use data validation is by creating a drop down list and linking this to the validation rules. Let’s see how to use this in our worksheet.
Let’s also assume that you offer a number of promotional schemes for your customers for 2016 and these details are available in the next worksheet in your workbook.

You want to record which promos your customers have availed on the first worksheet. You can create a drop down list of all your promos and reference this information in a drop down list using data validation. To do this:
1. In the worksheet Credit Limit and Promos 2016, enter a column title Promotions Availed.
2. Click cell D2.
3. On the Data tab, in the Data Tools group, click Data Validation. This will open the Data Validation dialog box.
4. In the Data Validation dialog box, on the Settings tab, from the Allow drop-down list, select List.
5. Click the Source control button, navigate to the Promos worksheet, and select the range of cells A2:A10.

6. Click the Source control button again to get back to the Data Validation dialog.
7. Make sure that the In-Cell Dropdown check box is checked.
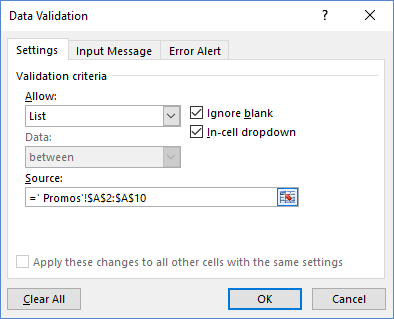
8. Click OK.
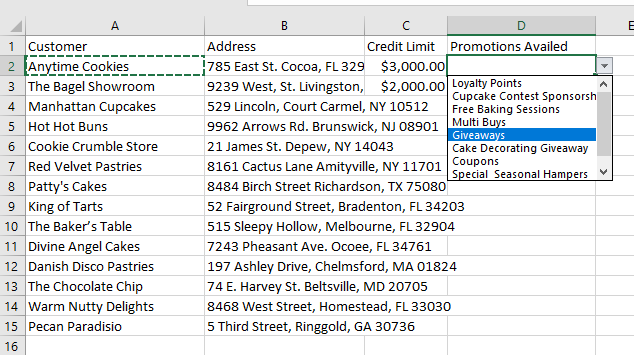
You’ll notice that a drop down icon is now available in cell D2. Click the drop down to view all promos available and select the one that the first customer Anytime Cookies has availed.
Next, click cell D3. Again you’ll notice that a drop down is visible and you can select a promo only from the list of items that are available.
That’s it! When it comes to applying simple data validation rules, you can use the Data Validation dialog to set the rules you want to apply to cell entries.
If you want to practice data validation using this worksheet, click below to download the example worksheet.
I hope you found this Excel tutorial helpful for you. Be sure to check out other tutorials in our Learn Excel series in the archives section.
If you wish to learn Excel from scratch, you can also take up our Excel 2016 for Beginners course on Udemy.
Happy Learning!
Leave a Reply