With Christmas round the corner, and the kids and family all in one place, there’s going to be a whole lot of memories captured. What better way to preserve and treasure such joyous moments than with a delightful photo album. You can even gift someone a photo album you created yourself or share it online with friends. In this PowerPoint tutorial, you will learn how to create your perfect Christmas photo album in PowerPoint 2010.
How to Create Your Perfect Christmas Photo Album in PowerPoint 2010
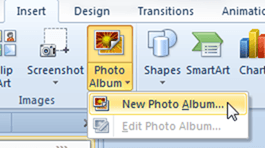
1. On the Insert tab, in the Images group, click Photo Album.

2. The Photo Album dialog box is displayed. Click the top half of the button to directly display the Photo Album dialog box. If you click the bottom half of the button, you need to select New Photo Album.
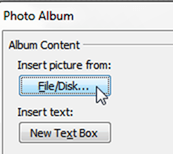
3. In the dialog box, click File/Disk.

4. The Insert New Pictures dialog box is displayed. Select one or more pictures, and then click Insert.
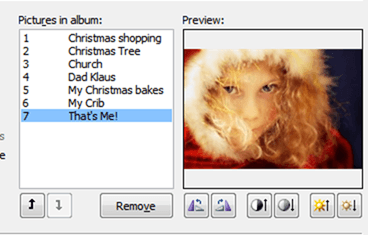
5. The photos are displayed in the Photo Album dialog box.6. If necessary, select a picture and apply the desired settings.

- Move a picture up or down the list.
- Rotate the picture right or left.
- Increase or decrease the contrast and brightness.
- Apply corrections.
6. If necessary, in the Album Layout section, apply additional settings.

- From the Picture Layout drop-down list, select a layout for the presentation slides.
- From the Frame shape drop-down list, select a shape.
- Click Browse and from the Choose Theme dialog box, select a theme.
7. If necessary, in the Picture Options section, check the desired option.
- Select Captions below ALL pictures to add caption boxes for each picture.
- Select ALL pictures black and white to display the pictures in black and white.
8. Click Create. A new presentation opens up as a photo album.
9. On the Quick Access toolbar, click Save and in the Save As dialog box, enter a file name and save the presentation.
Your photo album is now ready to be printed, emailed or saved in an online location. In this PowerPoint tutorial, you learned how to create your very own Christmas photo album.
If you found this tutorial useful, be sure to visit our archives for more useful PowerPoint tutorials and tips.
Leave a Reply