Every year, you make a promise to yourself to be more productive but as the days turn into months and the work load gets more hectic, you get caught up in the noise and chaos around you and lose sight of your goals. If using a physical planner like Clever Fox doesn’t work for you, you can consider a powerful task manager to get things done efficiently. Today, we are looking at Things 3, an award winning task management app that helps to manage your goals with little effort and achieve them one small milestone at a time.
If you’ve never used Things before, here’s the simple explanation on how it works:

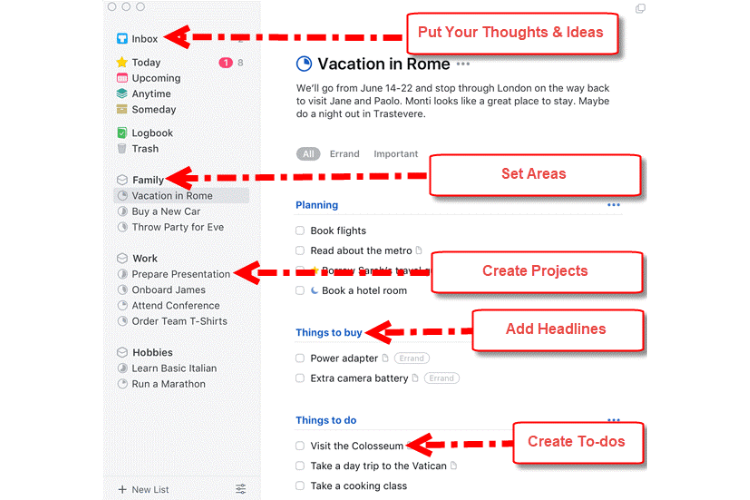
1. Put all your thoughts, ideas, to-dos and tasks in the Inbox. Assign a date when you want it done.
2. Or set up a project and add all related tasks, subtasks, checklists and such. Again, assign a date when you want to start and complete each item. Add necessary tags to easily pull out data at a later point in time. For example, tag items as super important, or add a person’s name, say Tim to follow up with Tim.
3. Integrate your Calendar so you can manage your tasks and Calendar events in one place.
4. Create headings like Work, Personal, Health, and so on and put your projects inside it to get a better hierarchical structure.
5. Get to work. Go to the Today section and you’ll automatically see what you have lined up for the day.
6. As and when items get done, mark them as complete and they disappear into the Logbook.
Simple!
Now that you have an idea of how you set up your work flow, it is time to put all your thoughts and plans into action.
Onto the UI.
Things 3 – Interface
The first thing you’ll notice when you open up Things 3 is how clean it looks. There’s plenty of white space with candy colored sections at the top left that opens up your task schedules. Everything about the Things UI is appealing and inviting! So, let’s get started!
Creating To-Dos and Projects
With most task managers nowadays, we’ve come to expect a couple of things. Creating tasks on the fly and inputting all the additional information necessary to finish the task like due date, files, deadlines and so on.
How does Things 3 for Mac handle this?
Creating To-Dos

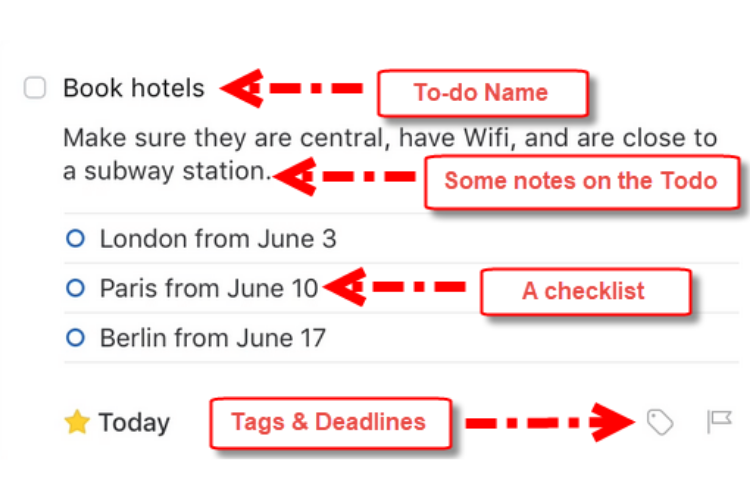
Creating a new to do item, is as simple as using the keyboard shortcut – Command+N. This will open up a small, tidy, card where you can enter the task details. Add a task name, some important notes, start date, tags for easy search later on, checklists ( if you need to come up with items to complete the task), and deadlines to ensure that you have everything wound up by a certain day.
That’s not all there is to it! You can use Siri to set up to-dos (see the option in the Settings). You can add reminders, turn to-dos into projects and even create repeating to-dos within projects using voice commands.
Creating Projects
If you have a project on your mind, like for example, going on a vacation, you can create a Project called Vacation by clicking the + New List at the bottom of the screen and selecting New project. Once the project is created, it will show up below the Logbook.
Click on the project name to start creating tasks inside it.
You can create a heading (File-> New Heading) like Booking, Itinerary, Items to Pack and so on. Inside each heading you can add further tasks, subtasks or checklists. You can also archive, move and delete the headlines using the options at the corner of the heading.
Creating a task inside a headline is the same as creating a to-do, which we saw earlier.
Keep hitting the Command +N shortcut to add as many to-dos as required for each headline and before long, your project will neatly list out all activities that need to get completed with timelines et al.
Creating Individual To Do Items
If you want to create individual to-dos, simply go to the Inbox and create them. You can always organize them later on by moving them into other projects if the need arises. Or just keep them in the Inbox and complete them on the date specified. In fact, the Inbox is one of the best places to start using Things 3. Just jot down all your tasks as they pop into your mind here. Then move them into projects or simply work on them on the appropriate due date.
If you still find it all a bit too confusing, simply download a free trial of the app on your Mac and a beautiful tutorial will guide you through the interface.
Using Things 3 Every Day
Once you’ve created your to-dos or projects in Things 3, you can find them on the left pane in the Today section.

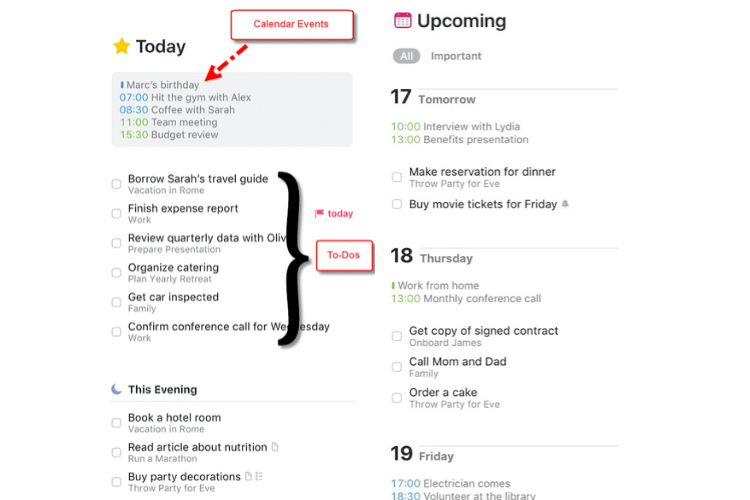
This is where you will find all the tasks you’ve planned for the day. Tasks that you created in your project or Inbox that is marked for the current day shows up in this section. A badge displays the number of tasks you’ve lined up for the day. So even without heading in to Today, you know how many tasks you have to finish for the day.
Upcoming
This is where you can find all tasks assigned to specific dates in the future. Here you can see the upcoming tasks for the next 7 days, listed out individually. Beyond the 7 days, you can see a weekly/monthly view of activities. In all, you can see a bird’s-eye view of tasks lined up in the future.
Anytime is a section that includes all tasks from Today as well as tasks that have no assigned start date (except for those found in Someday). Basically, if a task is in Anytime, you can work on it anytime you have a free moment.
Someday is the place where you add your ideas and plans you may take up later. If you plan to build a coffee table in your spare time, but you’ve not firmly made up your mind when you’re going to do it, you can add your plans here.
Logbook is the section where you can find all your completed tasks.
Other Niceties
Calendar Integration: Things 3 offers easy integration with the Mac calendar. Just grant access to it via Settings and choose which calendars you want to access and all events (color-code et al) listed in them will show up inside Today and Upcoming sections. Calendar events are usually listed above the list of tasks and turn grey in Today once they’ve passed. This helps to keep track of your day’s agenda easily.
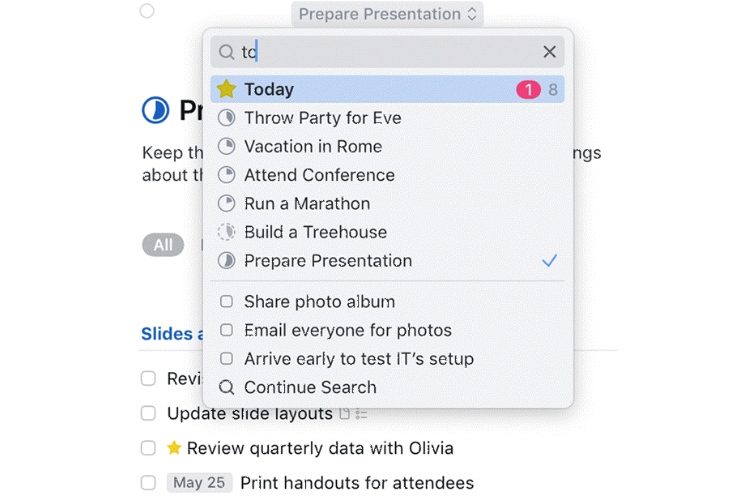
Search: When you want to find tasks in Things 3, you can simply start typing to begin a search. The app will pick up content from every location in the app including the logbook and it even finds items by tag. And you don’t have to go to a specific page to search. As long as you are in any active Window in Things 3, you can start typing your keyword to search.

Work with Multiple Windows: If you like to work on multiple items simultaneously, you can open each section (like Today or Upcoming), projects, and tasks in multiple windows of the app. Just click the tabbed window icon in the upper right corner to do that.
Integrates with the latest MacOS technologies: Things 3 works with the latest MacOS technologies such as the Touch Bar, Today Widget, Calendars, Siri & Reminders, Share Extension, Handoff, and AppleScript. If you happen to use any of these features you can use them when working on your tasks.
Apple Watch: Things 3 also works on the Apple Watch. You can see all tasks from your Today section, and you can interact with items in a few ways. For example, you can mark off items in a checklist, you can add notes or deadlines to a task and you can even add tasks via voice commands. You can also see your task progress via some cool icons on the Watch. All in all, its a pretty handy addition.
My Impressions – The Good
UI : If you love clean design, minimalist look and lots of white space to work, you’ll love Things 3. With its smooth animations, delightful interactions, and neat and sensible workflow, it is no surprise that Things 3 is the recipient of the 2017 Apple Design Award. I had just one look at the UI and wanted to jump in and start filling it up with all my activities. The UI fills you with a sense of confidence that it is going to make your crazy work schedule easy to manage.
Similarly, when creating to-do’s there’s a neat little card that pops up with fields that need to be filled up. I particularly love how the app puts focus on the task at hand. For example, when you click on a task, all other tasks fade to the background and your full attention is on the highlighted card with all its subtasks. Classy!
Organization : Creating to-dos is often an easy thing to do with any task management app. But when it comes to getting the whole thing organized, it can get tricky and confusing with a huge time-wasting learning curve. With Things 3 for Mac, I found creating and organizing tasks the most natural thing to do.
Easy shortcuts for creating to-tos, handy right-click menu options, easy click and drag options made it easy to create and manage tasks. I was also able to set deadlines to prevent tasks from spilling over. One more nice touch to the app …. natural language input. I could just type later this evening or today at 3.30 PM to set time based reminders.
Another nice touch is the easy way to reorder tasks inside a project. Just clicking and dragging the card solves the problem. Similarly, if you want to reschedule a task to a different date, you could just go to the Upcoming Calendar and drag it to the new date. You can also select multiple tasks in one go and reschedule, delete, or move them to a different task list.
I love how Things 3 lets you stay focused on your tasks rather than prioritize based on dates. Once you’ve created your task schedule for various projects, it is just a matter of heading over to the Today section to start working on them. Plus, you get a bird’s eye view of what’s lined up for the future and adjust any timelines if needed.
Everything about the organizational ability in Things just feels natural and easy to do. Nothing is hard to find or overwhelming to figure out!
The Not-So Good
File Attachments: Things 3 does not support file attachments on iOS although on the Mac, you can drag emails, files or web pages into the notes section and Things will create a direct link to the file. Still, no native file attachment.
Location Based Reminders: If you are someone who relies on location-based reminders, you’ll be disappointed as the feature is still not available on Things 3.
Sharing: While Things 3 allows you to share your to-dos with others, you cannot invite someone to access your list. This is a serious drawback for anyone who wants to work in collaboration with others.
Things 3 Apps : Things 3 is not a universal app. It works differently on the Mac and iOS versions. That’s a bit annoying but Things uses each OS’ strengths and weakness to deliver the best experience. At least, you can sync across devices without any problems.
Should You Buy Things 3?
Let’s face it! At $49.99, Things 3 is expensive. This is not a universal app so you’ll need to pay up for each device version.
If you want it on your iOS device, that’s an additional $9.99 and if you want the iPad version, add another $19.99 to that total. In all, Things 3 for the whole ecosystem is a whopping $79.97. On the other hand, the alternative is to take up a subscription based model, which means you will have to keep paying year after year (all features included).
Now if you are a serious productivity person who loves to organize your work with lists, checklists, to-dos and reminders, and you do all your work on your Mac, Things 3 should serve you well. If you want a tool to collaborate with others, this is not for you.
Cultured Code offers a 15 day free-trial of Things 3 for Mac. Download it, use it for 15 days and see if the app suits your work style. If it does, you can consider making the investment.
Click the links below to get your copy of Things 3 for Mac.
Things 3 for Mac : Price: $49.99 Download: Get it on the App Store Website: CulturedCode
What’s your take on Things 3 for Mac? Do you think its too pricey or it is so awesome that its worth every penny? Share your thoughts in the comments below.
Cheers,
Adeline
Leave a Reply