Excel users often find themselves performing certain tasks on a repetitive basis, such as preparing reports on a weekly or monthly basis. Such tasks can involve repeated actions such as copying data from one particular source, or formatting them in a particular style, or applying conditional formatting for certain numbers and so on. Instead of performing these mundane tasks repeatedly, you can get Excel to do it for you – using macros.
What are Excel Macros?
Macros are small programs or scripts that are created in the Visual Basic Editor. The beauty of using Excel is that you don’t have to be a geek or know coding to create macros. The Excel Macro Recorder button automatically does that for you. All you need to do is replicate the actions and Excel will write out the macro for those actions in the background. What is then left for you to do is assign that macro to an object, such as a command button, and voila, its ready to put to use.
In this post, we’ll take a look at how you can create Excel macros using the Excel Macro Recorder.
How to Create Excel Macros
In this tutorial, I’ll show you how to create a macro to highlight cells having a value of less than 40 and mark them as red. For this purpose, I have an Excel sheet containing the names of employees and the hours they clocked in during the week. I want to highlight the cells of employees who clocked in less than 40 hours and mark them red. I use a simple conditional formatting rule to do this.
Now, instead of having to go to Conditional Formatting->Highlight Cell Rules->Less than-> 40 and selecting red for every new weekly sheet, I can create a macro and just hit a button to instantly get the results for the rest of my worksheets. Let’s see how.
You can download the Weekly Timesheet to try the activity yourself. The solution sheet is attached here.
A. Enable the Developer Tab
Excel’s Macro related buttons are available in the Developer tab. The Developer tab is not enabled by default, so the first thing you need to do is activate it. You will find all the instructions to do that here. Or simply follow the instructions below.
1. Launch Excel. Select the File tab and click Options.
2. In the Excel Options dialog box, select Customize Ribbon.
3. In the Customize the Ribbon list box, check the Developer check box and click OK.
B. Change the Macro Security Settings.
In the next step, you need to modify the macro security settings. Macros are usually disabled to prevent any dangerous codes from running on the program. We will need to temporarily enable them whenever we create Excel macros. To do this:
1. On the Developer tab, in the Code group, click Macro security.
2. In the Trust Center dialog box, under Macro Settings, click Enable all macros (not recommended, potentially dangerous code can run) and then click OK.
C. Start Recording the Macro
1. In the Developer tab, in the Code group, click Record Macro. Alternatively, click the Record Macro button in the Status bar. (Right-click the Status Bar and select Macro Recording if you can’t see the button.)
2. In the Record Macro dialog box, in the Macro name box, enter a name for the macro. The macro name must always start with a letter and must contain no spaces. We are going to name this macro Highlight_Hours. Always try to give a relevant easily recognizable name for your macro.
3. You can assign a shortcut key if you work with shortcuts, but the danger here is that if you accidentally use a shortcut that is already assigned to an action, it will be overwritten by the macro. You can skip this step instead and use a button to run the macro.
4. In the Description text box, enter a description for the macro.
5. Click OK to start the recording.
6. On the Week 1 sheet, select cells C2 to C26.
7. On the Home tab, in the Styles group, click Conditional Formatting.
8. From the Conditional Formatting drop down list, select Highlight Cells Rules and then select Less Than.
9. In the Less Than dialog box, enter 40 and select Light Red Fill. Then click OK. Your data displaying work hours less than 40 is now highlighted in light red.
10. Go to the Status Bar and click the Record Macro button to stop the recording. Alternatively, in the Developer tab, in the Code group, click Stop Recording.
You have now recorded your first macro.
D. Assign the Macro button to the Quick Access Toolbar
Now its time to assign a button to activate the macro on other sheets in the workbook.
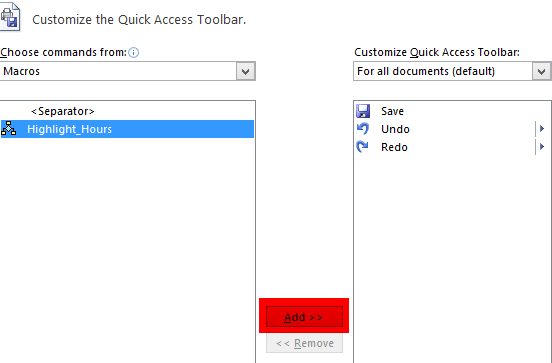
1. Click the Quick Access Toolbar dropdown menu and select More Commands.
2. In the Excel Options dialog box, in the Choose commands from dropdown, select Macros.
3. In the results section, you will see the command for the macro you created. Select it and click Add.

4. Click OK to close the dialog. The macro button is now added to the Quick Access Toolbar.
Now navigate to the rest of the worksheets and click the macro button to quickly ascertain the workers who have logged in less than 40 hours of work.
This is just one simple way to record a macro. You can create for macros for any of your repetitive tasks. Just remember to accurately record your actions in a macro and you’re set to go.
Related Reading
A few other macros you may be interested in:
Remove Hyperlinks in an Excel 2010 Worksheet With a Simple Macro
Extract URLs From Hyperlinked Text Using Macros in Excel 2010
How to Unprotect Multiple Worksheets in One Go Using Excel Macro
Leave a Reply