If you work on projects that require you to collect information from a large group of people, or if you need to prepare questionnaires or take surveys, you can take advantage of the useful free utility from Google called Google forms. Not only do Google Forms enable you to create professional looking documents with ease, you can even give it a professional makeover using custom themes. In this Google Apps tutorial, you will learn how to create a survey form from scratch. But before that, let’s take a look at some of the advantages of using Google forms.
Advantages of Using Google Forms
1. The recipient of the form need not have a Google account.
2. The results of the survey are auto populated updated.
3. The results can be effectively analyzed using charts and graphs.
4. You can export the results of the survey to another application.
5. You can choose from a variety of Google form templates. (About 60 themes and 7 question formats.)
How to Create a Survey using Google Forms
To create a survey:
1. Login to Google and navigate to the Google Forms website. Click Create a free form.
2. On the home page, notice an untitled form already ready for working on. Enter the necessary information.
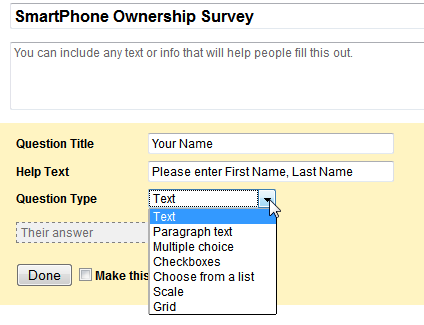
a. Enter the name of the form. You can also provide additional information about the survey in the Form Description text box below the form name.
b. In the Question Title text box, enter the first question.
c. If necessary, in the Help Text text box, provide additional information about the question.
d. In the Question type text box, you can select from a range of question types including multiple choice, checkboxes and so on.
e. If you want to prevent the participant from skipping the question, check the Required question check box.
f. Click Done.

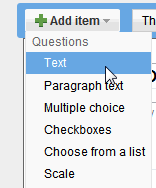
4. Add another question by clicking Add item and from the drop-down list, select a question type. In the question area, enter the details of the question and click Done. Add as many questions as you require until the form is complete.

5. The edit, duplicate and remove buttons displayed to the right of every question enable you to modify, create a duplicate question or delete a respective question. Once you have completed preparing the survey form, it is ready to be sent.
6. At this time you can consider adding a theme to make your form look more professional or attractive.
7.You can also use add-ons from the Google Add On Store to find tools that will make your form creation task more easy.
8. When you are ready to send out the form, click Send form at the top right corner of the window.
9. In the Send form dialog box, enter the email addresses of the participants and click Send. You can also use the Embed link to add the form to a website or share the link via social networks.
10. Click Done.
How to Embed a Google Form in a Blog or a Website
If you want to conduct a survey in your blog or website, you can embed the form after creating it.
1. Create the form and enter the required number of survey questions.
2. At the top-right of the form window, click Send.
3. In the Send form dialog box, click the Embed button to copy the link. Now paste it in your website/blog.
Now that you have learned how to create a Google form you can confidently prepare Google surveys and quiz questions for your audience.
Leave a Reply