In this Excel tutorial, we’ll show you how to create a custom list in Excel and save it so you don;t have to manually add one to your worksheets every time the need arises.
By default, Excel offers some common custom lists like days of the week and months of the year. If you want to create your own custom list, such as store locations, cities, client names or credit card numbers, you can create this custom list in Excel and save it. You can then use the fill option to reuse the list you created any time the need arises.
How to Create a Custom List in Excel
In this tutorial, we’ll show you how to create a custom list in Excel for a bunch of cities in Oklahoma where you have your bakery store set up. The cities include Cleveland, Edmond, Moore, Owasso, Shawnee, Yukon and Sand Springs. To do this:
1. Open Excel and in a new worksheet enter the names of the cities in individual cells.

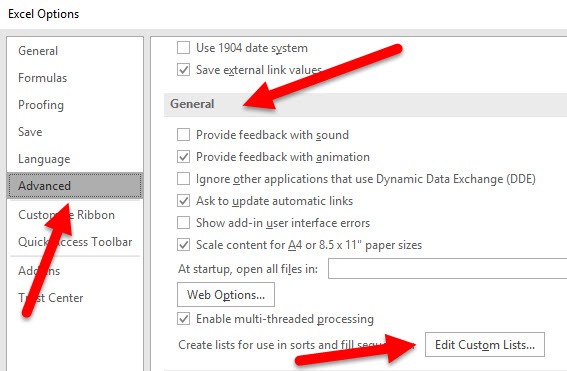
2. Select the File tab and click Options. This will open up the Excel Options dialog box.
3. In the Excel Options dialog box, on the left pane, click Advanced.
4. Scroll down to the General section.
5. Click Edit Custom Lists.

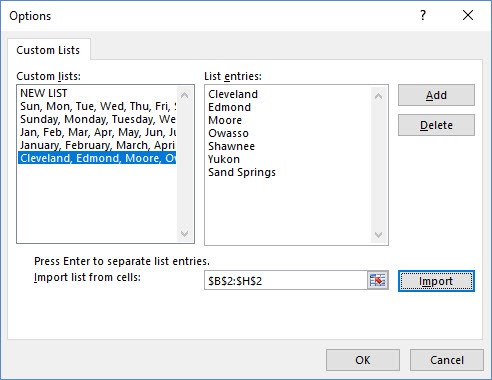
6. The Options dialog box is opened. You can see that Excel already has some custom built-in lists here. To add the list of cities to the dialog, click Import at the bottom of the box and select the cells in your worksheet that has the city names. In this example, it will be cells B2:H2.
7. Click Import. Alternatively, you can click inside the List entries text box and add one city at a time and click Add to manually add the names.

7. Click OK to close the dialog and then close the Excel Options dialog box as well.
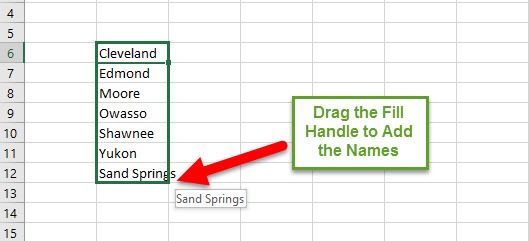
8. To add the custom list to your worksheet, click inside a cell and type Cleveland.

9. Then use the fill options to drag across the worksheet. Your custom list of cities should get prefilled.
If you learned something useful from this guide, please be sure to check out our other Excel Tutorials in the Archives section.
If you want to learn Excel from scratch, take up our Excel 2016 Training for Beginners on Udemy.
Leave a Reply