Want to add some watermark to your documents to personalize it? Here is a step-by-step guide that shows you how to create a watermark in Word, Excel, PowerPoint and Outlook. The activity was performed on Office 2013 but should work on 2010 and 2016 versions as well.
How to Create a Watermark in a Word Document
Watermarks are text or images that help identify the status of the document. Although they can be used to make a document look more intriguing, it is mostly used to tell the reader if the document is confidential, or in draft mode. Whatever be the reason for using watermarks, they are definitely an invaluable part of document creation. Here’s how to create a watermark in Word.
1. On the Page Layout tab, in the Page Background group, click Watermark.

2. In the Watermark gallery, select a watermark.
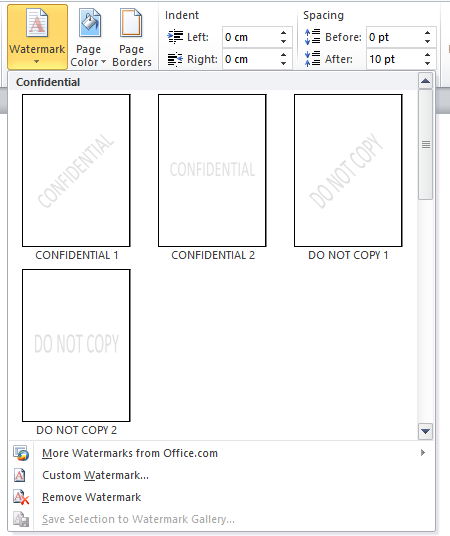
You have now inserted a watermark in 2 simple steps. You can also change a watermark by navigating to the Watermarks gallery and choosing another option. You can also add watermarks on selected pages of a document, but you will have to divide the pages into sections before you do that.
If you want to insert a picture watermark:
1. On the Page Layout tab, in the Page Background group, click Watermark.
2. In the Watermark gallery, select Custom Watermark.

3. The Printed Watermark dialog box is displayed. Select an option from this dialog box.

Select Picture Watermark to set a picture as a watermark. You can navigate to the desired folder to add the picture. The Washout option is selected by default to ensure that the image remains faded out and does not affect the visibility of the document’s contents.
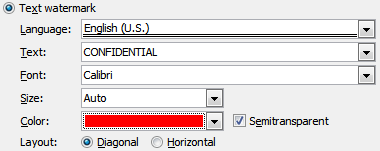
Select Text Watermark to add a text watermark to the document. You can then set the language, text, font, size, color, and layout of the text watermark according to your preferences.
4. Click Apply to apply the custom watermark to the document.
How to Add Watermarks in Excel 2010
Unlike Word 2010, which has a pretty obvious way to add watermarks, Excel 2010 doesn’t have one. The Microsoft Excel team have, however, shared a nice little workaround, which, to a large extent takes the pain out the entire process.
This works by adding a PNG image to the header of your worksheet. You can create your own DRAFT or CONFIDENTIAL PNG image (create a custom watermark in Word, insert it in a blank page, and capture that as an image using a screen capture tool such as SnagIT.) If you prefer to take the easy way out, simply download the images already created by the Excel Blog team and use them.
Download DRAFT image (Right-click and Save As)
Download CONFIDENTIAL image (Right-click and Save As)
Now to the procedure to add watermarks in Excel:
1. Open the Excel worksheet where you want to add the information.
2. On the Insert tab, in the Text group, click Header & Footer.

3. The Excel worksheet is now displayed in the Page Layout View with the cursor placed inside the header text box.

4. On the Header & Footer Tools Design contextual tab, in the Header & Footer Elements group, click Picture.
5. In the Insert Picture dialog box, navigate to the location where you saved the images mentioned at the beginning of the article, and click Insert.

6. The worksheet header will now indicate the text “& Picture.” Click outside the worksheet to navigate away from the Page Layout view.

You must have a worksheet with a white background to be able to view the watermark. A dark background will simply camouflage the watermark rendering it meaningless.
You can see the watermark in a printed page, in a print preview and in the Normal view.
How to Add Confidential Watermark to Email
1. Open Outlook 2010 and on the Home tab, in the New section, click New E-mail.
2. In the New Message window, select the Options tab.
3. Click inside the email message window and then on the Themes tab, click Page color and from the drop down, select Fill Effects.
4. In the Fill Effects dialog box, click the Picture tab.
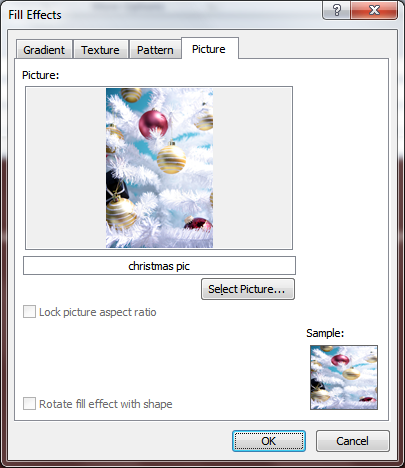
5. Click Picture, navigate to the folder where you saved the confidential.png file you created earlier and click OK.
Now the email message will display the confidential watermark. As an extra level of sensitivity, you can select the File tab and choose Properties.
In the Properties dialog box, in the Sensitivity Settings section, click the Normal dropdown menu and select Confidential.
How to Add a Watermark in PowerPoint
1. Open up the presentation and navigate to the View tab.
2. In the Master Views group, click Slide Master.
3. In Slide Master View, at the top of the thumbnail pane on the left, select the slide master.
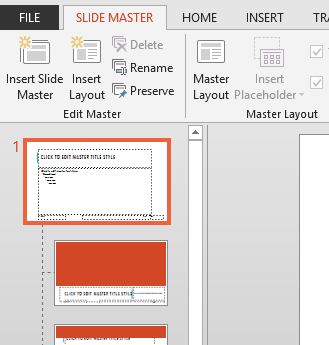
4. Navigate to the Insert tab. In the Text group, click Text Box. On the slide master, click and drag to draw a text box.
5. In the text box, type the text DRAFT. You can also add other watermark text such as CONFIDENTIAL or COPY. To add the text in a slant or vertically, you can select the text box, and turn the circular arrow in the direction you want.

6. Select the text you typed . In the Drawing Tools Format tab, select a lighter font color. If you wish to change the font and size you can make the additional changes too.
7. When you have adjusted the text box to match your requirements, on the Drawing Tools Format tab, click Send Backward->Send to Back.
8. On the Slide Master tab, click Close Master View and check out the resultant watermark on your presentation.
How to Add a Picture Watermark in PowerPoint
To add a faded picture as a background watermark to your slides, here’s what to do:
1. On the View tab, click Slide Master.
2. In Slide Master view, in the left pane, select the slide layout(s) to which you want to add a picture watermark.
3. Right-click the slide and then click Format Background.
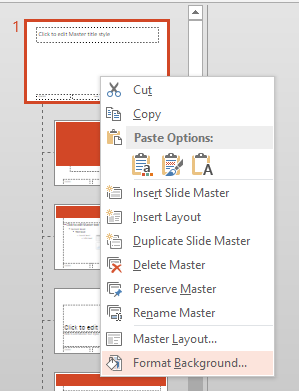
4. In the Format Background pane on the right, click Picture or Texture Fill, and then, under Insert picture from, select an option and insert a picture.
5. In the Format Background pane, slide the Transparency bar to the right to set the required transparency percentage.
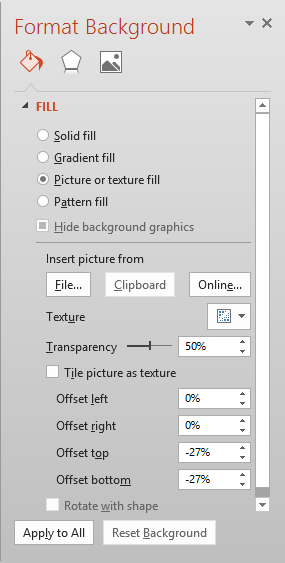
If you want to apply the watermark to all slides in the presentation, in the Format Background pane, click Apply to all.
6. On the Slide Master tab, click Close Master View.

You have now added a cool faded picture to the presentation background.
Leave a Reply