Excel offers some handy tools to help you identify and weed out errors in your worksheet. A simple Find and Replace is one way to correct errors, while the Spell Check feature can put paid to typos. However, if you have mistyped some data or overwritten something from the original, you may have a tough task of cross-checking all the entries against the ones in the original.
That’s where the Text to speech tool comes into play. Here’s a look at how to use Text to Speech to check errors in Excel. I’m using Excel 2016 for writing this post. If you are using an earlier version of Excel, there may be some variations in the steps.
How to Use Text to Speech to Check Errors in Excel
Excel’s Text to Speech tool reads aloud each entry that is in the range of cells you selected. As the data is read out, you can cross verify it against the documents in the original worksheet. To make use of this feature, you only need a pair of speakers or headphones to be connected to your PC or laptop.
Oddly, the Text to Speech commands are not available on the Ribbon for quick access. You need to add the hidden commands to the Quick Access toolbar or to a custom tab on the Ribbon.
Since there are quite a few commands available on this tool, I’ll create a custom group and add these commands first to my Ribbon.
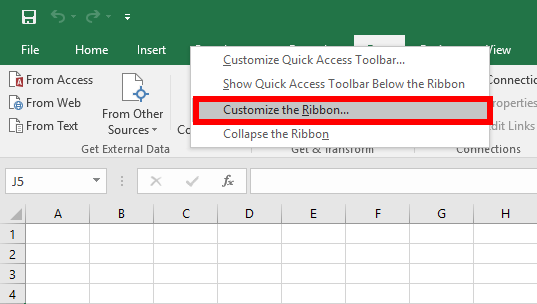
1. Right-click the Ribbon and select Customize the Ribbon.
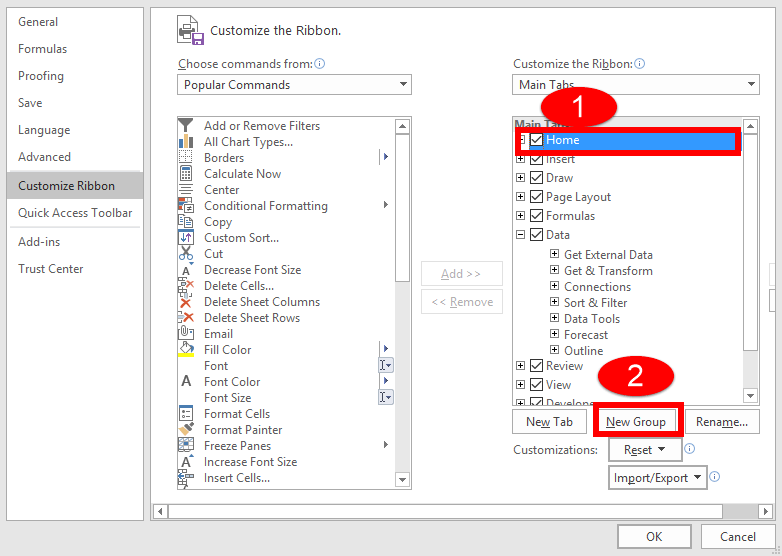
2. This will open up the Excel Options dialog box displaying the Customize the Ribbon page. In the right section of this dialog, select Home and then click New Group.
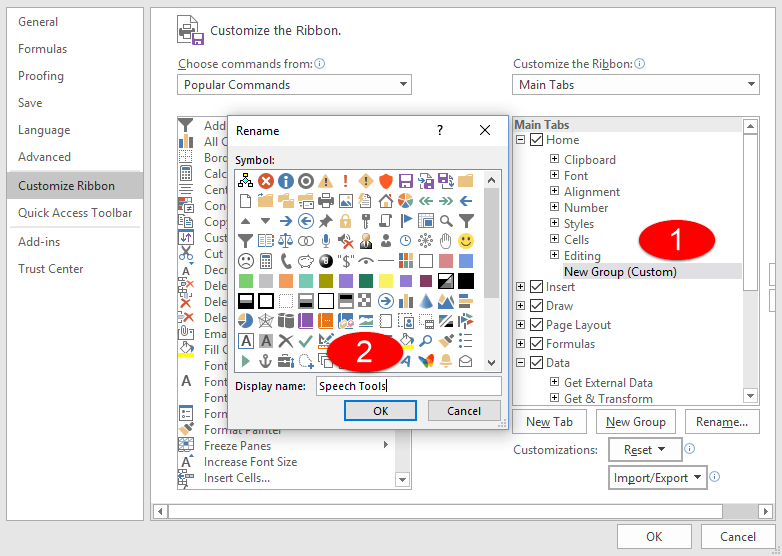
3. A new group will now be created in the Home tab called New Group (Custom). Right-click this group and rename it Speech Tools.
4. In the left pane, under the Choose commands from drop-down menu, select Commands not in the Ribbon.
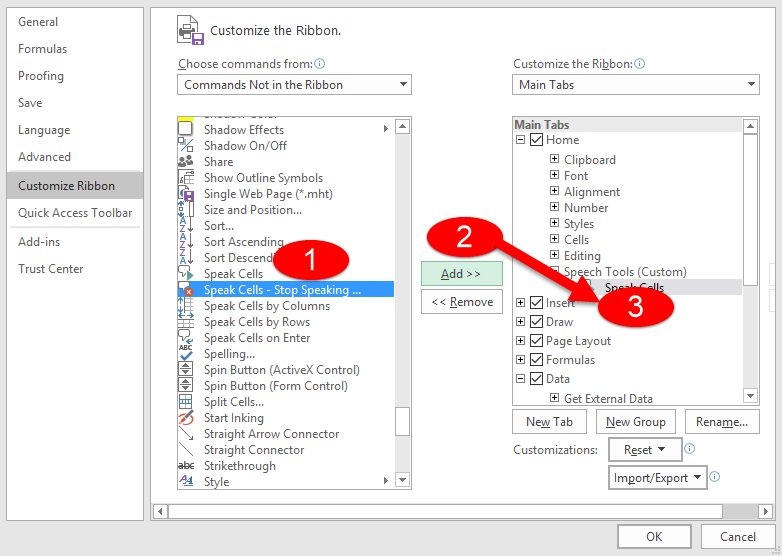
5. With the new group selected, from the left drop down list, select the following commands and add it to the newly created group.
- Speak Cells
- Speak Cells – Stop Speaking Cells
- Speak Cells by Columns
- Speak Cells by Rows
- Speak Cells on Enter
6. Click OK to close the Excel Options dialog box.
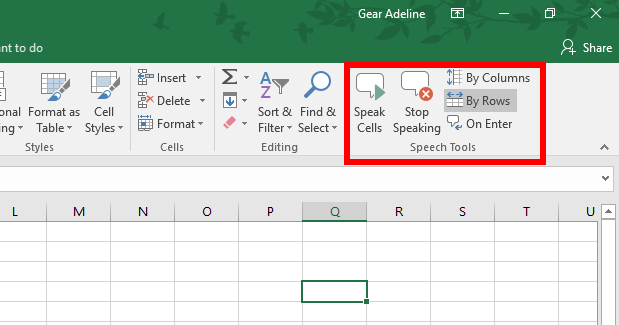
The new group that you created (Speech tools) will now be available on the Ribbon with all the speech commands inside it.
7. To start the feature, first select the range of cells you want to be read aloud. If you want the contents of a table to be read, just place the cursor inside the first cell of the table and Excel will automatically select the entire table when you click the Speak command.
8. Now from the Ribbon’s newly created group, click Speak Cells and Windows will start reading the data inside the selected range of cells. This feature works by reading the data downwards column-wise and then row-wise.
If there is some inconsistency in your data and you need to make a correction, click the Speak Cells – Stop Speaking Cells command to pause the reading.
Remember, you can also use the Speak Cells on Enter command to check each entry manually using the Enter button.
Have you used the Text to Speech command to check errors and inconsistencies between 2 documents in Excel? If you haven’t done so, this is a very convenient way to do it, so be sure to check it out!
If you are new to Excel, be sure to check out Udemy Course “Excel 2016 Training Course for Beginners” which will provide a strong Excel foundation for anyone just getting with the program. You can read all the details about the course here or head straight over to Udemy to check out the details.
You can read our archives section if you want more tool tips, tricks, and ideas on how to use Excel.
Leave a Reply