Touch ID is a feature on the iPhone and iPad that acts as a biometric fingerprint authenticator. It serves a number of useful purposes, the primary one being the ability to unlock your iPhone or iPad. You can also secure apps and authorize payments using Touch ID. Touch ID is a highly useful alternative to passcodes and passwords which are often a pain to use. The ease with which Touch ID can help secure your Apple device while offering better access to content you want to use makes it a great feature you simply shouldn’t miss out on. Touch ID works on the iPhone 5s or later and the iPad Air 2, iPad mini 3 or later. Let’s check out how to use Touch ID on your iPhone if you still haven’t figured it out yet!
How to Use Touch ID on iPhone – Setup
If you have picked up a brand new iPhone or iPad, you will be prompted to enable Touch ID during the setup process. If you already have an iPhone but skipped that setup step earlier, here’s how to set up Touch ID and get those fingerprints scanned into your iPhone.
1. Go to Settings->Touch ID & Passcode

2. In the Enter Passcode screen, type in your passcode for authorization. If you don’t have a passcode you can skip this step.
3. In the Touch ID & Passcode screen, tap Add a Fingerprint.
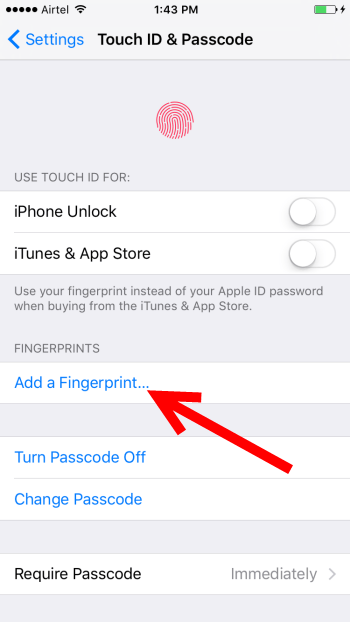
Next, you need to follow the on screen instructions to set up Touch ID. You will be asked to place your finger on the Home button and remove it repeatedly until the scanning is complete.Once its complete, you will be taken back to the Touch ID & Passcode screen.
How to Add Additional Fingerprints to Touch ID
You can add up to 5 additional fingerprints to Touch ID. This can be prints of your other fingers, or that of your family members. You can even register a companion’s fingerprint for immediate emergencies and for a temporary period of time. Setting up additional fingerprints to Touch ID is pretty much the same process as we saw earlier.
1. Go to Settings->Touch ID & Passcode
2. In the Enter Passcode screen, type in your passcode for authorization. If you don’t have a passcode you can skip this step.
3. In the Touch ID & Passcode screen, tap Add a Fingerprint.
You will be led through a series of screens that will prompt you to add the new fingerprint.
How to Name a Touch ID Fingerprint
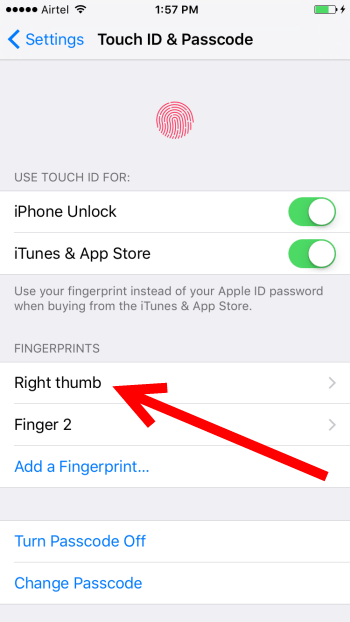
When you complete the process of creating a Touch ID, you’ll notice that your iPhone names the fingerprint as Finger 1, Finger 2 and so on. If you want more clarity on which fingerprint is listed on the device, especially if you have multiple fingerprints, you can rename these to your convenience. To do this:
1. Go to Settings->Touch ID & Passcode
2. In the Enter Passcode screen, type in your passcode for authorization.
3. In the Touch ID & Passcode screen, tap the fingerprint you want to rename.
4. In the next screen, click the x button next to the Finger 1 name and type a name that you can recognize like the right thumb, the left thumb, mum’s print and so on.
5. Then tap Done.
Repeat the steps to label all fingerprints.
How to Delete a Touch ID Fingerprint
If you have given someone a temporary access to Touch ID for any specific reason, you may want to remove that access at a later point in time. Also, if a fingerprint becomes glitchy, you can remove and redo it. Here’s what you need to do:
1. Go to Settings->Touch ID & Passcode
2. In the Enter Passcode screen, type in your passcode for authorization.
3. In the Touch ID & Passcode screen, tap on the fingerprint you want to delete.
4. In the next screen, tap Delete Fingerprint.

How to Turn off Touch ID for the Lock screen
If for some reason, you want to turn off Touch ID, Apple makes it easy to do so.
1. Go to Settings->Touch ID & Passcode
2. In the Enter Passcode screen, type in your passcode for authorization.
3. Tap to turn off the iPhone Unlock option.
How to Turn off Touch ID for iTunes and App Store Purchases
If you don’t want to use Touch ID for your iTunes and App Store purchases, you can turn it off just as you would for the lock screen.
1. Go to Settings->Touch ID & Passcode
2. In the Enter Passcode screen, type in your passcode for authorization.
3. Tap to turn off the iTunes & App Store option.
That’s it! You will now have to enter your password to purchase apps on the Stores.
That’s the long and short of using Touch ID on your iPhone. Do you use Touch ID or does that feature worry you? We’d love to hear your thoughts.
Leave a Reply