Watermarking is a technique many photographers, whether professional or amateur, graphic artists, photojournalists, bloggers and content creators frequently use. Why? Because it can turn out to be useful from two distinctive standpoints.
Why Add a Watermark to Your Images
For some, adding a watermark is a method to protect their original photography. By inserting a copyright text, your logo or own signature you claim ownership of that piece of content. This way you make it clear that the photo represents your intellectual property and can’t be used by anyone else without your authorization. Sure, it’s not 100% bulletproof, but at least it will make thieves think twice before stealing your pictures.
For others, a watermark can become a valuable marketing tool that can help them advertise their work. Having your name or your website on a remarkable photo shared online can aid you improve your visibility, drive traffic back to your portfolio website or blog and possibly acquire new clients.
Batch Watermark with PhotoMarks in 3 Simple Steps
Adding a watermark can be done with various post-processing software.
Of course, Photoshop can perform this operation, but it’s not the best possible solution. Adobe’s software does allow you to watermark your pics, but it’s not the most straightforward process. And in today’s world you tend to search for the simplest and quickest solution. In addition to that, Photoshop is a program that comes with a certain learning curve and, let’s face it, a high price tag.
If you want to watermark your photos in an efficient manner, you can accomplish the task with a lightweight alternative like PhotoMarks. PhotoMarks is a tool for Windows and Mac particularly developed for this purpose. The app is designed to make the process both fast and easy. Fast – because it has batch processing capabilities that enable you to watermark dozens or hundreds of images simultaneously. Easy – thanks to the intuitive, step-based UI. All you have to do is add your files in Step 1, apply the watermark in Step 2 and choose your final parameters in Step 3.
Let’s take a look at how simple it is:
Step 1

So once you open PhotoMarks, you’ll notice in the top center section the three steps you need to follow. The first step is called Add Photos. Nothing confusing about that, right? In order to do that you have several possibilities: you can drag & drop the files, click on Add Photos to select the desired images or click on the Add button to directly add an entire folder (with or without sub-folders).
Once you’ve loaded your pictures, you’ll be able to see a preview in the bottom right corner.
Step 2

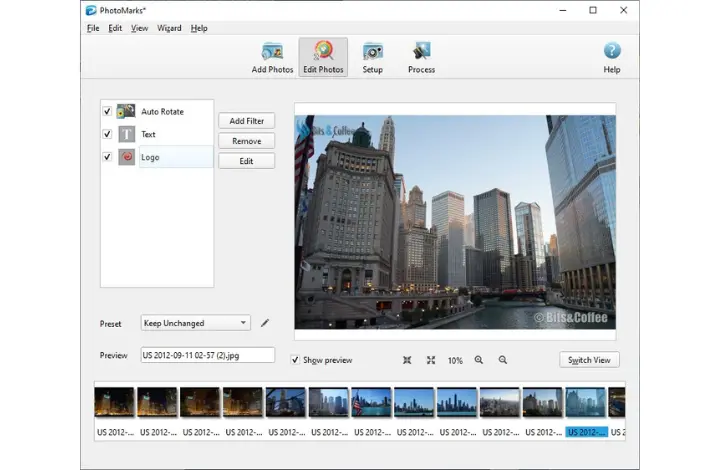
Next move on to the second step of the process, called Edit Photos. Here’s where you can watermark (and not only) your photographs with the aid of the built-in filters. Just click on Add Filter > Marks and choose the desired watermark type: Text, Logo or Mask.
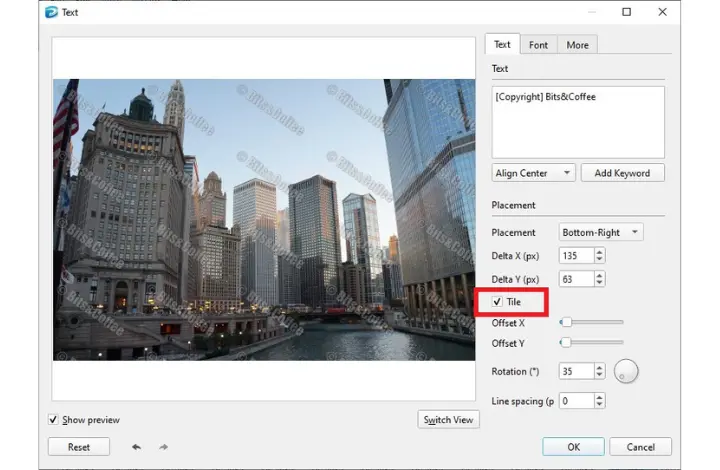
Next you can begin customizing the selected mark. The app allows you to choose the preferred position on the photo (freely or by selecting from preset positions), the size and rotation, to adjust the transparency, modify the font style and color or perhaps apply effects like stroke and shadow.

With PhotoMarks you can also use the tile mode if you want to opt for extra security. This gives you the opportunity to repeat the chosen watermark across the entire image.
In addition to watermarking, the app lets you rename, resize, crop, rotate and convert images. There’s also a filter to decorate your photos with frames and borders.
Step 3

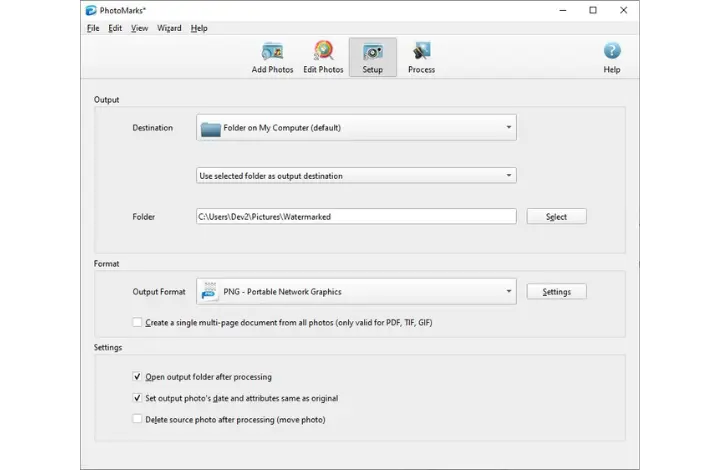
Once you’ve finished editing, you can move on to Step 3, called Setup. Here’s where you’ll choose the destination of your new images, as well as their output format.
PhotoMarks allows you to save your pictures on a local folder on your computer, to upload them to a FTP server or share them via email. As far the image format goes, you have plenty of options, from the classic PNG to more modern formats like WebP and AVIF.
After you’ve made your changes, all that’s left to do is click on the Process button.
In case you’re constantly working with images that require editing, PhotoMarks places at your disposal a very useful feature. The tool offers the option to save your current settings as Profiles and simply reuse them in other sessions.
You can download the fully-featured trial version of PhotoMarks here.
Leave a Reply