SmartArt Graphics in Office 2010 applications such as Word, Excel, and PowerPoint, and Outlook are useful tools that help you display data conveying complex relationships between various items. In this Microsoft PowerPoint 2010 tutorial, you will learn how to insert SmartArt Graphics in PowerPoint to Show hierarchical relationships.
Note: Check out our latest post on how to use SmartArt graphics to learn everything about creating and formatting SmartArt graphics. You can also download the activity files to practice what you learned.
How to Insert SmartArt Graphics in PowerPoint to Show Hierarchical Relationships
1. Display the slide in which you want to show the hierarchical relationship.
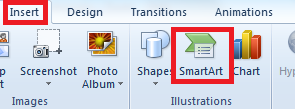
2. On the Insert tab, in the Illustrations group, click SmartArt. Alternately, you can click the SmartArt icon within the presentation slide.
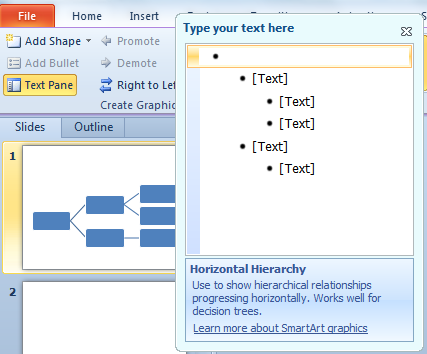
3. In the Choose a SmartArt Graphic gallery, click Hierarchy, and then double-click a hierarchy layout and click OK. In this example, I will use the Horizontal Hierarchy layout.
4. Enter text.
Click inside the text pane [Text] to enter text. If the Text pane is not visible, on the SmartArt Tools Design tab, in the Create Graphic group, click Text Pane.
Click inside the Text boxes in the slide and start typing.
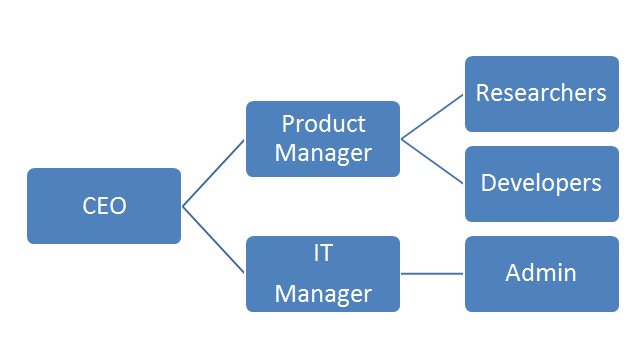
5. Click outside the slide to view the changes.
You can now format and apply design changes to the SmartArt graphics in PowerPoint to show hierarchical relationships in a professional manner.
Before we head off to the procedure you must remember that animations that you apply to SmartArt graphics don’t work quite the way you animate shapes, text, or WordArt. The single most important difference is that animation applied to shapes in in a SmartArt graphic plays in the order that the shapes appear. You cannot otherwise reorder the sequence of the animations. For example if you have 4 shapes in a SmartArt graphic named 1,2,3,4 you can animate the SmartArt graphic in the order 1,2,3,4 or 4,3,2,1 but not in any other order such as 1,2,4,3, 1,3,4,2 and so on.
Also, when you change the layout of the SmartArt graphic, any animation that applied to the earlier layout will be transferred to the new layout. Also, if there are connecting lines between shapes they are animated along with the second shape and not individually.
How to Animate SmartArt Graphics in Your Presentation Slides
1. Open the presentation that contains the SmartArt you want to animate.
2. Click the SmartArt graphic that you want to animate.
3. On the Animations tab, in the Animation group, click the More button, and then select the animation that you want.
4. On the Animations tab, in the Advanced Animations group, click Animation Pane.
5. In the Animation Pane list, click the arrow to the right of the animation that you want to modify, and then select Effect Options.
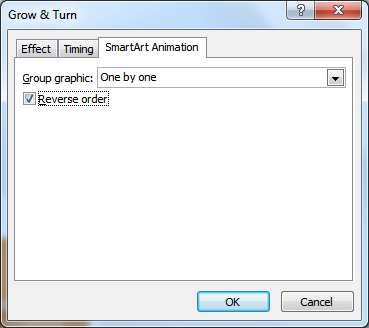
6. In the {Animation Name} dialog box, on the SmartArt Animation tab, from the Group graphic dropdown list, select an option.
- As one object: The animation is applied to the entire SmartArt graphic as one large picture or object.
- All at once: All the shapes in the SmartArt graphic are animated at the same time. This is most obvious when you use animations such as those that rotate and grow larger.
- One by one: Each shape is animated individually, one after the other.
- By branch one by one: If your SmartArt has branches such as a Hierarchy layout, all the shapes in a branch are animated simultaneously.
- By level at once: All shapes at the same level are animated simultaneously.
- By level one by one: The shapes in the SmartArt graphic are animated first by level and then individually within that level.
Not all animation effects can be applied to SmartArt graphics. If you want to apply a certain effect, you’ll need to right-click the SmartArt graphic and click Convert to Shapes and then animate the shapes.
Animations to SmartArt usually work in the order in which the shapes appear and cannot be mixed. For example, if you have 4 shapes in a SmartArt graphic named North South, East, and West you can animate the SmartArt graphic in the order of North South, East, and West or West, East, South, North. You cannot have the shapes animated in any random order. Previously, I showed you how to animate SmartArt graphics in a particular order. In this Microsoft PowerPoint tutorial, I’ll show you how to reverse the order of SmartArt Animations.
How to Reverse the Order of SmartArt Animations
1. Open up your presentation and select the SmartArt graphic with the animation that you want to reverse.
2. On the Animations tab, in the Advanced Animation group, click Animation Pane.
3. In the Animation Pane list, right-click the animation and choose Effect Options.
4. In the [Animation Name] dialog box, select the SmartArt Animation tab, and then check the Reverse order check box.
5. Click OK to view the SmartArt animation in reverse order.


Leave a Reply