Consider a scenario where you need to gather information about the popularity of a new program or collect volunteers for a workshop in your office. Whatever the situation, when you want to poll data from a large population, it will be a tedious task to do it manually. Outlook 2010 provides a set of default voting responses to help you to conduct a poll and collect responses. You can also create your own custom voting responses. Once you have entered the required poll details in your email message, just add the voting buttons in Outlook, hit Send and start collecting the responses. In this tutorial, you will learn how to collect votes using Outlook 2010.
How to Add Voting Buttons to a Message and Send it for a Vote
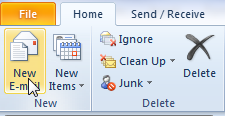
1. On the Home tab, in the New group, click New E-Mail.
2. On the Message window, select the Options tab.
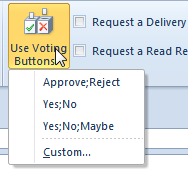
3. In the Tracking group, click Use Voting Buttons.
4. From the drop-down list select an option.
- Approve;Reject: This is another form of a this or that option that you can use to accept or reject a proposal or idea.
- Yes;No: This option is used when you want a definite yes or no answer from the recipients.
- Yes;No;Maybe: This option is used when you want to give more than two options to the recipients.
- Custom: This option is used to create you own custom response.
5. The voting buttons in Outlook are now added to the email message. Enter the names of the recipients, the subject, and the message details and click Send.
Now that you have sent out your poll message, you will want to know the results of the poll. To determine the number of ayes and the nays, here’s what you need to do.
Collect Votes and View the Voting Responses
1. Navigate to the Sent Items folder, and open the poll message that you sent to the recipients.
2. On the Message tab, in the Show group, click Tracking.
Note: The Tracking button will be displayed only if you have more than one response to your poll message.
Alternatively, in the Reading pane, right-click the message header and choose View voting responses.
3. The message bar below the Ribbon displays the results of the vote.
Downloadable: PDF Copy of
How to Collect Votes Using Outlook 2010
Now that you know how to create a poll in Outlook 2010, include voting buttons and collect votes, you can now go ahead and confidently do any type of poll using Outlook 2010.


Good article Eddie. I'd forgotten you could do this in Outlook. I used to work in a business where the senior staff would get invited to events. Sending out a poll like this was a good way for us all to respond quickly. I haven't used it since though!