The Outlook 2010 calendar helps you to create appointments and events, organize meetings, and maintain your daily schedules in an organized manner. You can make the Outlook calendar much more useful and adaptable to your work requirements by customizing it. Here are 7 ways to customize Outlook Calendar to suit your working style.
Methods to Customize Outlook Calendar
1. Modify the time scale
By default, the calendar grid displays a time scale of 30 minutes. You can change this time interval to one that suits your work requirements.
2. Specify the time range
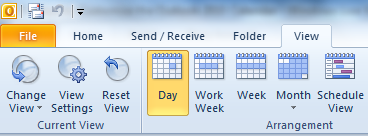
You can also modify the calendar view to display the time range in the day, week, month, or schedule view. Just navigate to the Outlook Calendar, and on the Home tab, in the Arrange group, click Day, Work Week, Month, or Schedule View as per your requirements. You can also specify how much information appears in the month view by following this daily app tip.
3. Add a background color
If you have multiple calendars, you can add a background color to distinguish each type of calendar. To do this:
1. On the View tab, in the Color group, click Color.

2. Select the color that you want to add as the background.
If you want a common background color for all calendars,
1. Select the File tab and choose Options.
2. In the Outlook Options dialog box, click Calendar.
3. In the Display options section, click Default calendar color, select a color, and then check the Use this color on all calendars check box.
4. Change the calendar font
To change the calendar font:
1. On the View tab, in the Current View group, click View Settings.

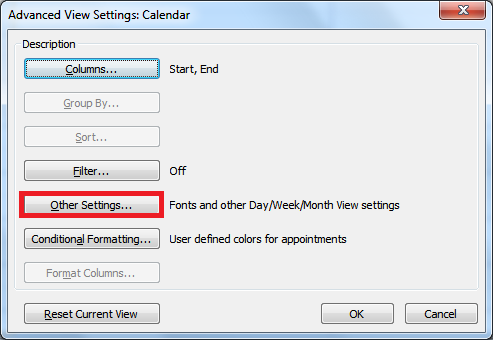
2. In the Advanced View Settings:Calendar dialog box, click Other Settings.

3. In the Format Day/Week/Month View dialog box, click the respective buttons to specify the font and font sizes that you want to use.
You can also customize the font of the small calendar, otherwise known as the Date Navigator that displays the current month in the calendar. To do this:
1. Select the File tab and choose Options.
2. In the Outlook Options dialog box, click Calendar.
3. In the Display options section, click Date Navigator font, then click Font, and in the Font dialog box, select the size and font that you want to use.

5. Bold format dates containing items
You can bold format dates containing transactions to highlight them when you open the calendar. To do this:
1. On the View tab, in the Current View group, click View Settings.
2. In the Advanced View Settings:Calendar dialog box, click Other Settings.
3. In the General settings section, check the Bolded dates in Date Navigator represent days containing items checkbox.
6. Set work week options
You can set the beginning and end of your work day, and the first day of the week or year by checking the respective checkboxes.
1. Select the File tab and choose Options.
2. In the Outlook Options dialog box, click Calendar.
3. In the Work Time section, check the desired option.
- In the Start time box and the End time text boxes, set the the beginning and end times of your work day.
- Check the Work week check boxes to set your work days.
- In the First day of week text box, select the day you want to set as the first day of the week.
- In the First week of year text box, select an option to set the first week of the year.
7. Add an additional time zone
You can set an additional time zone to set up meeting schedules with people working in other time zones more easily.
If a particular option to customize Outlook calendar worked well for you, be sure to share it with us.
Leave a Reply