Sometimes, when you copy and paste a ton of content onto your Excel worksheet, you end up with a lot of blank rows or columns. You can delete them by right-clicking the rows or columns and choosing the Delete option but that can become very trying if you have too many rows. Plus, there’s always the danger that you might lose content. That’s why you should be careful when you’re deleting data and in this Excel tutorial, I’ll show you how to delete blank rows in Excel 2016 the right way.
How to Delete Blank Rows in Excel 2016
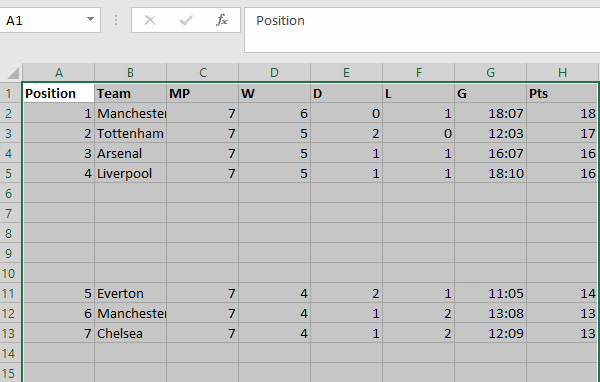
Our worksheet contains some data on the team standings in the English Premier League. Some rows were inserted into the worksheet to fill in some additional information, but it was later decided to keep that out of the worksheet. The result is a bunch of unwanted blank rows sitting in the worksheet. To delete these blank rows here’s what we need to do.
1. Select all the data. Or if you like shortcuts, press Ctrl + Home and then press Ctrl + Shift + End.
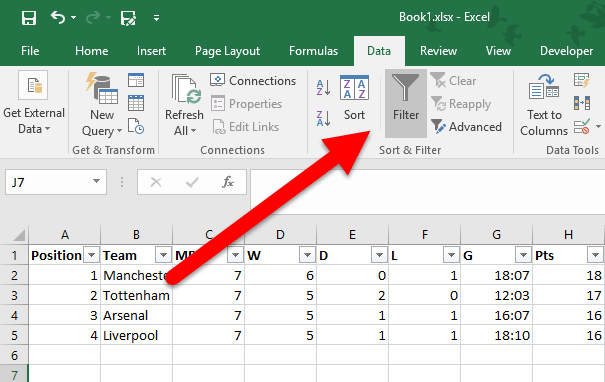
2. Select the header row. Then select the Data tab. On the Sort & Filter group, click Filter to add the AutoFilter button to the worksheet header row.
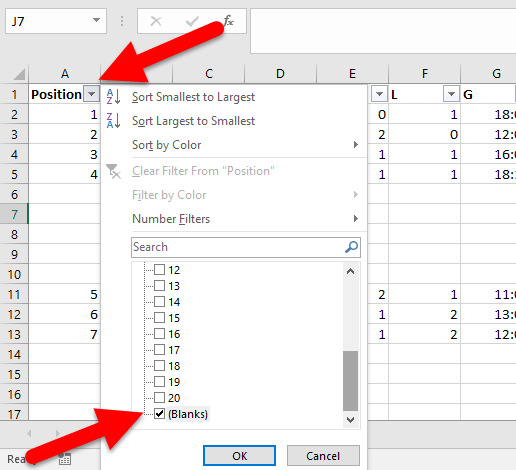
3. Click the Filter button in the Position column, uncheck Select and then scroll down, select Blank, and click OK.
4. Click inside the worksheet and press Ctrl + Home. Then press the down-arrow key to go to the first data row, then press Ctrl + Shift + End.
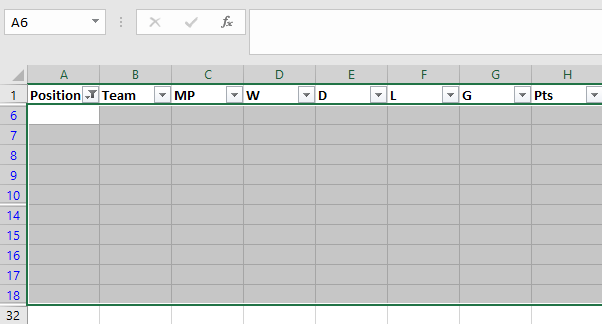
5. Right-click on the selected row and from the contextual menu, select Delete row.
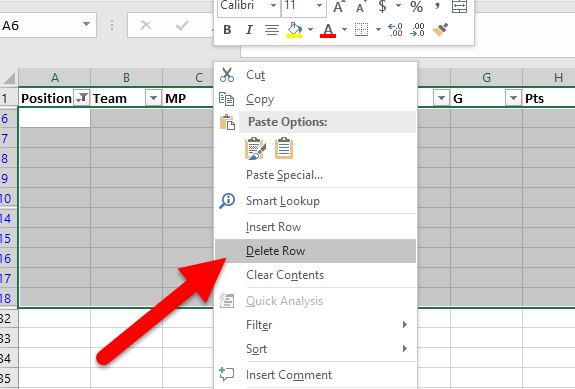
6. In the Delete entire sheet row confirmation box that pops up, click OK to confirm the deletion.
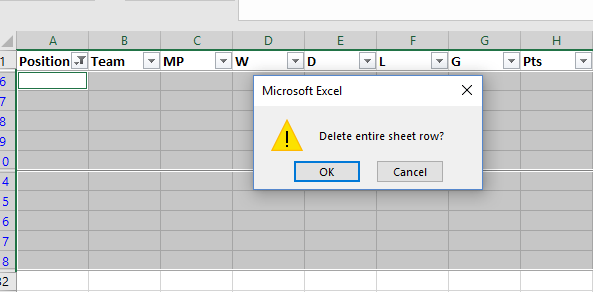
Now remove the filters and you’ll find that all the blank rows are completely removed.

This method works best when you have a column with serial numbers or IDs to identify the rows that are blank. There’s one drawback in this method that is also worth noting. If you have the first column, that is, the serial number column blank, but there is some data further down the row, Excel will assume the row is blank and delete it.
How to Delete Blank Cells in Rows with Partial Data
So if you have data scattered across different columns, and you need to delete only those rows that do not have any data whatsoever in any cell of that row, you need to first identify the rows that have no data and then do the filtering and deletion. For detecting the blank rows, you need to make use of the COUNTBLANK function. Let’s see how this works.
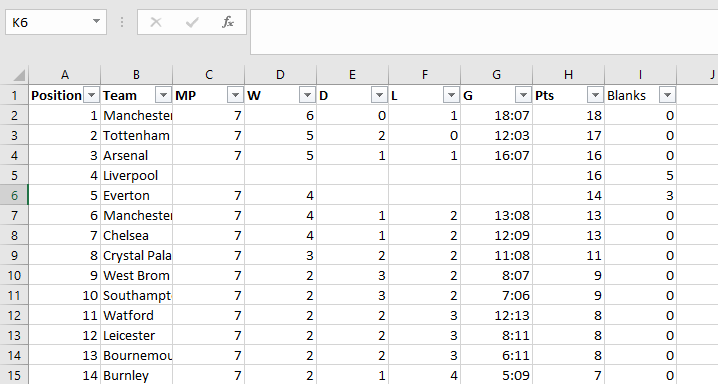
In our worksheet, in Row, 4, let’s remove the data in columns C to G. Similarly, in column 6, lets remove the data in columns E to G.
Now, If we used the steps outlined above, our filter will show both Rows 4 and 6 lined up for deletion. That’s why we need to insert a column to identify fully blank cells and then filter only such cells. For this we apply the CountBlank function. Let’s see how this works:
1. In cell I1, enter the header title, Blanks.
2. In cell I2, enter the formula, =COUNTBLANK(A2:H2)
What we are doing here is identifying how many blank cells are there in the row. In row 2, that’s 0.
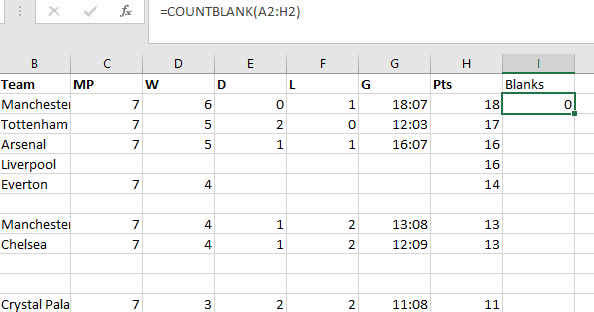
3. Now, we’ll use the AutoFill feature to drag this formula down to the last row to find out the number of blank cells in each row.
4. Select the header row. Then select the Data tab. On the Sort & Filter group, click Filter to add the AutoFilter button to the worksheet header row.
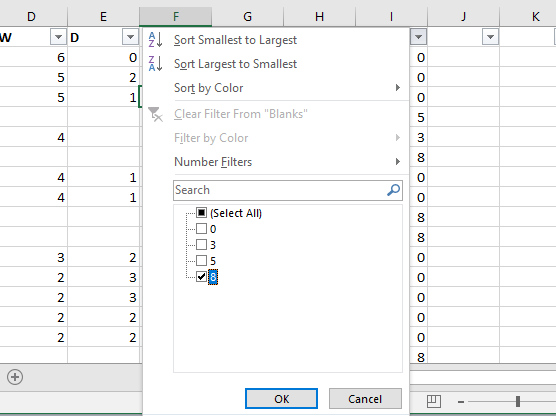
5. Click the Blanks Filter button. Uncheck the Select All option and choose 8. This will filter all rows which are completely blank. Click OK.
5. Now, click inside the worksheet and press Ctrl + Home. Then press the down-arrow key to go to the first data row, then press Ctrl + Shift + End. This will select all the rows for deletion.
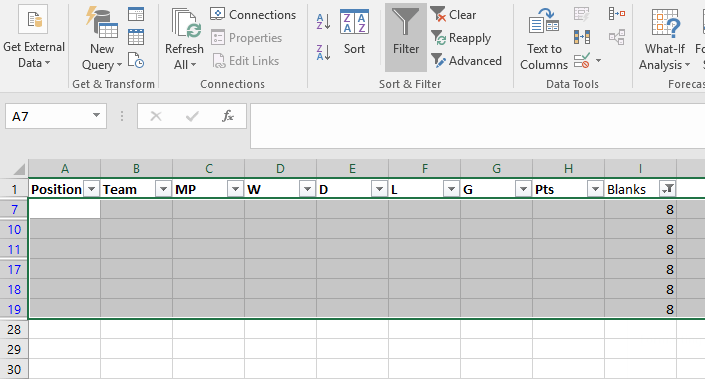
6. Right-click on the selected row and from the contextual menu, select Delete row.
7. In the Delete entire sheet row confirmation box that pops up, click OK to confirm the deletion.
Now all the rows that were fully blank will be deleted, while rows 4 and 6 that had partial information continue to be displayed in the worksheet.
If you found this tutorial helpful, be sure to check out more good stuff in our Learn Excel series. If you want to learn Excel from scratch, consider taking up our Udemy course, Excel 2016 for Beginners. It is available at a nominal price of just $10.
Leave a Reply