The level of brightness on your Windows PC needs to be adjusted to high or low depending on where you are working. If you are sitting outdoors, you may want to increase the brightness and if you are working indoors, you may want to turn it down a little so that it does not hurt the eyes. One of the biggest challenges with the brightness feature is that if you leave it on high for a long time, it can quickly drain out the battery. That’s why its essential that you have an optimum level at which you can squeeze the most out of your laptop battery life.
With Windows 10, you can make these brightness changes manually or you can set it to change automatically. Windows will automate this task based on certain conditions such as when the battery power drops below a certain level, when you are using an ambient light sensor or when you are not plugged in. In this post, we’ll show you the different ways in which you can adjust and manage Windows laptop brightness effectively.
How to Manage Windows Laptop Brightness Manually
This is the tedious process but is actually made easy thanks to the brightness button now included on most laptop keyboards. You will find the brightness button on the row where the F keys are. To increase the brightness of the screen, all you have to do is look for the brightness icon and then press the corresponding key along with the FN key. The same goes for dimming the screen too.
If you don’t have the brightness keys on your keyboard, you can make these adjustments from the Windows software as well.
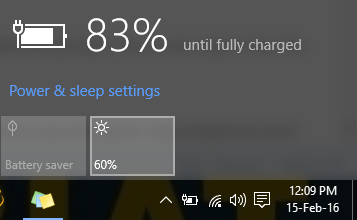
In the Windows 10 notification center, click the battery icon. Tap the brightness tile to adjust the brightness in increments of 25% for every tap. You can also click the Notification icon and from the tiles on the pane, click the brightness icon to adjust the settings.

Alternatively, you can click the Windows Start button, select Settings, and on the Settings page choose System. On the System screen, from the Display tab, drag the Adjust brightness level slider to modify the brightness level.
If you are using Windows 7 or Windows 8, you can find this option in the Control panel. Open the Control panel, select Hardware and Sound and select Power Options. You’ll find the Screen brightness slider at the bottom of the Power Plans window and you can use that to make the adjustment.
How to Adjust Brightness on External Display
If you are using an external display with your laptop you can adjust the brightness on the external display itself. You need to find the buttons (usually near the Power button on the monitor) where you can adjust the brightness.
How to Manage Windows Laptop Brightness Automatically
To Adjust Brightness When Charging or Otherwise
You can let Windows automatically adjust the screen brightness by configuring certain options on the laptop. For instance, you can set a high brightness level when you are plugged in to a power source and set a low brightness level when you are using the laptop battery. when any of these conditions are fulfilled, your Windows laptop will automatically adjust the brightness for you.
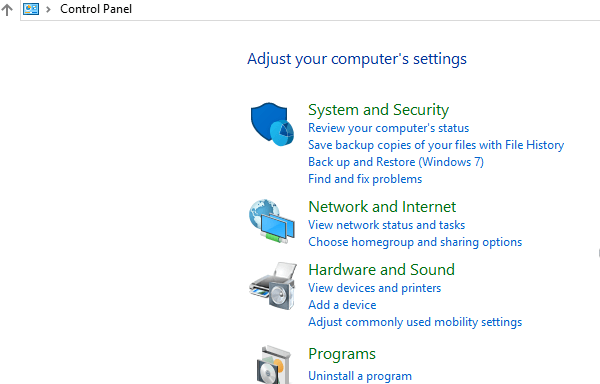
1. To do this, right-click the Start button and choose Control Panel.
2. Click the Hardware and Sound link.

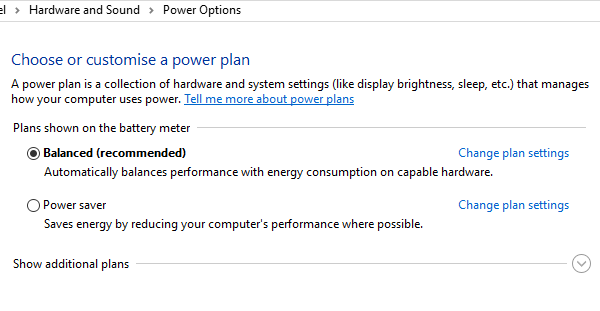
3. On the next screen, section, click Power Options.

4. On the next screen, the Balanced option will most likely be selected. click Change plan settings.

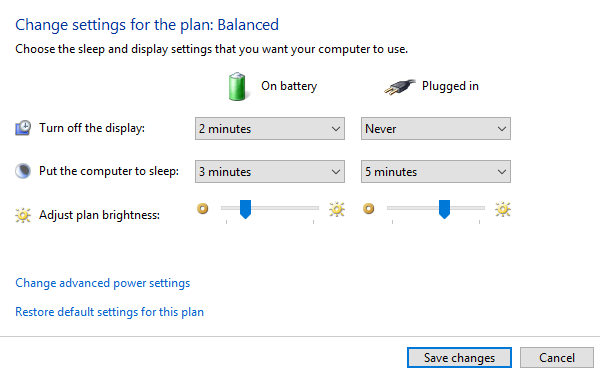
5. On the next screen, you will have options to adjust the brightness when you are plugged in and when you’re on battery. Configure the options that you want here.

To Adjust Brightness When You Have Battery Life Left
You can also set Windows to automatically adjust your display’s brightness depending on how much battery power your device has remaining. You can use the Windows battery saver option to do this.
1. Go to Settings->System and select Battery saver. Click the Battery saver settings link.
2. Enable the Lower screen brightness while in battery saver option and then select the percentage at which you want the Battery saver mode to kick in. By default, this is set at 20%. When your laptop battery life reaches 20% (or the level set by you), the laptop will automatically decrease the backlight saving you some additional power.
To Adjust Brightness Based on Ambient Light
Many modern laptops now offer an ambient brightness sensor that can automatically sense that you are in a bright area or in a dark room and adjust the brightness automatically,. This is a feature that you often see on smartphones and tablets.
The trouble with this feature though is that it isn’t always smart and may make the changes even when you don’t want it to do so. If you think that the ambient light is not working the way you want it to, you can adjust the brightness manually.
To enable or disable this feature on Windows 10, go to Settings->System. In the Display section, disable the Change brightness automatically when lighting changes option. If you don’t see this option, it means your device does not have an ambient brightness sensor.
You can also access this setting from the Control Panel.
1. Click the Hardware and Sound link on the Control Panel and select Power Options.
2. Click Change plan settings next to the plan that is active and click Change advanced power settings.
3. Expand the Display section. Then expand the Enable adaptive brightness section. You will see options to control whether adaptive brightness is used when you are on the battery or when you are plugged in. Set the brightness option as desired.
While adjusting the brightness may not seem like a really big deal, it can come in handy when you are using your laptop on the go and saving every bit of battery life is important. If you do feel the need to get the best brightness output for your laptop, make the adjustments using the steps mentioned in this guide to get the optimum benefits.
Leave a Reply