OneNote is an awesome collaboration tool that lets you create, share and work with your notes not just from your desktop, but also from your mobile device. If you store a lot of personal information on your OneNote files, or if you have created different sections in your Notebook to collaborate with different groups of people, you may want to ensure that your personal data is secure and safe; or the different sections in your Notebook are not visible to the other group. Whatever the reason, an ideal way to ensure security of data is to password protect them. In this tutorial, I’ll show you how to password protect OneNote files.
There are a few points points that you must keep in mind before applying passwords to your notes.
- The first point is that you cannot password protect an entire Notebook. You can only apply password protection for individual sections of a notebook.
- Secondly, password protection currently does not work on the OneNote WebApp and the OneNote mobile app. This means that you may password protect your OneNote file while working on your desktop application and sync it to the cloud, but you will not be able to open the files from OneNote WebApp or from your smartphone.
- Thirdly, password protected sections will not appear in the search results, so when you search a notebook, remember that your results will be displayed only for unprotected sections.
Now time to check out the steps to apply a password to OneNote files.
How to Password Protect OneNote Files
1. Open the OneNote file and right-click the tab that you want to password protect.
2. From the right-click context menu, choose Password Protect This Section.
3. In the Password Protection task pane, click Set Password.
4. In the Password Protection dialog box, in the Enter Password text box, type your password. Confirm the password in the the Confirm Password text box and click OK.
Now that you have secured your password make sure you remember the password you applied. If you forget your password, you cannot retrieve it.
Another point to remember with password protected sections is that while you are working in the protected section it will stay in an unlocked phase for a specified period of time. You can customize these settings in such a way that they stay unlocked for the period of time you specify, or when you navigate away from the page. In the next section, I’ll show you how to customize password protection settings in OneNote 2010.
How to Customize Password Protection Settings in OneNote 2010
1. Open the notebook you password protected.
2. Select the File tab and choose Options.
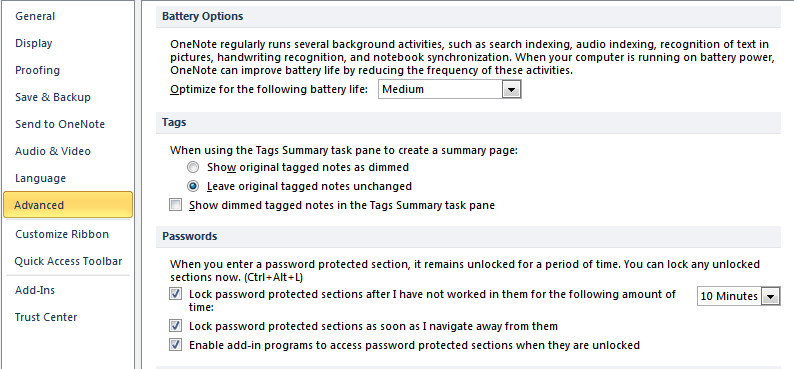
3. In the OneNote Options dialog box, select Advanced.
4. Scroll down to the Passwords section.
5. Customize the password protection settings.
- In the Lock password-protected sections after I have not worked in them for the following amount of time text box, enter the amount of time you need. By default, it is set to 10 minutes, but you can change it to 1 minute and all the way up to 1 day.
- Check the Lock password-protected sections as soon as I navigate away from them check box to lock the section when you navigate away from it.
- Uncheck the Enable add-on programs to access password-protected sections when they are unlocked check box if you want to prevent other programs from accessing sections that are temporarily unlocked.
6. Click OK to apply the settings and close the dialog box.
These simple customization options in OneNote will ensure that you stay safe when working with confidential data.


Leave a Reply