• About
  • Contact
  • Privacy Policy
  • Submit For Review
  • Template Gallery
  • Excel 2016 Udemy Course
  • Skip to primary navigation
  • Skip to main content
  • Skip to primary sidebar

TheAppTimes

App Reviews, Tutorials, & Gadget News Hub

  • Gadgets
  • How To
  • Mobile Apps
  • Software and Web Apps
  • Buying Guides
  • Show Search
Hide Search
Home » How To » How to Save Excel Workbook Settings Using Custom Views

How to Save Excel Workbook Settings Using Custom Views

June 8, 2016

There may be times when you need to work on an Excel sheet for a prolonged period of time with some unique settings applied, such as a zoom option that is not default, a specific column width or height, or a specific print area. You’ll lose plenty of time if you have to keep resetting these options every time you open that particular workbook to continue your work.

Thankfully, Excel’s Custom Views options lets you save your workbook settings in the custom format in which you want it for quick access later. If you have never used the feature or want to know how to get started with it, here are the steps to Save Excel Workbook Settings Using Custom Views.

How to Save Excel Workbook Settings Using Custom Views

If you are ready to set up a custom view, make sure to first set the current normal view as a custom view so that you can quickly switch back to the normal view whenever you want. To do this:

1. Select the View tab.

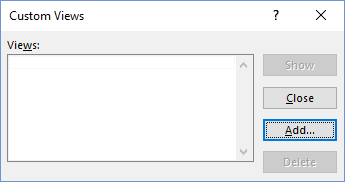
2. In the Workbook Views group, click Custom Views. You can also use the keyboard shortcut of Alt+W+ C. This will display the Custom View dialog box.

3. In the Custom Views dialog box, click Add to display the Add View dialog.

Custom Views dialog box

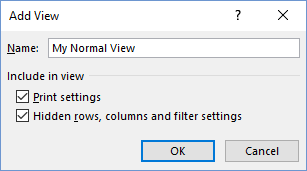
4. In the Add View dialog box, in the Name text box, enter a unique name for the view. I’m going to call this My Normal View and click OK. You can  check or uncheck the Print settings and Hidden rows, columns and filter settings checkboxes depending on what you want to include in the view.

Add View dialog

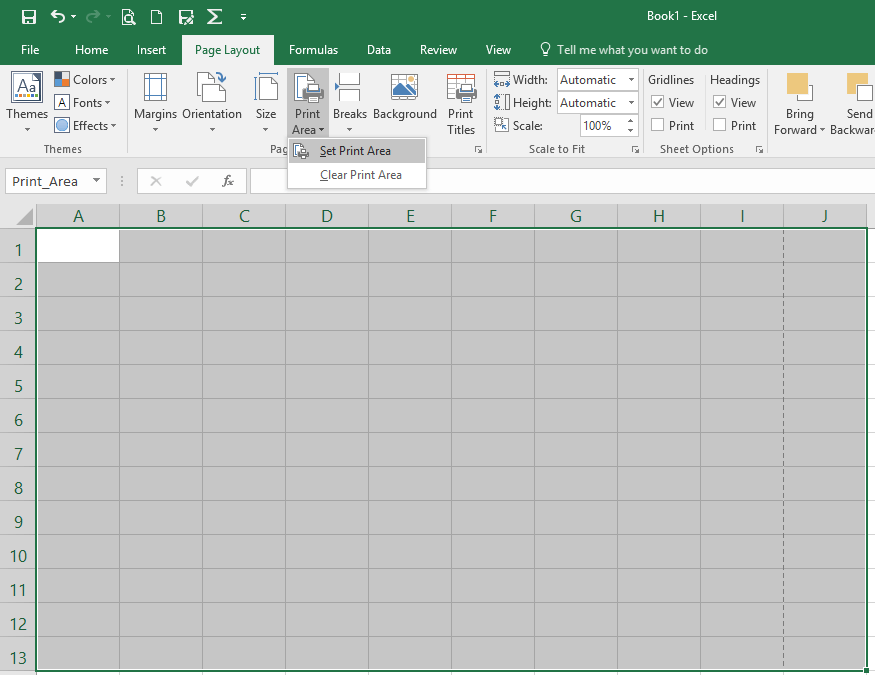
5. Now, we’ll create a custom view. (You can set up the view according to your requirements.) Let us, for example create a view with 130% zoom, increase the height of the row to 20 and set a custom print area in the range A1: J13.

ALSO READ:  How to Calculate the Number of Work Days Between Two Dates in Excel

a. I’ll click the + icon on the slider to move it to a 130% zoom level.

b. Ill select the worksheet, right-click anywhere inside it and select Row height. In the Row height dialog, I’ll enter 20 to increase the row height to 20.

Row height adjusted to 20

c. On the worksheet, I’ll select the range A1: J13. Then I’ll select the Page Layout tab. In the Page setup group, I’ll click Print Area->Set print area to define my print area.

Setting a Custom Print area

6. Then on the View tab, in the Workbook Views group, click Custom Views.

7. In the Custom Views dialog box, click Add.

8. In the Name text box, enter a unique name for the custom view and in the Include in view section, check or uncheck the boxes as desired. I’ll use the name My FB Custom View for the newly created custom view. Then click OK.

9. Now when you want to switch views, you just have to go to the View tab, Workbook Views group, and click Custom Views or use the keyboard shortcut of Alt+W+ C.

Save Excel Workbook Settings Using Custom Views

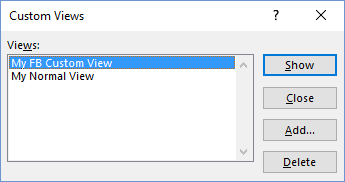
The Custom Views dialog box will be displayed and you can double-click a view you want Excel to display.

Custom views are only available in the workbook in which you created them. They also apply only to the worksheet that was active when you created the custom view. When you select a custom view to display for a worksheet that is not currently active, Excel activates that worksheet and applies the view. So, you must create custom views for each worksheet in each workbook separately and be sure to save your workbook with your custom views if you want the feature to work as per your specifications.

For more cool Excel tips and tutorials, be sure to visit our Archives center by clicking here.

Tweet40
Share11
WhatsApp
Pin3
Buffer
54 Shares

Filed Under: How To Tagged With: excel how to

You May Also Like

Ways to Use Excel Mobile - TATFI
10 Creative Ways to Use Excel Mobile in your Business
How to Get Rid of the Paste Options Menu in Word, Excel and PPT
How to Calculate Number of Days Between Two Dates in Excel

About Adeline Gear

Adeline is a tech enthusiast who loves exploring the latest tools and applications in the marketplace. She also loves her Android and spends time reviewing apps and playing games when she has the time.

Reader Interactions

Leave a Reply Cancel reply

Your email address will not be published. Required fields are marked *

This site uses Akismet to reduce spam. Learn how your comment data is processed.

Primary Sidebar

Hottest New Gadgets!

Best e Readers to Buy in 2023 - TATFI

5 Best eReaders to Buy in 2023

Amazfit Falcon Smartwatch - TATFI

The Amazfit Falcon is a Military Grade Smartwatch with Premium Looks and Great Features

Couchmaster Cyboss Ergonomic Couch Desk - TATFI

Couchmaster Cyboss is an Ergonomic Desk to Keep Off Neck Pain

Philips Hue Festavia String Lights - TATFI

Add a Bit of Sparkle to Your Christmas Tree with Philips Hue Festavia String Lights

Samsung Galaxy Tab A7 Lite Kids Edition - TATFI

This Kid Friendly Tablet from AT&T is a Thoughtful Gift for Your Little One This Christmas

Is An iPhone Really Worth It - TATFI

Is an iPhone is Really Worth It?

Devices You Might Want to Try - TATFI

4 Fantastic Devices You Might Want to Try

Popular Tags

android android apps android games android how to apple casino games chrome extensions excel excel how to facebook gadgets gaming gmail google instagram ios apps ios games ios how to ios tips ipad iphone kids apps learn excel management microsoft music apps new releases outlook how to photo apps powerpoint powerpoint how to productivity Samsung security smartphone smartphones software tablet tablets twitter web browsers windows 10 word how to xbox youtube

Disclosure

TheAppTimes is a participant in the Amazon Services LLC Associates Program, an affiliate advertising program designed to provide a means for us to earn fees by linking to Amazon.com and affiliated sites.
Samsung Galaxy S10 Unlocked - TATFI

The Samsung Galaxy S10 Unlocked– Your Key to Total Freedom

Make Money Playing at Fairspin Online Casino - TATFI

Make Money Playing at Fairspin Online Casino

How Mobile Wellbeing Apps are Empowering Patients - TATFI

How Mobile Wellbeing Apps are Empowering Patients

Tips to Boost Your Ranking and Sales on Etsy - TATFI

5 Ways to Boost Your Ranking and Sales on Etsy

PunchBee Time Management App - TATFI

Know How You Spend Your Time with PunchBee

DevOps Model Explained - TATFI

The Complete Guide to DevOps: How the Model Works and Who It Benefits

Approaches to Digital Marketing - TATFI

Blending Technical and Content-Centric Approaches to Digital Marketing

Tech Tips For Startups - TATFI

Useful Tech Tips For Startups

Boox Tab X Android eReader - TATFI

Boox Tab X is an Android eReader That Helps You Do More Than Just Read

Best Translation Apps for Android - TATFI

5 Great Translation Apps for Android

Dynamic Island Feature on Your Android - TATFI

How to Get the Dynamic Island Feature on Android

Connected TV Advertising In 2023 - TATFI

5 Things You Need To Know About Connected TV Advertising In 2023

TheAppTimes © 2023 // Runs on StudioPress