In this post, we take a look at some of the handy tips that can make your tasks easier to do in Outlook 2010. We show you how to forward multiple messages as a single message, change the calendar view to show just the details you want, open Outlook itself in calendar view if you prefer to see your schedules and appointments first, reply to an email with a meeting request, download RSS feeds as attachments, and display two time zones in your favorite email client among others.
15 Outlook 2010 Tips for Email Efficiency
1. Forward Multiple Messages as a Single Message in Outlook 2010
1. In your Inbox, select all the messages that you want to forward as an attachment.
2. On the Home tab, in the Respond group, click Forward.
3. In the Message form, enter your message, and the email addresses of the persons you want to forward to and click Send.
All the selected messages will be attached to the mail and sent to the recipients.
2. Reply to an Email with a Meeting Request
1. Select the email message that needs to be converted to a meeting.
2. On the Home tab, in the Respond group, click Meeting.
3. Enter the location, start and end times, add or remove attendees, and add attachments as required.
The header and body of the original message are included in the body of the meeting request. So there’s no need to add further information unless you want to.
4. Hit Send, and you’re done.
Responding to email messages with a meeting request is as easy as selecting an email and clicking a button.
3. Download RSS Feeds as Attachments in Outlook 2010
1. Select the File tab.
2. Click Account Settings, and then click Account Settings.
3. Select the RSS Feeds tab, and select the feed that you want to display the full content. Click Change.
4. In the RSS Feed Options dialog box, in the Downloads section, check the Download the full article as an .html attachment to each item check box and click OK.
You can now receive your RSS feeds as an HTML attachment and preview its contents in the Outlook Reading pane, without having to navigate away from Outlook.
Note: You may not be able to view pictures when you preview the HTM attachment using this method.
4. Display Two Time Zones in Outlook Calendar
1. Select the File tab and choose Options.
2. On the Calendar tab, in the Time zones section, check the Show a second time zone check box.
3. In the Label box, enter a name for the additional time zone.
4. From the Time zone drop-down list, select the time zone that you want to add.
You can now click the Calendar form to view the additional time zone you added.
You can also swap the position of the time zones by going back to the Options dialog box, Calendar tab and clicking the Swap Time Zone button. The time zones will now be reversed in the Calendar.
5. Change Calendar View
In Calendar view, on the Home tab, in the Arrange group, click Day, Work Week, Month, or Schedule View to display the Calendar in the desired view.
When you set the Month View, your Calendar is most likely to be cluttered. In such cases, you can click the Month drop-down arrow and select one of the following options.
| Option | To Display |
| Show Low Detail | Only all day events. |
| Show Medium Detail | All day events as well as free/busy information for each day. |
| Show High Detail | All appointments and events. |
6. Display the Calendar View When You Launch Outlook
1. Select the File menu, and select Options.
2. In the Outlook Options dialog box, select Advanced.
3. In the right pane, in the Outlook start and exit section, click Browse.
4. In the Select Folder dialog box, select Calendar, and click OK.
5. Close all open dialog boxes.
The next time you launch Outlook, it will open in Calendar view. You can also choose to launch Outlook in other views, just select the appropriate folder option in the Select Folder dialog box.
7. Edit an Outlook Attachment
1. Open the message containing the attached document.
2. Double-click the message to open it in a separate window.
3. On the Message tab, in the Move group, click the Actions drop-down arrow and choose Edit Message.
4. Now double-click the attachment to open the attached document.
5. In the document, click Enable Editing to start editing the document. Make the desired changes to the document and close the document.
6. In the message box asking you to save the document, click Save.
7. Close the message window and click Yes in the next message box that asks if you want to save changes to the message.
Note: Do not save the document immediately after making the changes. Close the document and then click Save only when prompted.
You have now saved the edited attachment in Outlook as an attachment without downloading it on you system. You can double-click the attachment to see if the changes have been saved. You can also send the email to yourself and check if the attachment includes the changes you made.
This is quite a simple way of editing attached documents in Outlook and resending them, just that it’s not obvious.
The next time you need to edit an attachment, do try this procedure.
8. Create an Alert Tone for a High Priority Mail
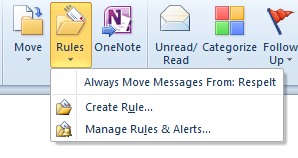
1. On the Home tab, in the Move group, click Rules.
2. From the Rules drop-down list, select Manage Rules & Alerts.
3. In the Rules and Alerts dialog box, click New Rule.
4. In the Rules Wizard, in the Start from a blank rule section, click the Apply rule on messages I receive option and click Next.
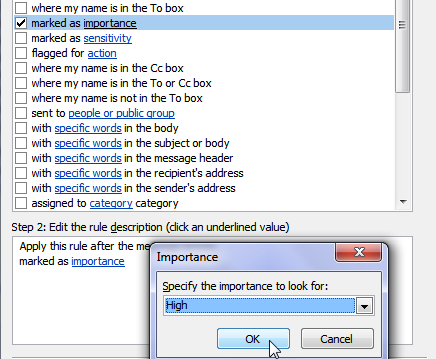
5. In the Step 1: Select condition(s) section, check the marked as importance check box.
6. In the Step 2: Edit the rule description section, click the importance link.
7. In the Importance dialog box, choose High, click OK, and then click Next.
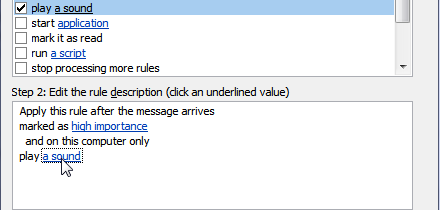
8. In the Step 1: Select action(s) section, check the play a sound check box.
9. In the Step 2: Edit the rule description section, click the a sound link.
10. In the Select a Sound to Play dialog box, browse your system and select and add the .wav sound file you want to use as the alert tone.
11. Click Finish and then click OK.
Setting up a mail alert in Outlook for high priority messages will enable you focus your immediate attention on more important matters and work in an organized matter.
9. Reuse Email Content in Outlook Using Quick Parts
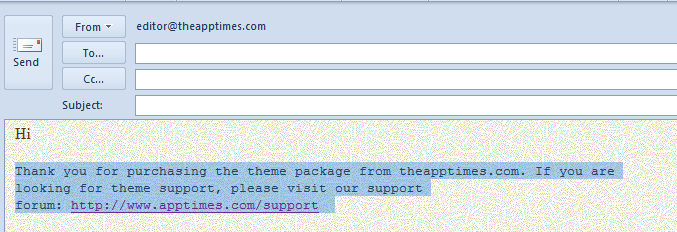
1. Compose the email that contains content that you will use repeatedly.
2. Select the content.
3. In the message form, select the Insert tab.
4. In the Text group, click Quick Parts, and from the drop-down list, select Save Selection To Quick Part Gallery.
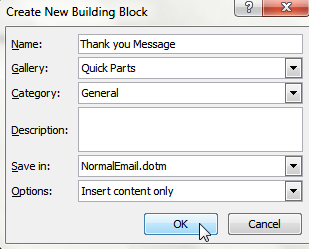
5. In the Create New Building Block dialog box, enter a name for the block of content, fill other fields as required and click OK.
6. Reuse the saved chunk of content. To do this, open the email in which you want to add the content, place the insertion point at the point where you want to add the content, and on the Insert tab, in the Text group, click Quick Parts, and then select the Quick Part from the gallery.
In this Outlook 2010 tutorial, you learned how to insert chunks of content easily into a new email. This will save you time and effort and simplify your repetitive tasks.
10. Schedule Email Delivery in Outlook 2010
1. Compose the email message.
2. In the message form, select the Options tab and in the More Options group, click Delay Delivery.
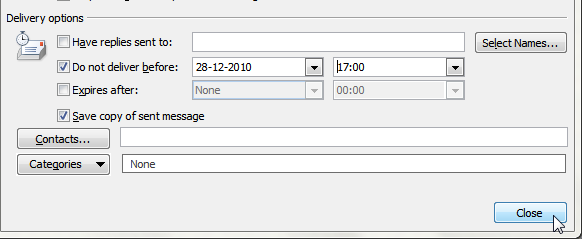
3. The Properties dialog box is displayed. In the dialog box, in the Delivery options section, check the Do not deliver before check box, and then select the delivery date and time that you want and click Close.
4. Click Send. The message will be stored in the Outbox folder until the scheduled delivery time.
11. Take a Screenshot in Outlook
1. Open a new email message and enter the requirements of the message, such as the recipients, subject, and body.
2. Place the insertion point where you want to insert the picture.
3. On the Insert tab, in the Illustrations group, click Screenshot.
4. From the drop-down list, select Screen clipping.
5. Drag the mouse over the image that you want to add. The image is automatically added in the message.
6. Drag the corners of the picture to resize it if required.
7. Add any additional screenshots/ information and click Send.
12. Create a Rule to Automatically Forward a Message to your Mobile
1. Select the File tab and choose Options.
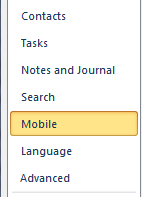
2. In the Outlook Options dialog box, in the left pane, select Mobile.
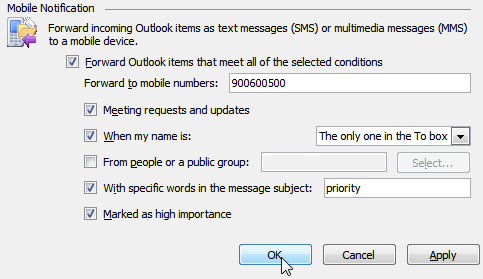
3. In the right pane, click Configure Forwarding to display the Mobile Notification dialog box.
4. In the dialog box, check the Forward Outlook items that meet all of the selected conditions check box.
5. Check the respective check boxes to choose the items that you want forwarded to your mobile phone and click OK.
6. Close the Outlook Options dialog box.
13. Send a Reminder to Your Mobile from Outlook
1. Select the File tab and choose Options.
2. In the Outlook Options dialog box, click Mobile.
3. In the right pane, click Mobile Reminder Settings to display the
Reminder dialog box.
4. In the Reminder dialog box, check the Send reminders check box, verify the mobile number, set other reminder options such as when the reminder needs to be sent, and the items for which reminder needs to be sent and click OK.
14. Forward a Message to Your Mobile Phone
1. In the Inbox, select the message.
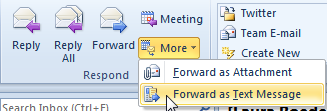
2. On the Home tab, in the Respond group, click More and from the drop-down list select Forward as Text Message.
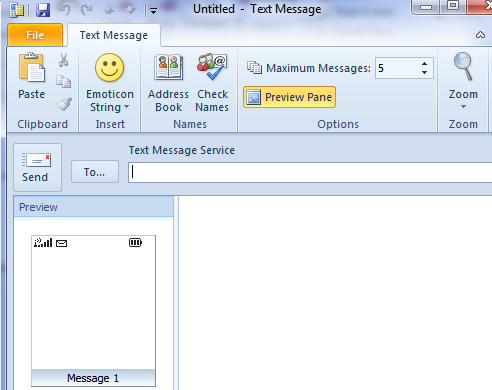
3. A text message form is displayed with the message to be forwarded.
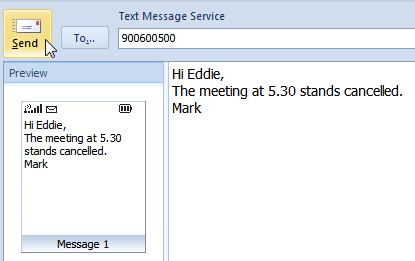
4. You can preview the message in the Preview pane, enter the mobile number in the To text box, and click Send.
15. Send a Text Message to a Mobile Number from Outlook
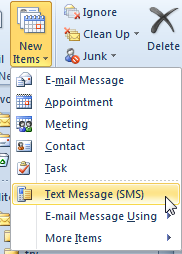
1. On the Home tab, in the New group, click New Items and select Text Message (SMS).
2. A Text Message form is displayed.
3. Click To to display the Select Names: Contacts (Mobile) dialog box and select a mobile contact or type the mobile number in the To text box.
4. In the message area, type the message (a preview of the message is displayed in the Preview pane) and click Send.
How to Send a Message to Both Email and Mobile Recipients
1. On the Home tab, in the New group, click New E-mail.
2. Click the To, Cc, or Bcc buttons.
3. The Select Names: Contacts dialog box is displayed. From the Address Book drop-down list, select the relevant address book to send the email to an email contact or a mobile contact and click OK to close the dialog box.
4. Add the subject and the message text and click Send.
Note: If you send a message to both email and mobile recipients, only the textual content of the message will be sent.
Downloadable
PDF Copy of Outlook 2010 Tips









Leave a Reply