With every new operating system update, new features are added and existing features are tweaked to offer a better user experience. While that’s good news for users it also comes with the added burden of learning and relearning how we use our devices. If you are someone who has just upgraded your Android from Lollipop to Marshmallow, or if you’ve picked up a new phone with Android 6.0 version installed, you’ll need a bit of help getting started. Here is our complete guide to Android Marshmallow that will help you get the most out of your device.
The Complete Guide to Android Marshmallow
Longer Lasting Battery
Android smartphones somehow cannot seem to shrug off the persistent problem of battery drain. There are plenty of apps available on the Play Store that can optimize battery life and lots of tricks you can try to maintain your battery life but the fact remains that if you use your smartphone to its full capacity, you’re going to end up spending plenty of time recharging your device. Android Marshmallow doesn’t really do anything to remedy the problem, but there are some improvements that allow you to stretch your battery life just a little bit more.
The battery icon on the Status bar will show you how much of battery life is left, but if you swipe down the status bar, you can see the exact percentage left. When you are running low on battery, the Battery saver kicks in to gear allowing you to make calls and send SMS while restricting other features. You can enable this feature or set it up to work automatically:
1. Go to Settings.
2. In the Device section tap Battery.
3. Tap the menu icon and select Battery Saver.
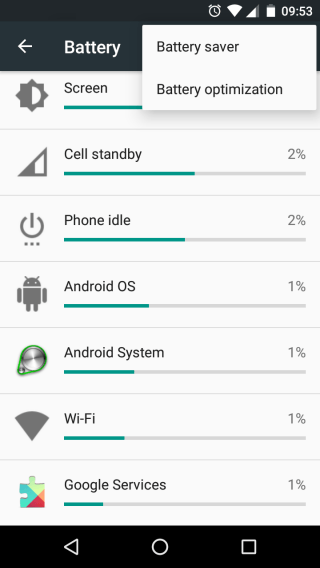
You can turn on battery saver to run automatically.
Android Marshmallow integrates plenty of battery optimization features by default. 2 of the more prominent ones include the Doze and App Standby mode. Doze reduces battery usage when the device is not in use and is not charging. App Standby reduces battery drain of apps that haven’t been used in a long time.
If you want to tweak the battery optimization settings for an individual app, you can follow steps 1-2 above and from the menu select Battery optimization. Then, tap the Non optimized menu and select All apps. Now tap on the individual app you want to optimize and select Optimize.
Google Now on Tap
Now on Tap is a powerful search feature that displays relevant suggestions based on the content that you are currently viewing on your screen. For example, if a friend emails you about a new movie, you can tap & hold the Home button to quickly see reviews or book a ticket in the Now card that appears. To take advantage of Now on Tap, you have to first activate the feature.
1. Long press the Home button.
2. You’ll see a prompt asking you to turn on the feature. Tap Get Started.
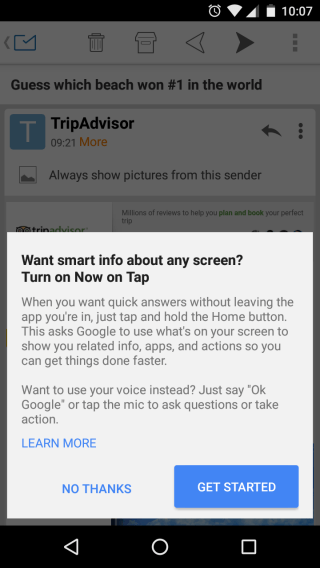
3. The next screen will ask that you have your Google account settings turned on for the features that are displayed on the screen. Tap Yes, I’m in.
4. In the next screen, tap Turn On.
Instances Where You Can Use Now on Tap
If you are chatting with your friends about a new restaurant that opened out in your area and you want to know more information about it, just long press the Home button and Now on Tap will display Google Now cards showing you important links related to the restaurant. You’ll see a Google map, website link, app link, and social media profiles for the topic in discussion. Some irrelevant data may also turn up on the cards since its only an algorithim at work, but it should get better with longer usage.
Similarly, when you have a music app open, if you launch Now on Tap, you will get Google Now cards displaying information about the artist or group, links to YouTube and social sites such as Twitter and Facebook. You can do Now on Tap with individual tracks, albums or compilations as well.
If you want to disable Now on Tap:
1. Hold down the Home button.
2. Press the menu button on the Now on Tap screen.
3. Tap Settings.
4. Tap the Now on Tap toggle button to turn it off.
Access Google Now from the Lock Screen
With Android Marshmallow, there’s an even more easier way to access Google Now– right from the Lock screen.
1. At the bottom left corner of the left screen, place your finger on the microphone icon.
2. Swipe your finger in any direction on the screen and voice your instructions to Google Now.
Manage App Permissions
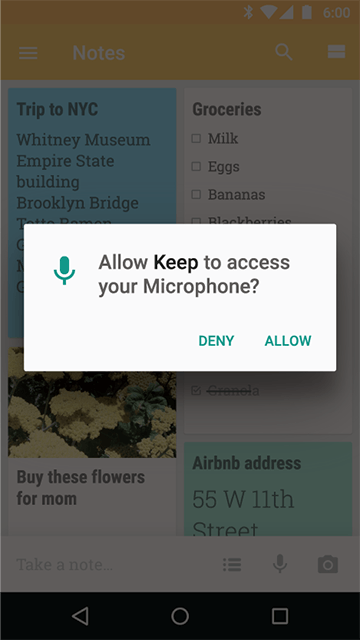
In Android Marshmallow, app permissions are more transparent. When you download an app, instead of requesting permission for everything, you can grant or deny access to specific features on an as-needed basis. When you install a Marshmallow optimized app it will ask you permissions when it tries to perform a specific function such as asking you permission to use your microphone. You can also manage permissions for individual apps.
1. Go to Settings.
2. Tap Apps and select an app you want to change the permissions for.
3. On the App info screen, go to Permissions and turn off the permissions you want.
Using the RAM
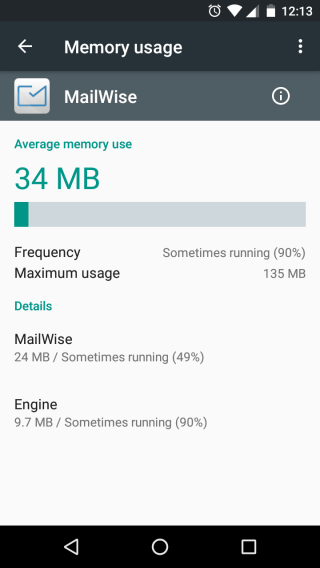
Marshmallow has a new memory manager that displays the list of apps that are using up your phone’s RAM.
1. Go to Settings and tap Memory.
2. Here, you will see details about the phone’s memory usage in the past three hours in terms of performance, total memory used, average usage, and the amount of RAM still free.
3. You can tap the 3 hours drop-down menu to change the time period that RAM Manager displays for memory usage.
4. To find out the average memory a specific app is using, tap Memory used by apps. On the next screen, you’ll see a list of apps and core Android processes with usage details. I’ve selected my mail app Mailwise and it shows you a bunch of geeky details. If you find that the app is using too much of memory and you can live without it, you can force uninstall the app in question.
Setting Do not Disturb
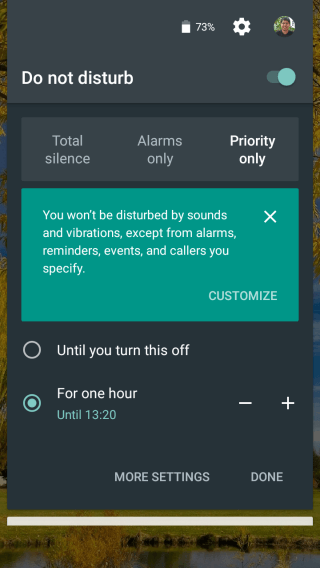
In Marshmallow, you have options to let your device notify you only for certain types of alerts that you specify. To set the appropriate options:
1. Swipe the status bar with 2 fingers to access Quick Settings.
2. Tap Do not disturb.
3. Select an option from the following:
Total silence: This option disables all alarms, push notifications, and phone calls for as long as you want.
Alarms only: If you want to enable only the alarm alert, then select this option. This way you won’t miss getting up in the morning and still get to skip out on your Facebook alerts you don’t want disturbing you. You can set this option to run until you turn it off for for a specified time such as one hour.
Priority only: When you select this option, only alarms, reminders, events and contacts that you’ve specified will be able to reach you. You can set this option to run until you turn it off for for a specified time such as one hour. Hit the Customize button to further specify which groups of people can reach you.
Using Android Pay for Shopping
The next time you shop on your mobile, payment should be a little bit easier thanks to Android Pay. You need to download and install Android Pay from the Play Store. Then launch and enter your credit card details. When you shop on any app that supports Android Pay (currently there are just a handful, but hopefully this will expand in the coming months), you can select Android Pay as the payment option to complete the purchase.
Changing Default Apps and Setting Links
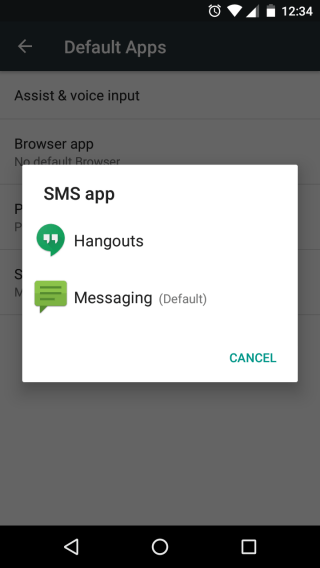
In previous versions of Android, you could set apps as default apps the first time you opened them, such as using Firefox as your default browser, but changing the default app later on was a bit convoluted. With Android Marshmallow, this process is a lot easier.
1. Go to Settings.
2. Tap Apps.
3. Tap the Cog icon at the top right corner of the screen.
4. Tap Default apps.
5. Select the app you want to set as the default app.
The options are currently limited to browser, phone and messaging.
You can also set certain links to be opened by a certain app. For example, you can set any Twitter link to open only in the Twitter app rather than in a dialog box. To apply this settings:
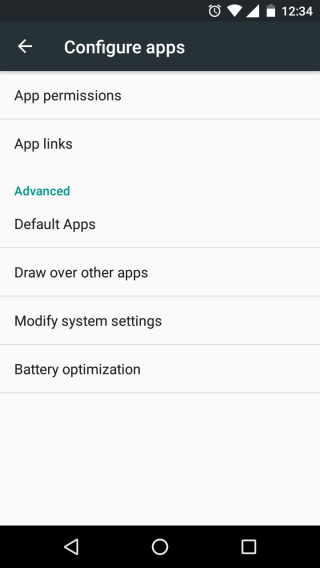
1. Go to Settings.
2. Tap Apps.
3. Tap the cog icon at the top right corner of the screen.
4. Tap App Links and select the app to add the link settings.
Deleting Apps
By default, some Android smartphones running older versions have a convoluted app deletion process. You either need to search for the app in the App Drawer or go to Settings->Apps to find one you want to delete. With Android Marshmallow, if you have the app on the Home screen, its just a matter of long pressing it to enable the Uninstall icon and then dragging and dropping it into the icon to delete it from your phone.
Disable/Enable Heads-up Notifications
Heads-up notifications are a great feature but not everyone wants it. If you are one of those people you to disable it. To do this:
1. Go to Settings.
2. Tap Sounds & notification.
3. Tap App notifications and tap on the app you want to disable notifications.
4. Tap the Allow peeking button to turn it off.
Text Translation in Any App

If you use the translation feature often on your smartphone, Android Marshmallow just made your job a tad easier. If you use an app that supports text selection, you can easily translate text. Here’s how it works.
1. Download Google Translate if you don’t already have it on your phone.
2. Navigate to the app that you want to translate text from; it could be a messaging app or a web page.
3. Long press the text to activate the text selection tool. Tap Select All to select the text you want to translate.
4. The Translate option is now available on the contextual menu. Select it.
5. In the next screen, from the drop-down menu, select the language you want to see it translated to.
Customize Android with System UI Tuner
Another interesting feature available in Android Marshmallow is the System UI Tuner, which allows you to customize your device in more ways than usual. The only trouble with this feature is that the options here are experimental and may change or disappear in the course of time. If you are game to try it on, here’s what you need to do:
1. Swipe the status bar to display the Notification panel.
2. Long press the Cog icon for a few minutes and then release.
3. You will see a message pop-up that reads, Congrats! System UI Tuner has been added to Settings.
4. Scroll down the Settings page and tap System UI Tuner.
5. In the pop up message, tap Got it.
You can now make a number of customization changes. Some of the things that you can do include:
Add Battery Percentage to Status Bar to display the % value on the Home screen.
Customize Status Bar to choose which icons you want to see there.
Customize Quick Settings Menu to add items, reorder or remove them.
Add Daydream Screensaver
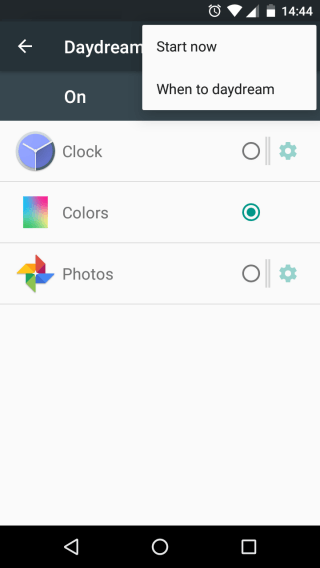
The Daydream feature in Android can display an interactive mosaic of images, news headlines or random colors or photos. To setup Daydream:
1. Go to Settings.
2. Tap Display.
3. Tap Daydream and turn it to see the list of apps that integrate with the feature.
4. Select an app and from the menu select Start now.
5. Tap the screen to leave the daydream screen.
6. Now from the same menu, select When to daydream.
7. You have the option of choosing Daydream when docked, when charging, or either one.
Fingerprint Support
If your device comes with a fingerprint scanner, you can use the fingerprint reader support on apps such as Android Pay to make payments securely. Of course, your phone needs to support this feature for it to work it but future handsets definitely get the advantage with Android 6.0 fingerprint support.
Managing Volumes
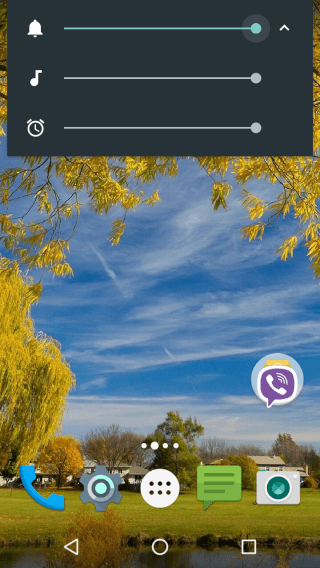
You’d think that setting an optimum volume on your phone would be an easy thing to do, but somehow Lollipop makes it a mucky affair. Android Marshmallow cleans this up with some sensible options. You can use the hardware buttons to turn on Quite mode (volume=0) and tap the down arrows to adjust the volumes independently.
Improved Text Selection
If you are one of those users with a small Android phone, chances are you’ve been struggling a lot to make text selections. Android Marshmallow makes this easy by placing handles around the words which you can drag either way to cover a word or phrase or longer pieces of text.
Better Access to Share Apps
Sharing with your contacts just got a little intuitive with Android Marshmallow. When you bring up something to share, your device studies your behavior and displays your most often used sharing app on the screen, making it easier to share anything. If you use Twitter more than any other sharing tool, this app will show up right on top of the Sharing screen, so you don’t have to scroll and search for the app.
Access the Built-in File Manager
The absence of a default way to access the Android File Manager has always been a sore point but Android Marshmallow changes all that; only problem…its hidden deep inside the settings. To access the file manager on Android 6.0, go to Settings->Storage & USB->Internal storage, scroll right down and tap Explore. Its pretty basic but has useful copy, paste and delete functions.
Final Thoughts
If you install Android Marshmallow you won’t see anything right off the bat that gives the impression that the OS is something new and worthy of a new version. But there are plenty of small but significant features that improve upon the Android user experience. Do you have Android 6.0 Marshmallow installed on your device? What do you think of it.
Leave a Reply