• About
  • Contact
  • Privacy Policy
  • Submit For Review
  • Template Gallery
  • Excel 2016 Udemy Course
  • Skip to primary navigation
  • Skip to main content
  • Skip to primary sidebar

TheAppTimes

App Reviews, Tutorials, & Gadget News Hub

  • Gadgets
  • How To
  • Mobile Apps
  • Software and Web Apps
  • Buying Guides
  • Show Search
Hide Search
Home » How To » Add a Mobile Service Provider in Outlook 2010

Add a Mobile Service Provider in Outlook 2010

February 6, 2013

If your work requires you to be constantly on the move and you need access to your email messages, Outlook 2010 provides features that allow you to access your email using your mobile phone. To activate this functionality, you need to register an Outlook Mobile Service account in Outlook 2010. Once you register a mobile service provider on payment of a certain fee for the SMS service, you can send and receive email messages to and from your mobile phone. Additionally, you can forward messages, calendar entries, and reminders from Outlook 2010 to your mobile phone. In this post, I will explain how to add a Mobile Service Provider in Outlook.

How to Add a Mobile Service Provider in Outlook 2010

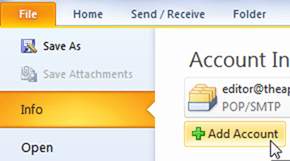
1. Select the File tab and click Add Account.

add-account

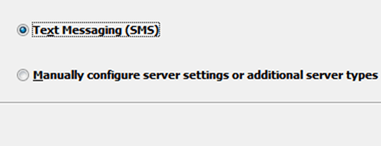
2. In the Add New Account dialog box, select Text Messaging (SMS) and click Next.

text-messaging

3. In the Outlook Mobile Service Account dialog box, in the Sign up with a text messaging service provider section, click the Find a text messaging service for your mobile operator link. You will be directed to a web page from where you can select and register with a service provider.

country

4. In the Outlook Mobile Service Account dialog box, in the Fill in account information section, in the Service Provider URL, User ID, and Password text boxes enter the required details.

5. Click Test Account Settings to test the service.

test-account-settings

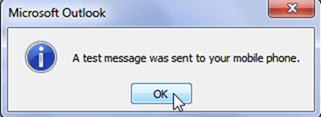
6. In the Microsoft Outlook message box, click Yes to send a test message to your mobile phone.

7. You will receive a test message on your mobile phone and a message box in Outlook confirming the same. Click OK to close the confirmation message.

ALSO READ:  How to Create a Mailing List in Outlook 2010

Add a Mobile Service Provider in Outlook 2010

8. If necessary, click More Settings to rename the mobile account name or configure additional settings in your service provider site and click OK.

9. Click OK to close the Outlook Mobile Service Account dialog box.

10. In the Add New Account dialog box, click Finish.

That’s it! You just learned how to add a mobile service provider in Outlook 2010.

If you found this tutorial useful, please visit our archives section for more use Outlook tips and tutorials.

Tweet
Share1
WhatsApp
Pin
Buffer
1 Shares

Filed Under: How To Tagged With: outlook how to

You May Also Like

New Features in Outlook to Power Your Productivity - FE
New Features in Outlook to Power Your Productivity
How to Set Up an All Mail Folder in Outlook to See Mail from All Inboxes - FE
How to Set Up an All Mail Folder in Outlook to See Mail from All Inboxes
How to Secure Your Outlook Data Files with a Password fi
How to Secure Your Outlook Data Files with a Password

About Adeline Gear

Adeline is a tech enthusiast who loves exploring the latest tools and applications in the marketplace. She also loves her Android and spends time reviewing apps and playing games when she has the time.

Reader Interactions

Leave a Reply Cancel reply

Your email address will not be published. Required fields are marked *

This site uses Akismet to reduce spam. Learn how your comment data is processed.

Primary Sidebar

Hottest New Gadgets!

Best Luggage Tags for the Constant Traveller - TATFI

Best Luggage Tags for the Constant Traveller

Amazfit Band 7 - TATFI

Keep Track of Your Physical Activity with Amazfit Band 7 (Just $50)

Best Wireless Headphones to Buy in 2022 - TATFI

The Best Wireless Headphones to Buy in 2022

HyperX DuoCast USB Microphone - TATFI

Need New Microphones? Take a Look at the Fabulous HyperX DuoCast USB Microphone

Xiaomi Smart Band 7 - TATFI

Xiaomi Smart Band 7 Launches with Always On Display in 6 New Colors

Popular Tags

android android apps android games android how to apple casino games chrome extensions excel excel how to facebook gaming gmail google instagram ios apps ios games ios how to ios tips ipad iphone kids apps learn excel management microsoft music apps new releases outlook how to photo apps powerpoint powerpoint how to productivity Samsung security smartphone smartphones software tablet tablets technology twitter web browsers windows 10 word how to xbox youtube

Disclosure

TheAppTimes is a participant in the Amazon Services LLC Associates Program, an affiliate advertising program designed to provide a means for us to earn fees by linking to Amazon.com and affiliated sites.

TheAppTimes © 2022 // Runs on StudioPress