Making a back up of your SMS and text messages may not sound like a big deal, but the fact is there are times when a crucial piece of information is contained in an old message and you beat yourself that you did not store it somewhere safe or take a copy of it. If you want to stay safe than sorry, then one of the best ways to do is move them to the cloud, one you most likely use all the time, like Dropbox. In this tutorial, I’ll show you how to back up calls and text messages to Dropbox from Android using a free app called SMS Backup & Restore.
How to Back Up Calls and Text Messages to Dropbox
SMS Backup & Restore is a pretty handy app that lets you back up your text messages to Dropbox, but it doesn’t stop there. It even offers to let you make a backup to Google Drive or one of your preferred email accounts. Let’s see how the process works.
1. First up, download the free SMS Backup & Restore app from Google Play.
2. Launch the app to configure it to do the backup.
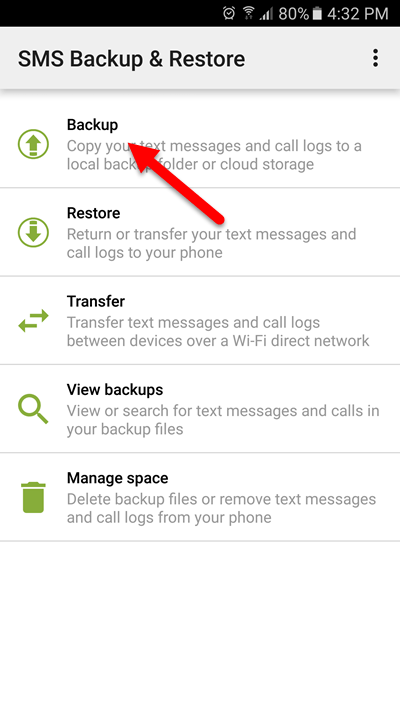
3. On the Home screen, tap Backup.
 4. First off, you’ll need to select your backup folder. You can use the default folder or choose your own folder. We’ll retain the default option and click OK.
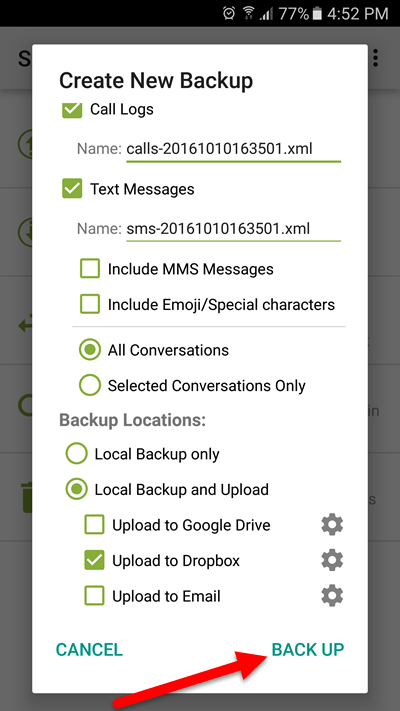
5. In the next screen, you’ll see a number of options to configure. First off, choose your backups. You have Call Logs and Text Messages enabled by default.If you wish to include MMS messages and emoji or special characters, you can enable them.
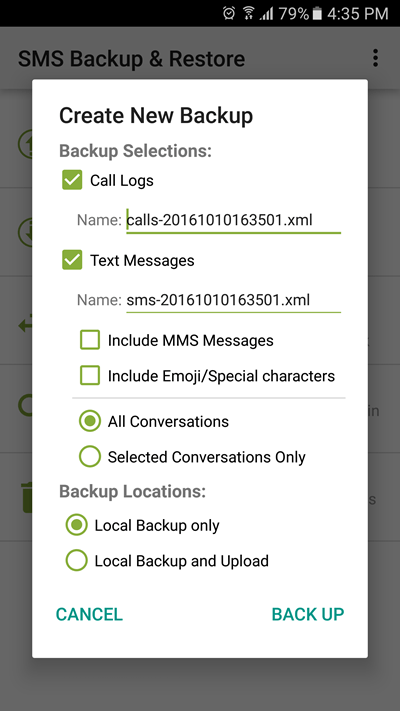
6. Next up, you can choose to backup selected conversations instead of the whole thing. Just select the desired option by tapping the radio button. If you choose the Selected Conversations Only option, a screen will open up allowing you to choose the conversations. Once you’ve selected the conversations, just hit the Back button to go back to the main configuration screen.
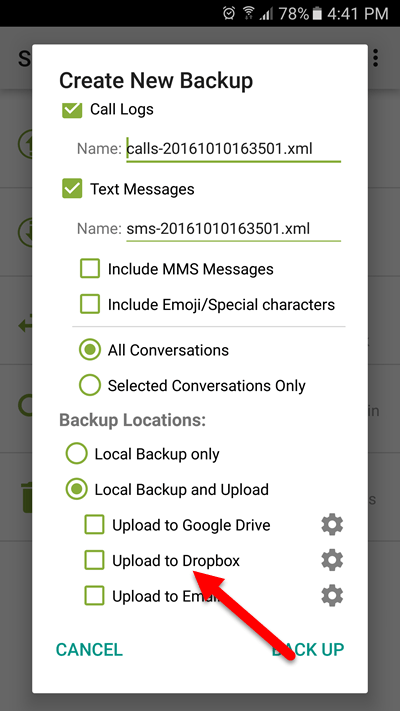
7. Once that’s out of the way, you can choose your backup location. You have a couple of options here: to do a local backup or do a local backup and upload. Tap Local Backup and Upload.
8. You will now see additional backup options available. You can upload to Google Drive, Dropbox, or an email account. Select Upload to Dropbox.
9. In the next screen, configure your cloud setup. In the case of Dropbox, you need to log in, choose if you want the upload to happen only when you’re connected on Wi-Fi and then choose when to delete older backups. By default, every time a backup is taken, backups older than 30 days will be deleted from the cloud. You can set this to a shorter time or set the Do Not Delete option, which I recommend you do.
 You can also choose which folder to save your backups. This option is optional but if you choose to use it, you need to manually mention the folder name as you don’t have a navigation option to choose the folder. I suggest you leave it blank to save yourself some careless mistake or error in entering the folder name.
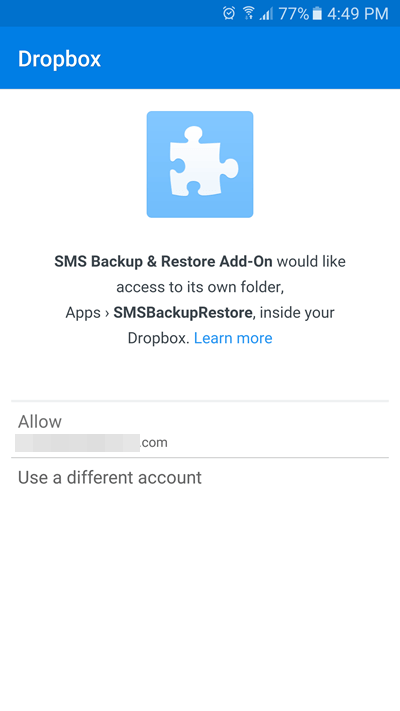
Note: When you log in to your cloud account, you need to give the app permission to access your account.
10. If you want to, you can tap the Test button to confirm that everything’s working okay. You will receive a confirmation message that the test file was successfully uploaded.
11. Once the test comes out successful, hit the Save button to complete the configuration.
12. You’ll be brought back to the main configuration screen. Tap Back Up.
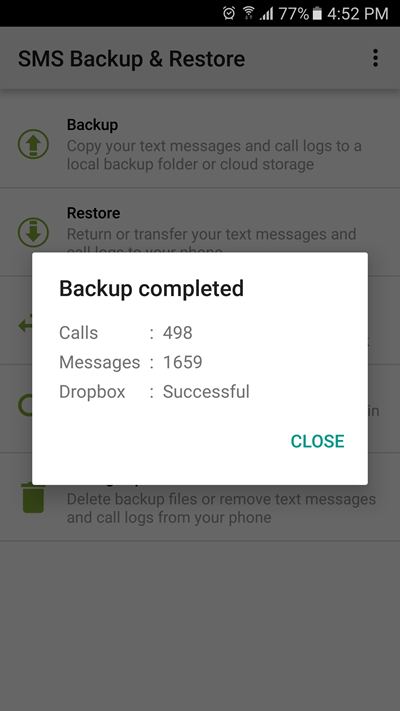
All your calls and text messages will be backed up to the Cloud and you’ll receive a confirmation of the same.
That’s it! A straight forward process to back up all your calls and text messages to Dropbox or Google Drive.
If you want the backup to happen on a regular basis without your intervention, you can set up a backup schedule. Let’s take a look at how to do this:
How to Set Up a Backup Schedule
1. Tap the overflow menu (3 vertical dotted icon) at the top right of the screen.
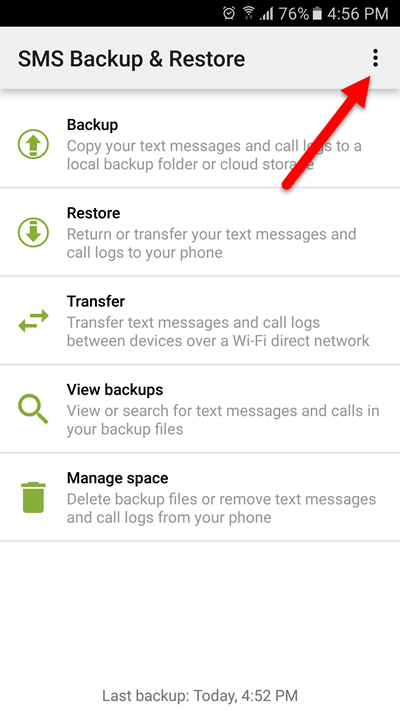
2. From the drop down menu, select Preferences.
3. On the screen, tap Scheduled Backups.
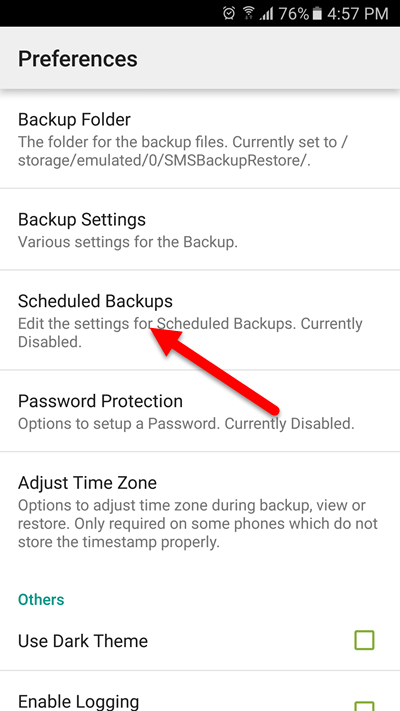
4. In the Schedule Settings screen, turn on the Scheduled Backups toggle button.
5. You can then set a backup Start time, and choose how often the backup should be done. You can scan for new content by minute, hours, or days. I recommend setting a schedule of once a day. But to each your own.

As far as the Start time goes, pick a time when you are most likely not going to be texting anyone.
Every time a backup happens you will receive a notification. If you don’t want to see that disable the option by turning off the Disable Notifications checkbox.
6. Once you’ve set your schedule, tap Save.
That’s it! Now you no longer have to be worried about losing precious information lodged in your SMS conversations.
All messages are saved in the XML format which should make it easy for you to view on any browser.
If you found this tutorial useful, be sure to visit our archives section for more tips and how-tos.
Leave a Reply