Windows Live Writer is an awesome tool that lets authors write content and publish it to a content management system. If you run a WordPress blog, then Live Writer is the ideal offline blog publishing tool for you. This tutorial is for newbies to blogging who want to learn how to use Windows Live Writer to publish posts to WordPress. One of the first things you need to do to get started is to configure your WordPress blog to the application and this tutorial shows you how to configure a WordPress blog on Windows Live Writer.
Prerequisites
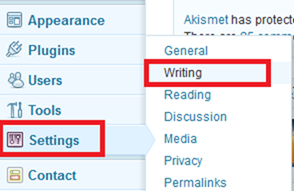
Before you get started, you need to have created and setup a blog on WordPress.org. Login to your WordPress blog. On the left panel, in the Settings section, select Writing.
In the Writing Settings page, in the Remote Publishing section, check the XML-RPC checkbox to enable the WordPress, Movable Type, MetaWeblog and Blogger XML-RPC publishing protocols and click Save Changes.
Now that the first part has been done, it’s time to configure Windows LIve Writer.
How to Configure a WordPress Blog on Windows Live Writer
1. If you haven’t already done it, download and install Windows Live Writer. Download Windows Live Writer 2011
2. Open Windows Live Writer .
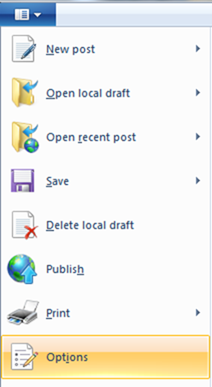
3. From the Live Writer menu, click Options.
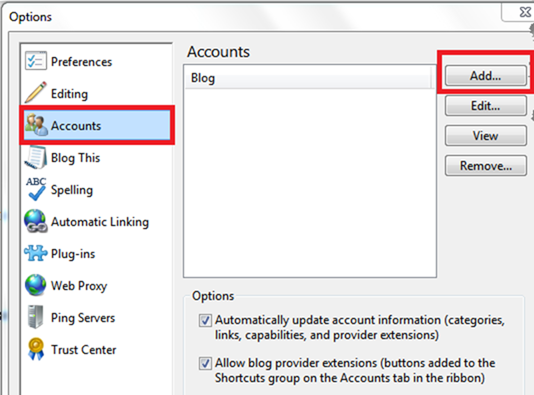
4. In the Options dialog box, select the Accounts tab and click Add.
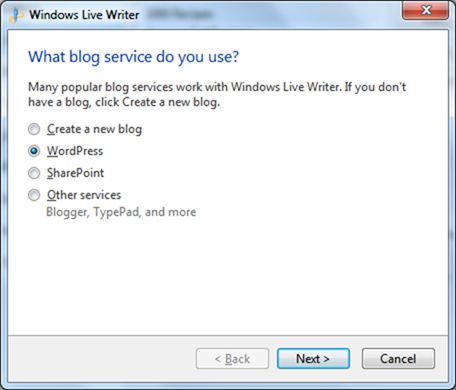
5. In the Windows Live Writer wizard, in the What blog service do you use page, select WordPress and click Next.
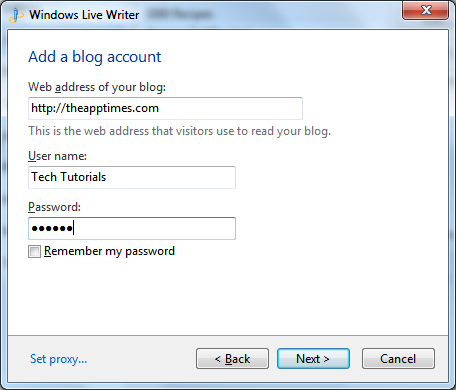
6. In the Add a blog account page, enter the web address of your blog, your blog username and password as configured in WordPress.org and click Next.
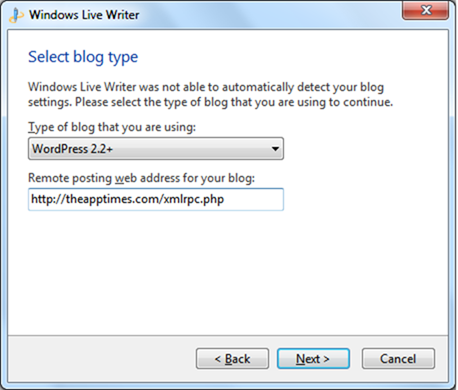
7. In the Select blog type page, in the Type of blog that you are using spin box, select WordPress 2.2+.
In the Remote posting web address for your blog text box, you will find the text http://<hostname>/<wp_path>/xmlrpc.php
Replace <hostname>/<wp_path>/ with your blog title as shown in the diagram below.
8. In the message box, asking permission to download the blog theme by publishing a temporary post to WordPress select Yes. This will give you the ability to preview your post offline.
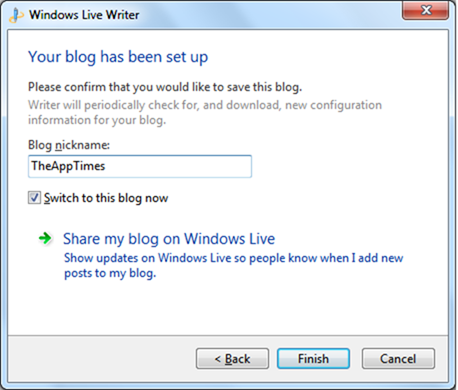
9. In the final page, confirm your blog’s nickname and click Finish.
That’s it. In a few quick steps you have configured your WordPress blog on Windows Live Writer.
You can also set up other platforms on Windows Live Writer. For instance, you can add a Blogger account in Windows Live Writer.
Now you can conveniently work in an offline mode and schedule and publish posts to WordPress from Windows Live Writer.
Follow us on Twitter or join our Facebook fan page to get the latest tutorials, updates and how-to articles on Microsoft, Google and Apple products.

Great tutorial. I have had some problems trying to do this in the past. i see now where I messed up.