If you receive a whole lot of email messages every day, you might find it annoying to have to manage them every day. In such situations creating rules in Outlook 2010 will help you to manage or process messages more effectively. Outlook has a set of default rules that you can use, or if you need a new rule, you can just go right ahead and create one. Rules work on messages that are either sent or received. You can manage your messages by creating a single rule or multiple rules. For example, you can create a rule to allow Outlook to automatically reply to certain messages, or to move messages to certain folders based on the criteria you specify. Some of the tasks for which you can create rules include, but are not limited to the following.
- Organize messages based on the sender, recipient, or subject.
- Flag messages.
- Copy messages to another folder.
- Move messages from one folder to another.
- Delete messages.
- Reply to the sender.
- Forward messages.
- Redirect messages to specified email addresses.
- Prioritize messages.
- Print messages.
Creating Rules in Outlook 2010 : Default Options
1. In your Inbox, select a message.
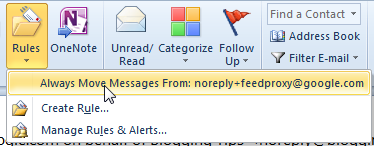
2. On the Home tab, in the Move group, click Rules.
3. From the drop-down list, select the Always Move Messages From: option.
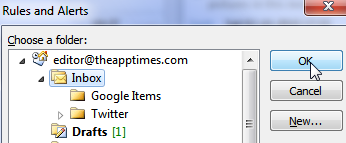
4. The Rules and Alerts dialog box is open. You can do one of two things.
- Select a folder and click OK to move messages from that particular sender to the folder.
OR
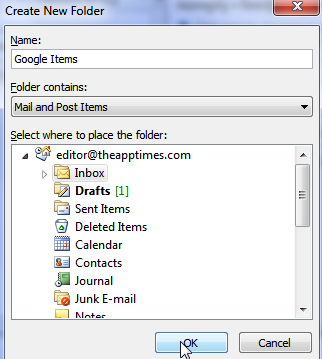
1. Click New to display the Create New Folder dialog box.
2.In the Name text box, type a new name for the folder.
3. In the Select where to place the folder list box, select a folder and click OK.
4. In the Rules and Alerts dialog box click OK.
Create a Rule in Outlook 2010
If you want to do more than just move email messages, you can create your own rule. Here’s what you need to do.
1. In your Inbox, select a message.
2. On the Home tab, in the Move group, click Rules.
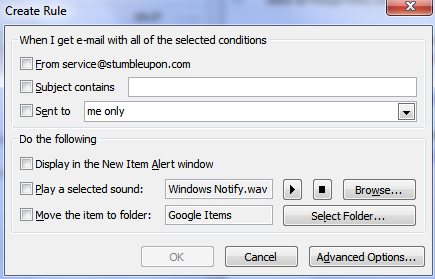
3. The Create Rule dialog box is displayed. In the When I get e-mail with all of the selected conditions section, check one or more of the required checkboxes.
4. In the Do the following section, choose an action and click OK to create the rule.
Downloadable: PDF Copy of
How to Create Rules in Outlook 2010
Now that you know how to create a rule in Outlook 2010, you can organize your email messages more efficiently.


I personally like this tip. I never knew it exists untill now. Thanks for the share. Does it work similar to gmail filters?
Thanks Narayan. I personally love the Rules feature more than the Gmail filter feature, which is not so comprehensive as Outlook Rules.