• About
  • Contact
  • Privacy Policy
  • Submit For Review
  • Template Gallery
  • Excel 2016 Udemy Course
  • Skip to primary navigation
  • Skip to main content
  • Skip to primary sidebar

TheAppTimes

App Reviews, Tutorials, & Gadget News Hub

  • Gadgets
  • How To
  • Mobile Apps
  • Software and Web Apps
  • Buying Guides
  • Show Search
Hide Search
Home » How To » How to Remove Microsoft XPS Document Writer in Windows 10

How to Remove Microsoft XPS Document Writer in Windows 10

October 12, 2016

Windows 10 and some earlier versions of the operating system comes with a Microsoft XPS Document Writer Printer option for printing your documents. I’ve never used that option for as long as it existed and by the looks of it, I never will. Its just an extra listing on the menu that bugs the hell out of me and I figured, why let it bother you when you can simply remove or hide it from view. So, if that’s an option that annoys you and you want to be rid of it, here’s how to remove Microsoft XPS Document Writer in Windows 10 Print dialog.

The Case of the Microsoft XPS Document Writer

Microsoft  created an electronic paper format called XPS that allowed users to create and share documents with others as an alternative to the popular PDF format. One of the advantages of printing to this format was that once users create and save the documents in the XPS format, it could not be edited.

The Microsoft XPS Document Writer is a file to print option that makes it possible to save and print files to the XPS format. It comes preinstalled on devices running Windows Vista and later but users of Windows XP with SP2 and Windows Server 2003 can also download and use the tool. Its hard to miss the option when you open the Print dialog to take a printout.

However, despite Microsoft claiming that this will be a PDF killer, the popularity of the PDF continues to remain undented. And the option to print to XPS continues to linger on in Windows. If you want to get rid of it, you can remove it from view, though you cannot uninstall it. So here’s how its done.

How to Remove Microsoft XPS Document Writer in Windows 10

1. Launch the Settings app in Windows 10.

2. Select Devices.

3. In the next screen, in the Printers & scanners page, under the Printers & scanners section, you will see the Microsoft XPS Document Writer option.

ALSO READ:  How to Clean Windows System Files with Disk Cleanup Tool

printers-scanners

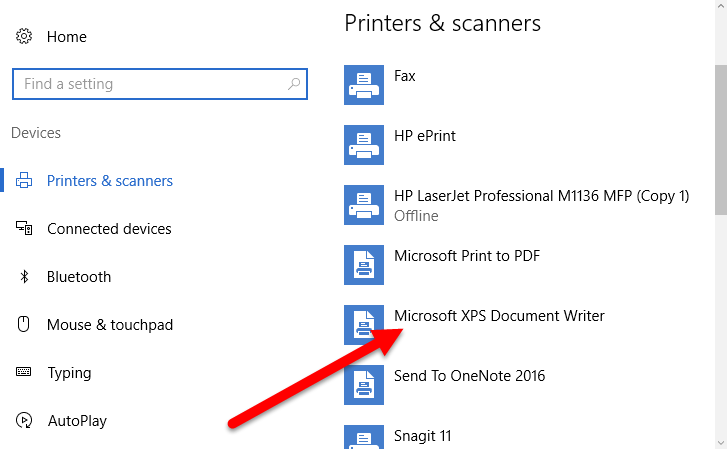
4. Click the option to bring out a menu and then choose Remove device.

How to Remove Microsoft XPS Document Writer in Windows 10

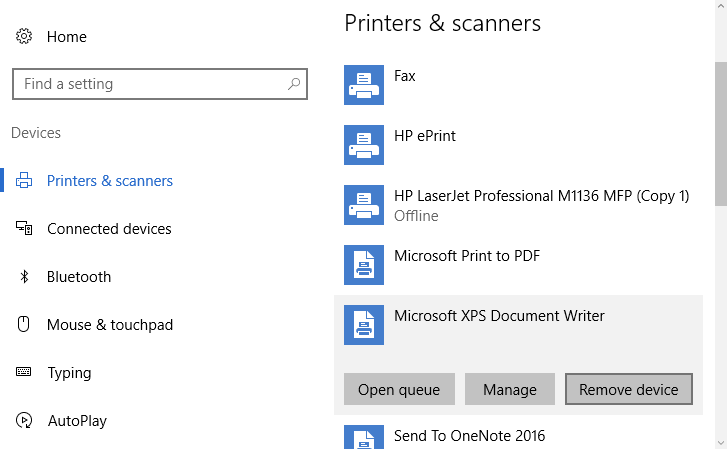
5. Confirm that you want the device removed by clicking Yes.

That’s it. The option will no longer be available in the Print dialog.

This procedure works with removing any other printer and scanner devices you have on your Windows 10 PC as well so if you find no use for any option you see here, you can have it removed.

If at some later point in time you do want to bring back this printer (really?), you can do it by following these steps:

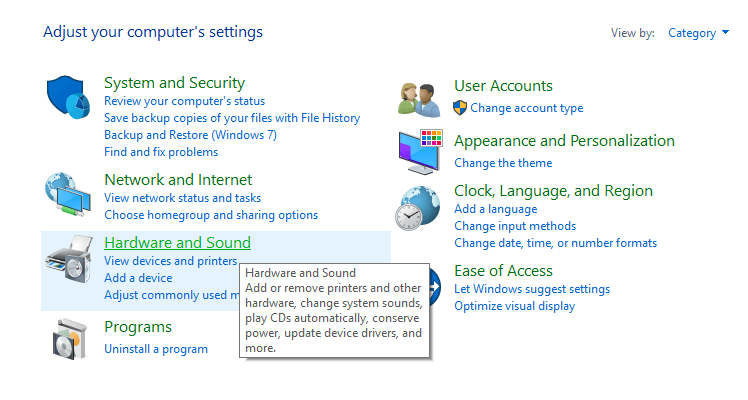
1. Open Control Panel.

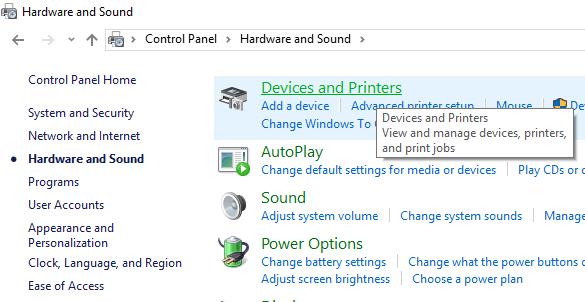
2. Select Hardware and Sound.

hardware-and-sound

3. Select Devices and Printers.

select-devices-and-printers

4. On the toolbar at the top, click the Add a printer button.

add-a-printer-button

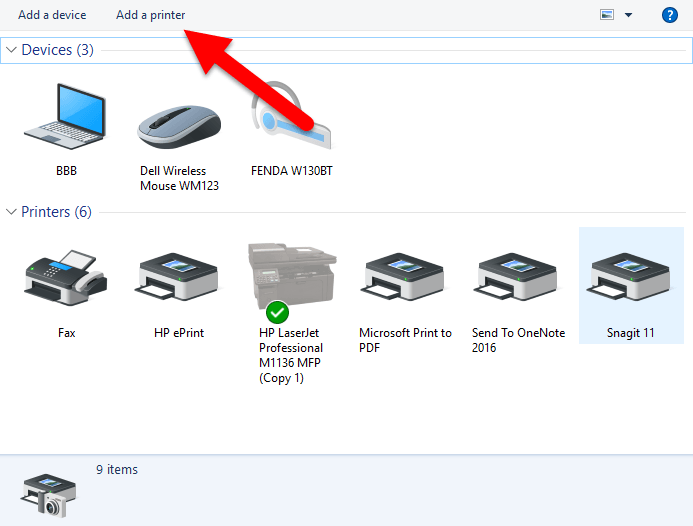
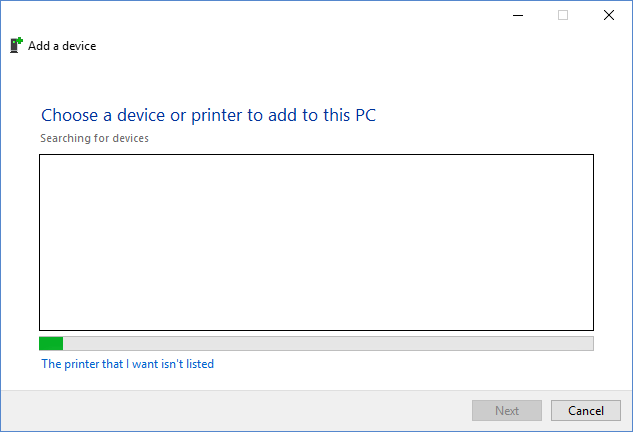
5. In the Add a device dialog, click The printer that I want isn’t listed.

the-printer-that-i-want-isnt-listed

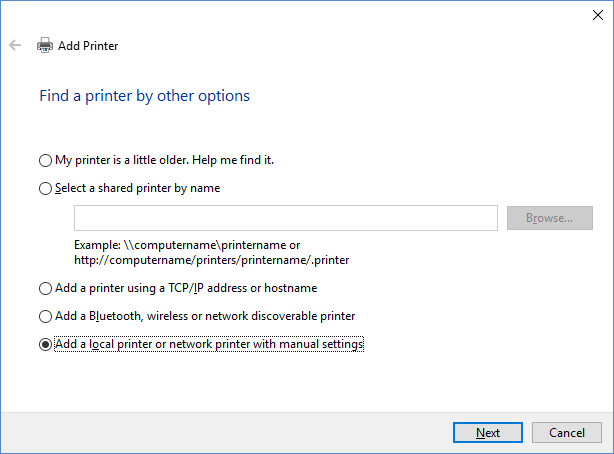
6. In the Find a printer by other options screen, select Add a local printer or network printer with manual settings and click Next.

find-a-printer-by-other-options

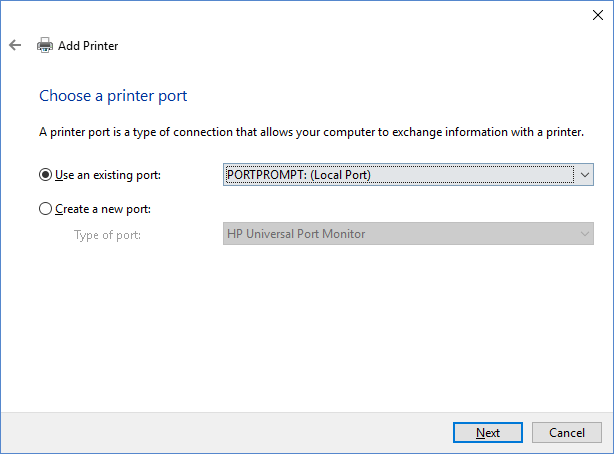
7. In the Choose a Printer port screen, in the Use an existing port dropdown, select PORTPROMPT: (Local Port) and click Next.

choose-a-printer-port

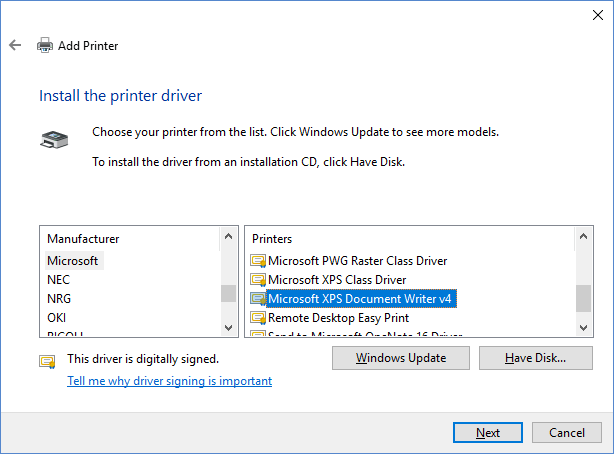
8. On the Install the printer driver screen, in the Manufacturer section, select Microsoft. On the Printers section, select Microsoft XPS Document Writer v4. Then, click Next.

install-the-printer-driver


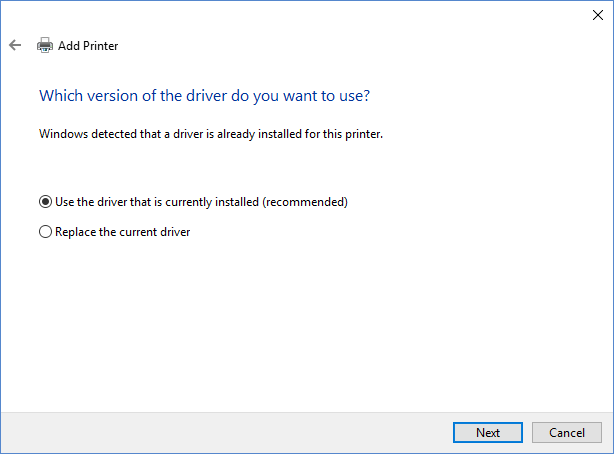
9. In the Which version of the driver do you want to use screen, select Use the driver that is currently installed and click Next.

which-version-of-the-driver-do-you-want-to-use

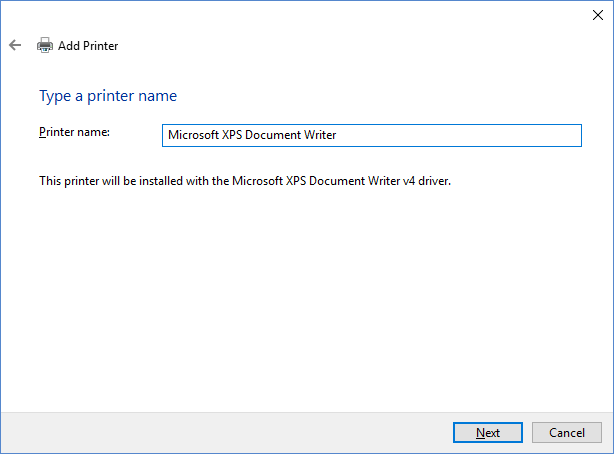
10. In the Type a printer name text box, you can type a name you want or leave it at the default. I’m just going to remove the version number for this one. Click Next.

type-a-printer-name

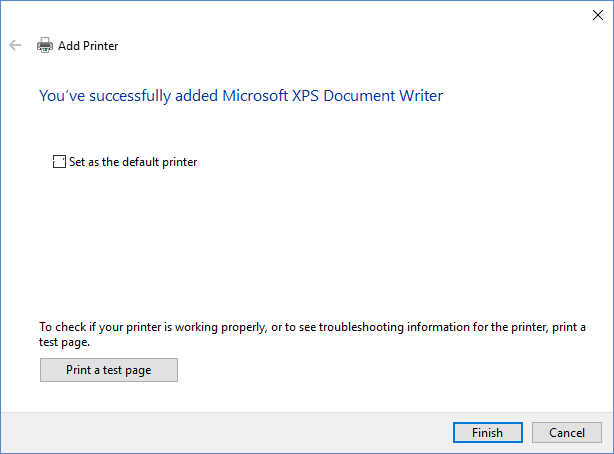
11. You will then receive a confirmation that the printer was successfully installed. Make sure you uncheck the Default Printer option before you click Finish to complete the setup.

complete-the-setup

So there you go! A quick and easy way to remove Microsoft XPS Document Writer and add it back in Windows 10.

Tweet6
Share1
WhatsApp
Pin1
Buffer
8 Shares

Filed Under: How To Tagged With: windows 10, xps document writer

You May Also Like

Windows 10 Project Redstone 4 Update - FE
Windows 10 Project Redstone 4 Update: All You Need to Know
Fun Hidden Object Games for Windows 10 - TATFI
Fun Hidden Object Games for Windows 10
How to Shut Down Your PC Automatically at the End of the Day

About Adeline Gear

Adeline is a tech enthusiast who loves exploring the latest tools and applications in the marketplace. She also loves her Android and spends time reviewing apps and playing games when she has the time.

Reader Interactions

Leave a Reply Cancel reply

Your email address will not be published. Required fields are marked *

This site uses Akismet to reduce spam. Learn how your comment data is processed.

Primary Sidebar

Hottest New Gadgets!

Amazon Fire Max 11 - TATFI

Amazon Launches the Amazon Fire Max 11 – Its Biggest and Most Powerful Tablet Yet

Google Pixel Tablet - TATFI

Google Pixel Tablet: An Exciting New Tablet for Android

Google Pixel 7 vs Google Pixel 7a - TATFI

Comparing the Google Pixel 7a and Pixel 7: Which to Buy?

Top Gaming Mouse Brands in 2023 - TATFI

Top Gaming Mouse Brands to Maximize Your Gaming Experience in 2023

HyperX Pulsefire Haste 2 - TATFI

Pulsefire Haste 2 – A Great Wireless Gaming Mouse from HyperX

5 Great Portable Power Stations - TATFI

5 Great Portable Power Stations for Indoor and Outdoor Use

Garmin Instinct 2X Solar - TATFI

Garmin Instinct 2X Solar Launches with Flashlight and More Great Features

Popular Tags

android android apps android games android how to apple casino games chrome extensions excel excel how to facebook gadgets gaming gmail google ios apps ios games ios how to ios tips ipad iphone kids apps learn excel management microsoft music apps new releases outlook how to photo apps powerpoint powerpoint how to productivity Samsung security smartphone smartphones software tablet tablets technology twitter web browsers windows 10 word how to xbox youtube

Disclosure

TheAppTimes is a participant in the Amazon Services LLC Associates Program, an affiliate advertising program designed to provide a means for us to earn fees by linking to Amazon.com and affiliated sites.
How to Control Your Apple Watch Using Hand Gestures

How to Use AssistiveTouch Gestures to Control Your Apple Watch

Fairplay Club Betting App - TATFI

Fairplay Club Is the Best Mobile Betting App in India

Parimatch India App - TATFI

Parimatch India App: Experience Unmatched Benefits, Odds, and Support

1Win Betting App - TATFI

Enjoy the Best Betting App in India With 1Win

Sony HT-S2000 Soundbar - TATFI

Sony Launches the Incredible HT-S2000 3.1ch Dolby Atmos Soundbar

Backpack for iMac and Studio Display - TATFI

Declutter Your Desk with the Ultimate iMac and Studio Display Storage Solution – BackPack

Latest technological innovations - TATFI

Latest Technological Innovations to be aware of as a Businessperson

5 New Video Games to Play in May 2023 - TATFI

5 New Video Games to Play in May 2023

Apps That Users Could Make Money From - TATFI

Apps That Users Could Make Money From

IT Security - TATFI

How Important IT Security Can Be for Small Businesses

How To Make Extra Cash Using Apps And Gadgets - TATFI

How To Make Extra Cash Using Apps And Gadgets

Audio Editing Tool Audacity - TATFI

5 Good Reasons to Use Audio Editing Tool Audacity

TheAppTimes © 2023 // Runs on StudioPress